OOOH, Tilda. Tilda to the UK born child of Indian parents means watching strange, brightly-coloured movies in an unknown language on grainy VHS with a beautiful Sari-ed lady in the advert in a rice field and the song “Tiii-lda Basmati” (the best rice, which I still buy now). And possibly the only understandable bit in the movie for my brother and me. But now it means this:
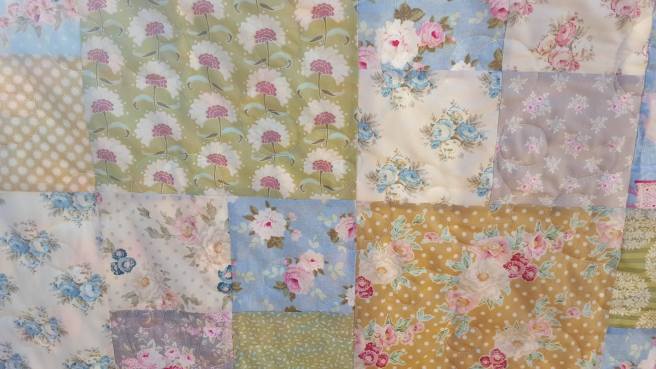
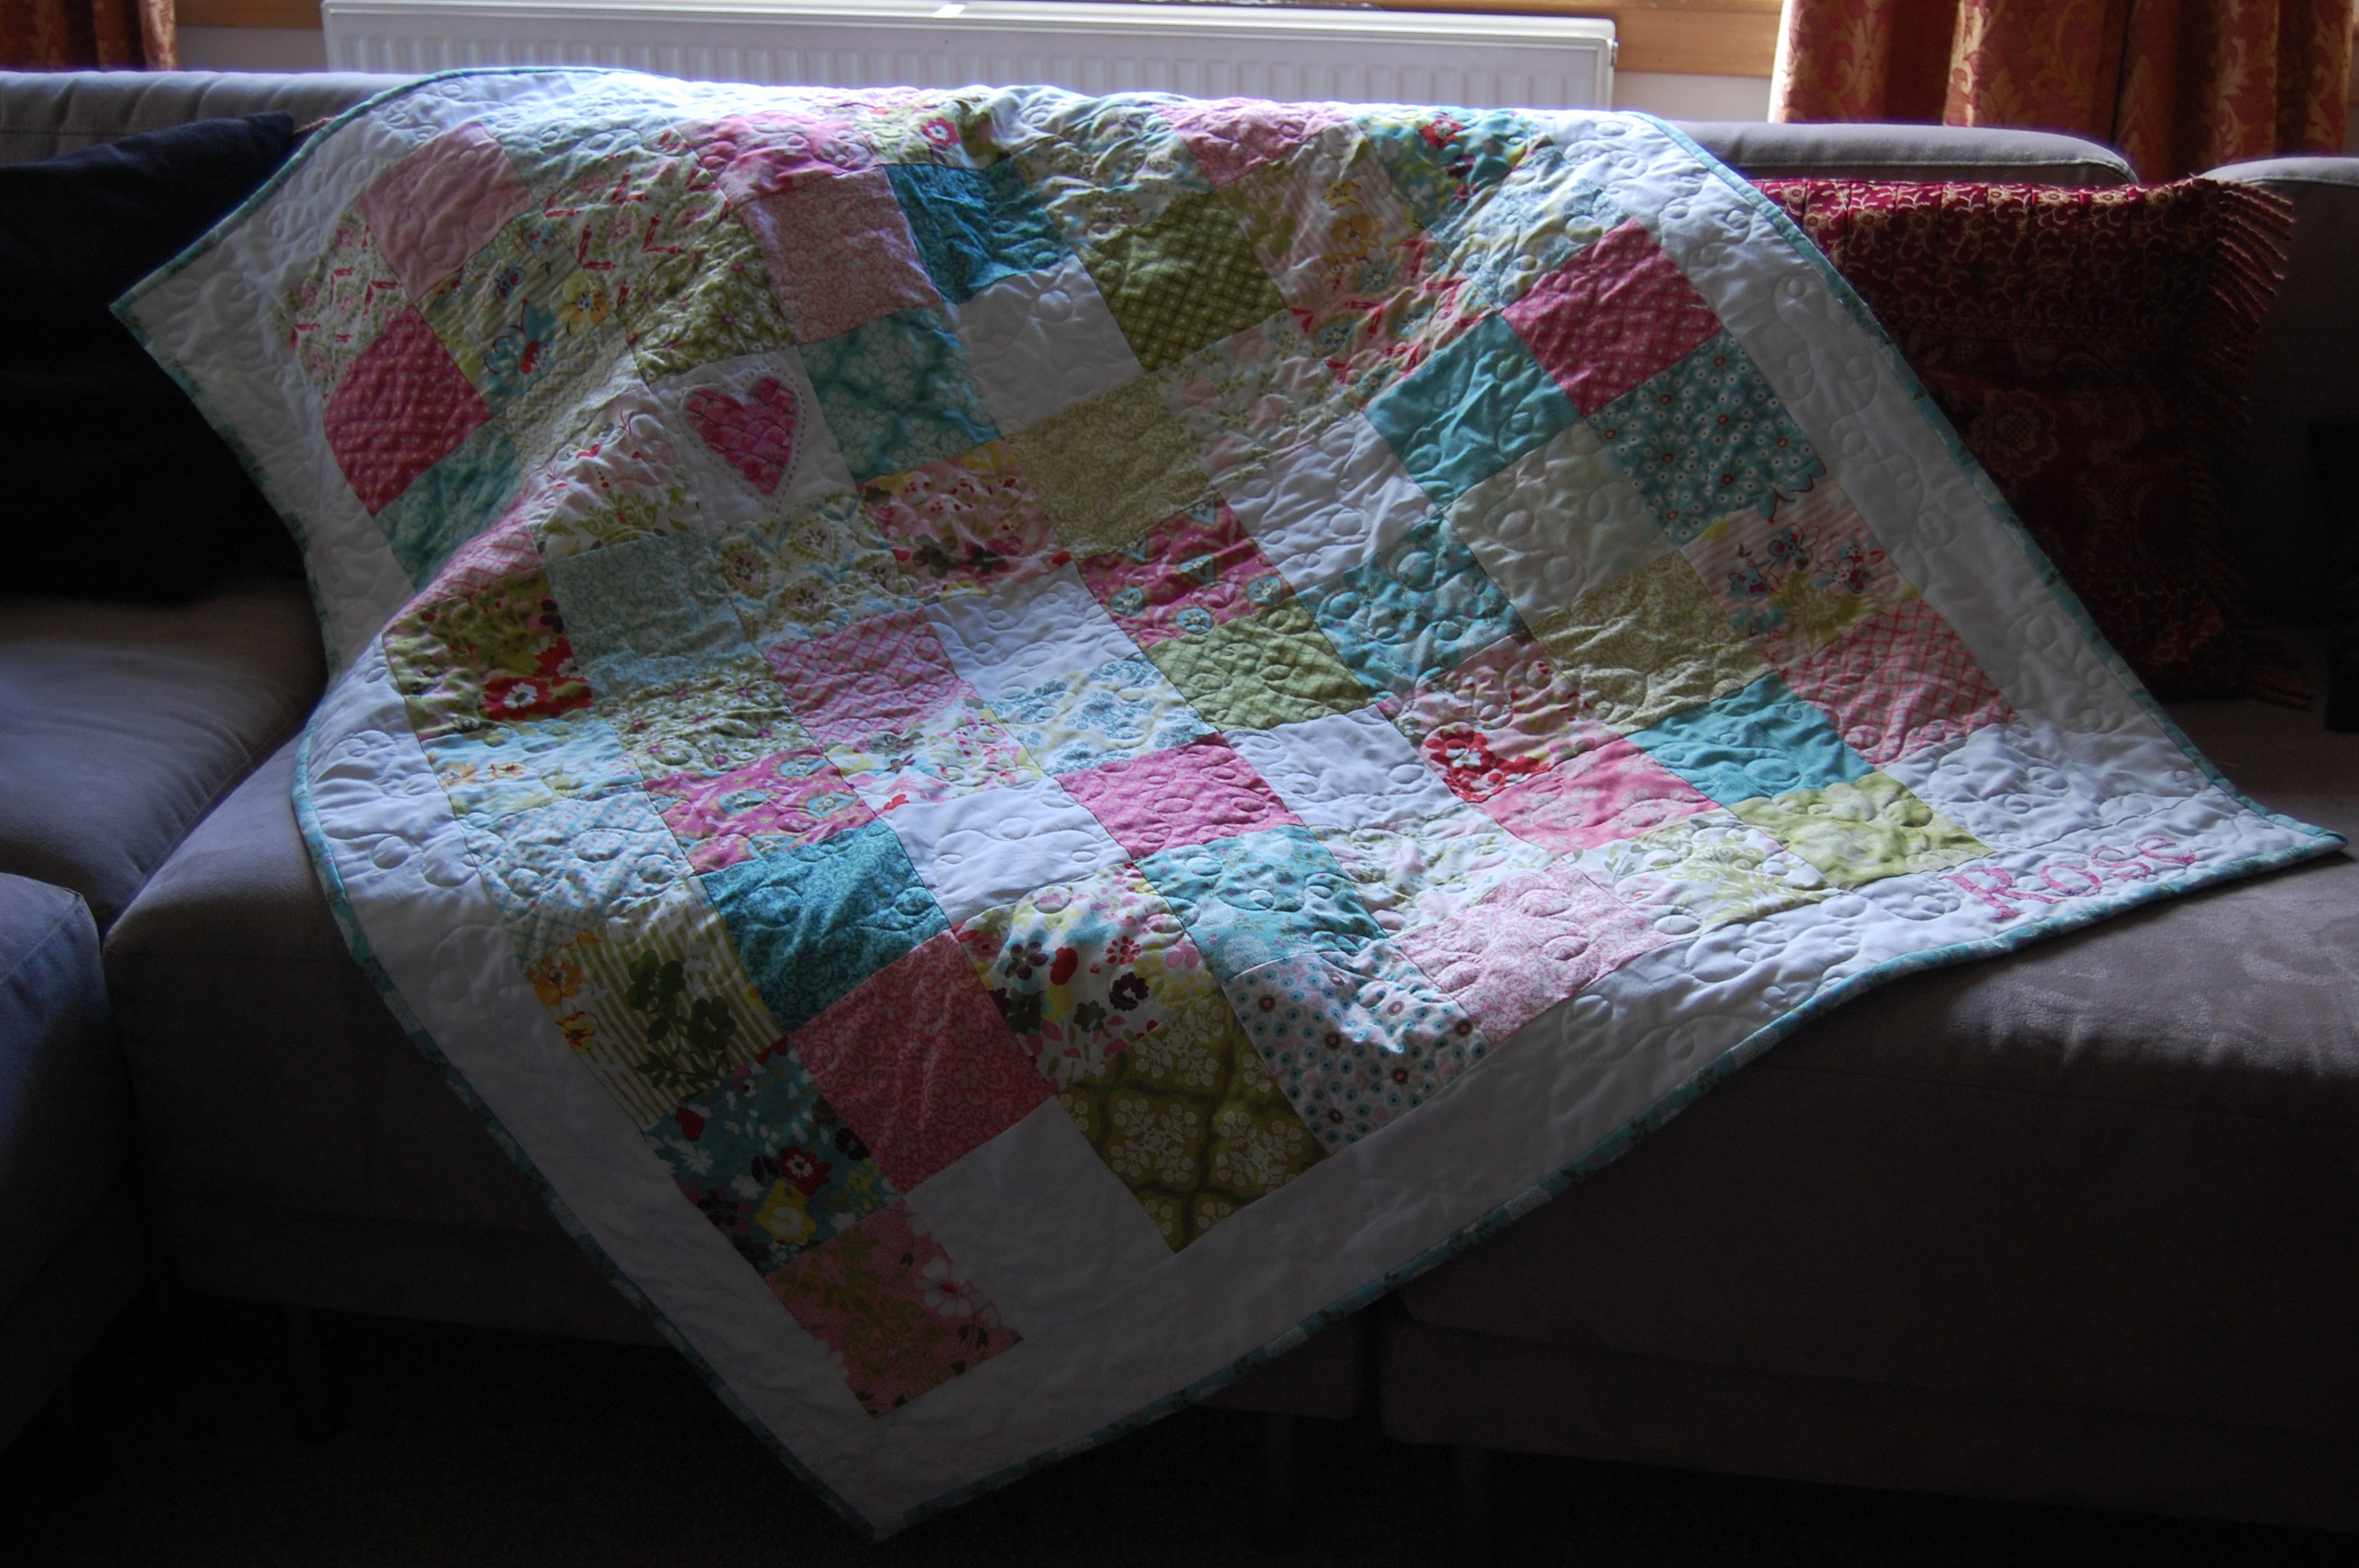
Soft, vintagey, floral, prettiness with both a modern freshness of colour and an authenticity you don’t often find in modern fabric lines which are so often “trying” to have a vintage feel but don’t quite make the grade.
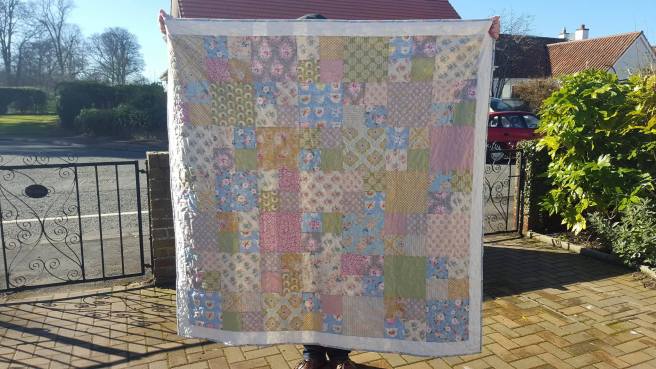
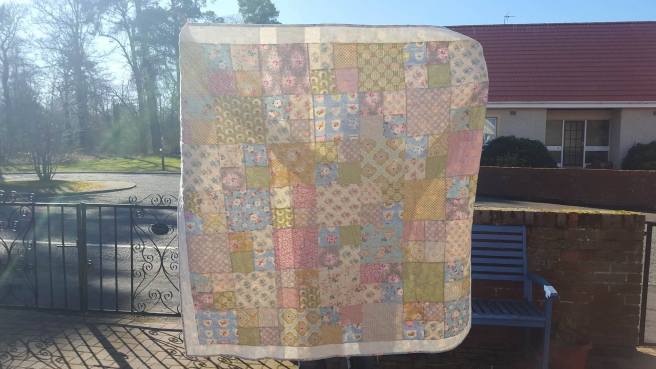
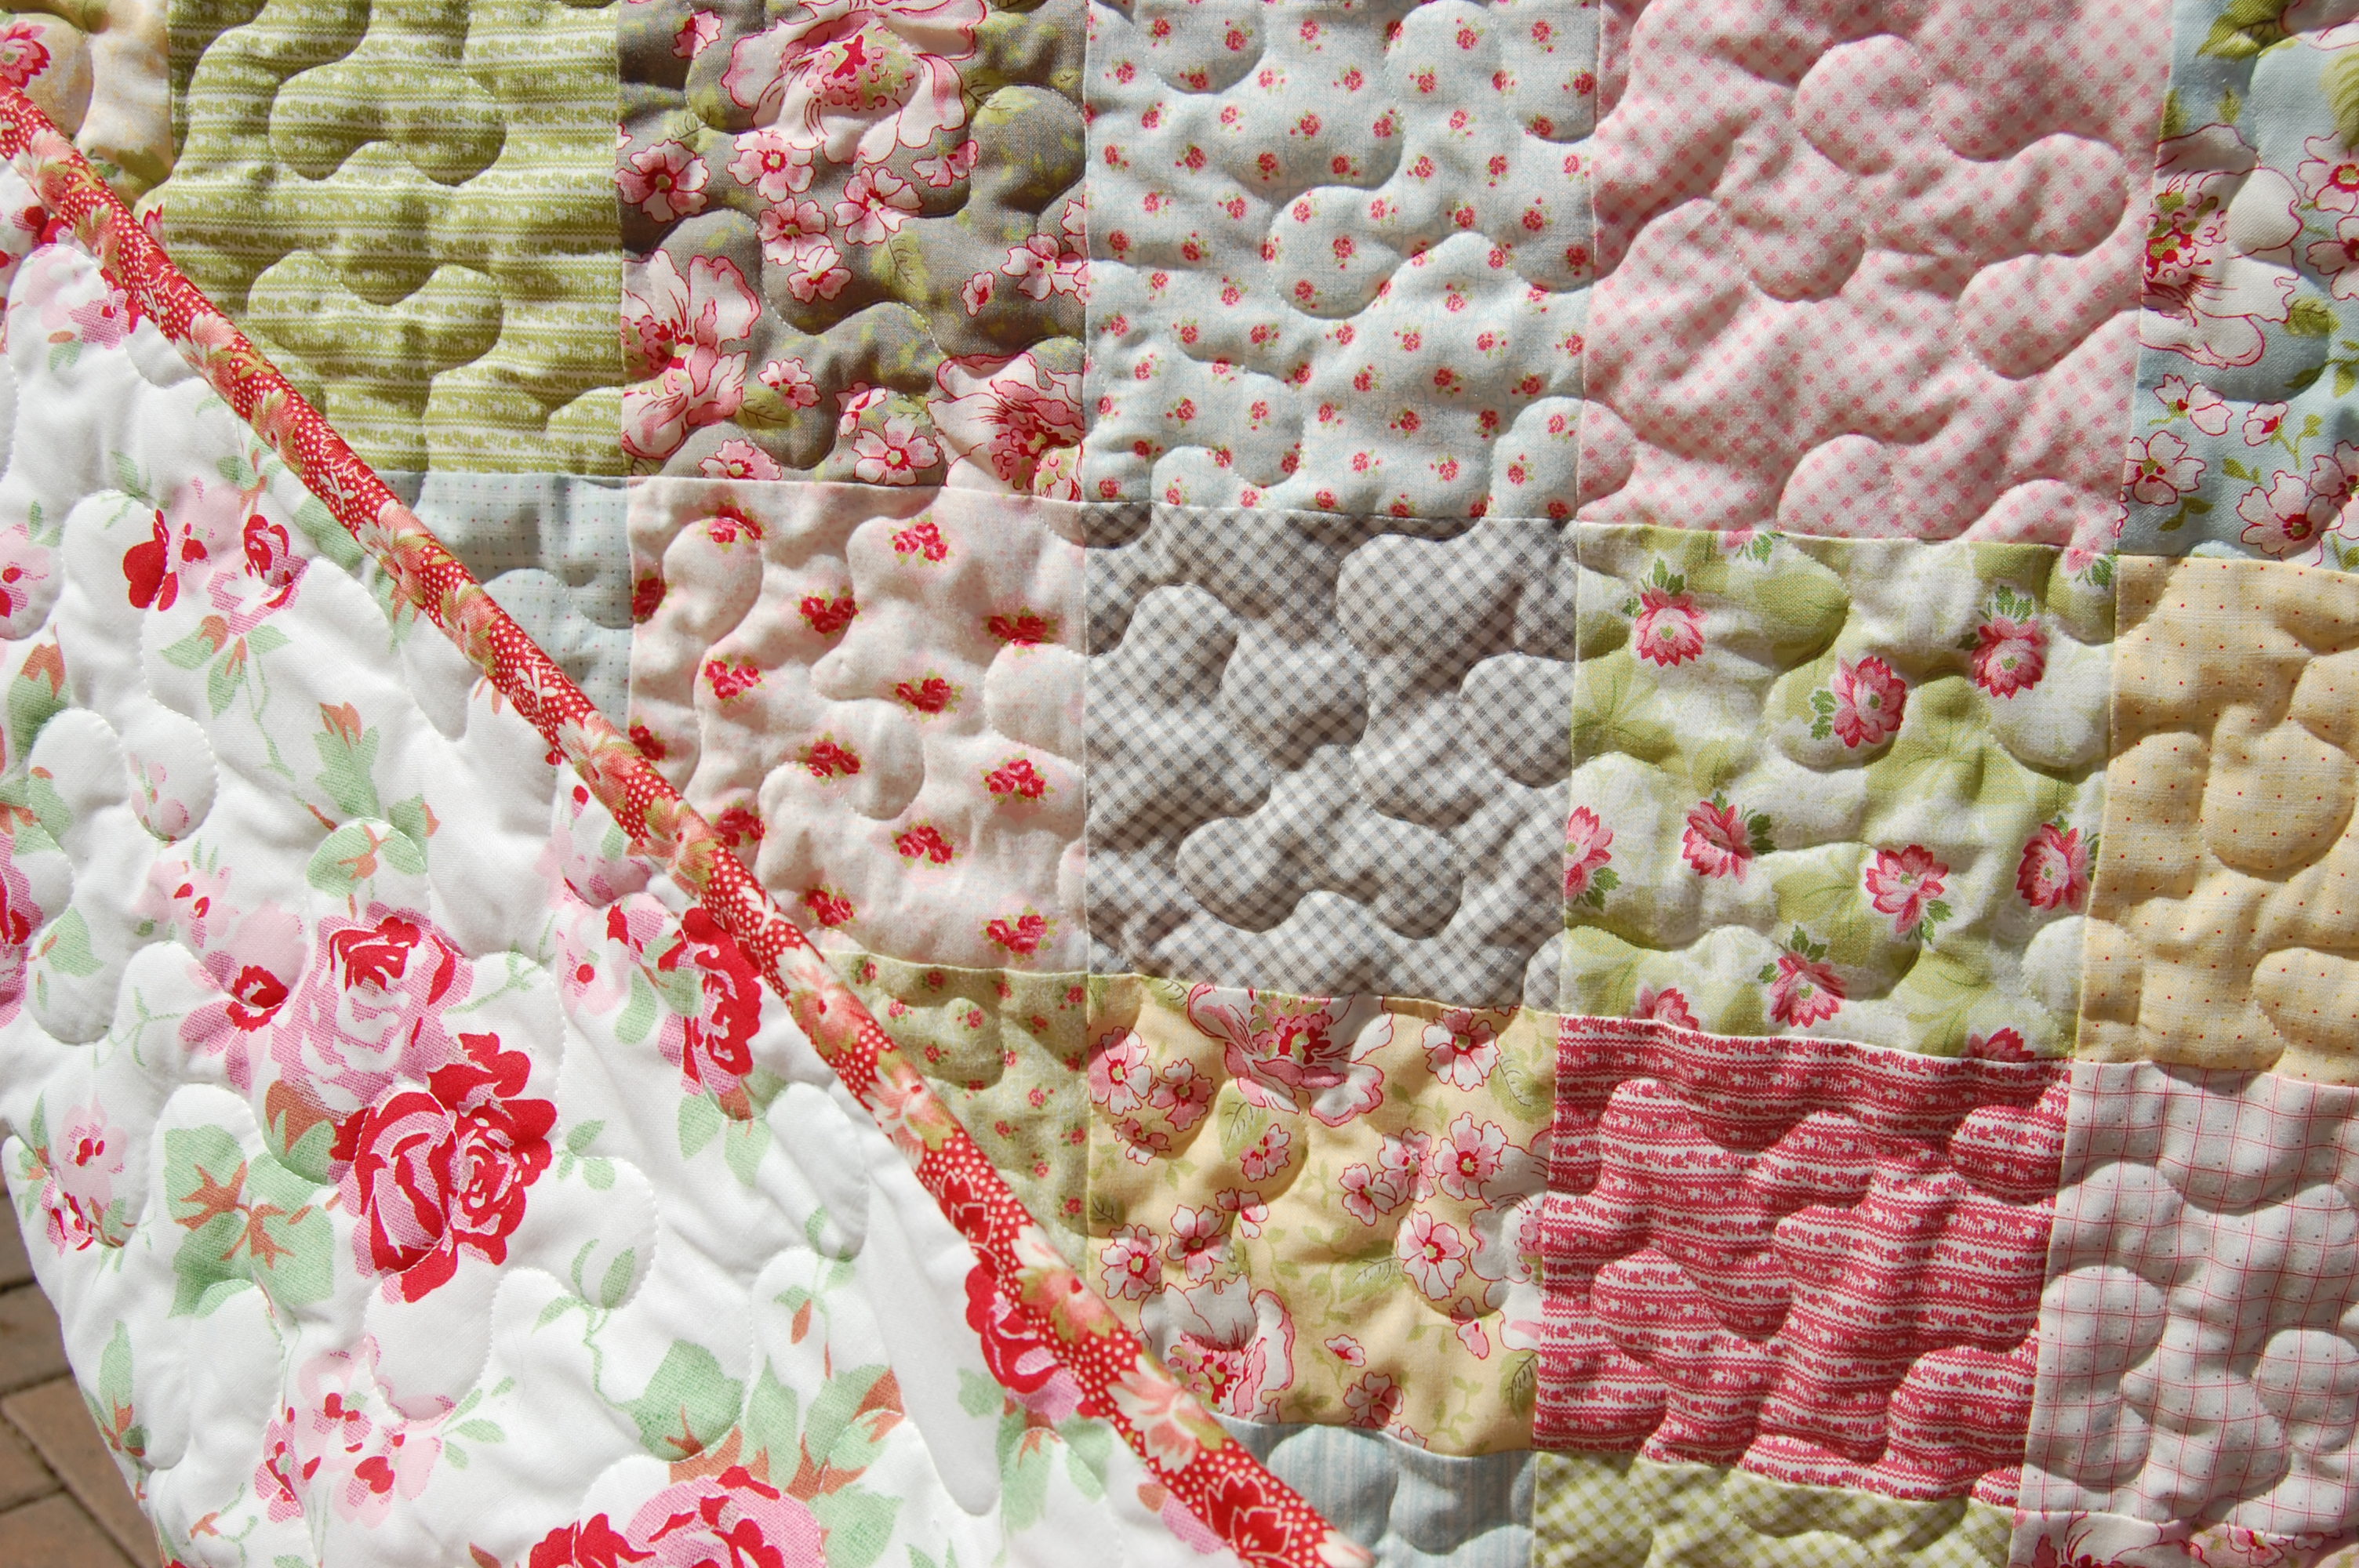
I admit the colours are not showing up well in our first-week-of-spring-cold-but -bright Scottish sunlight; you might have to trust me about the gentle romance of these fabrics. I used fat eighths of the Apple Bloom and Spring Lakes collections, but then took out the teal colours from Spring Lake and added Taupey-greys and Cadet blues from other Tilda collections.
It is a commission quilt; my friend commissioned it as a wedding gift for a lovely girl whom I did actually meet once and I thought was fabulous. I had a telephone consultation with her, and they live in a whitewashed Scottish cottage with pale, duck-egg blues and ivory/ white colours. I just knew Tilda would be the right fit. Not the rice obviously.
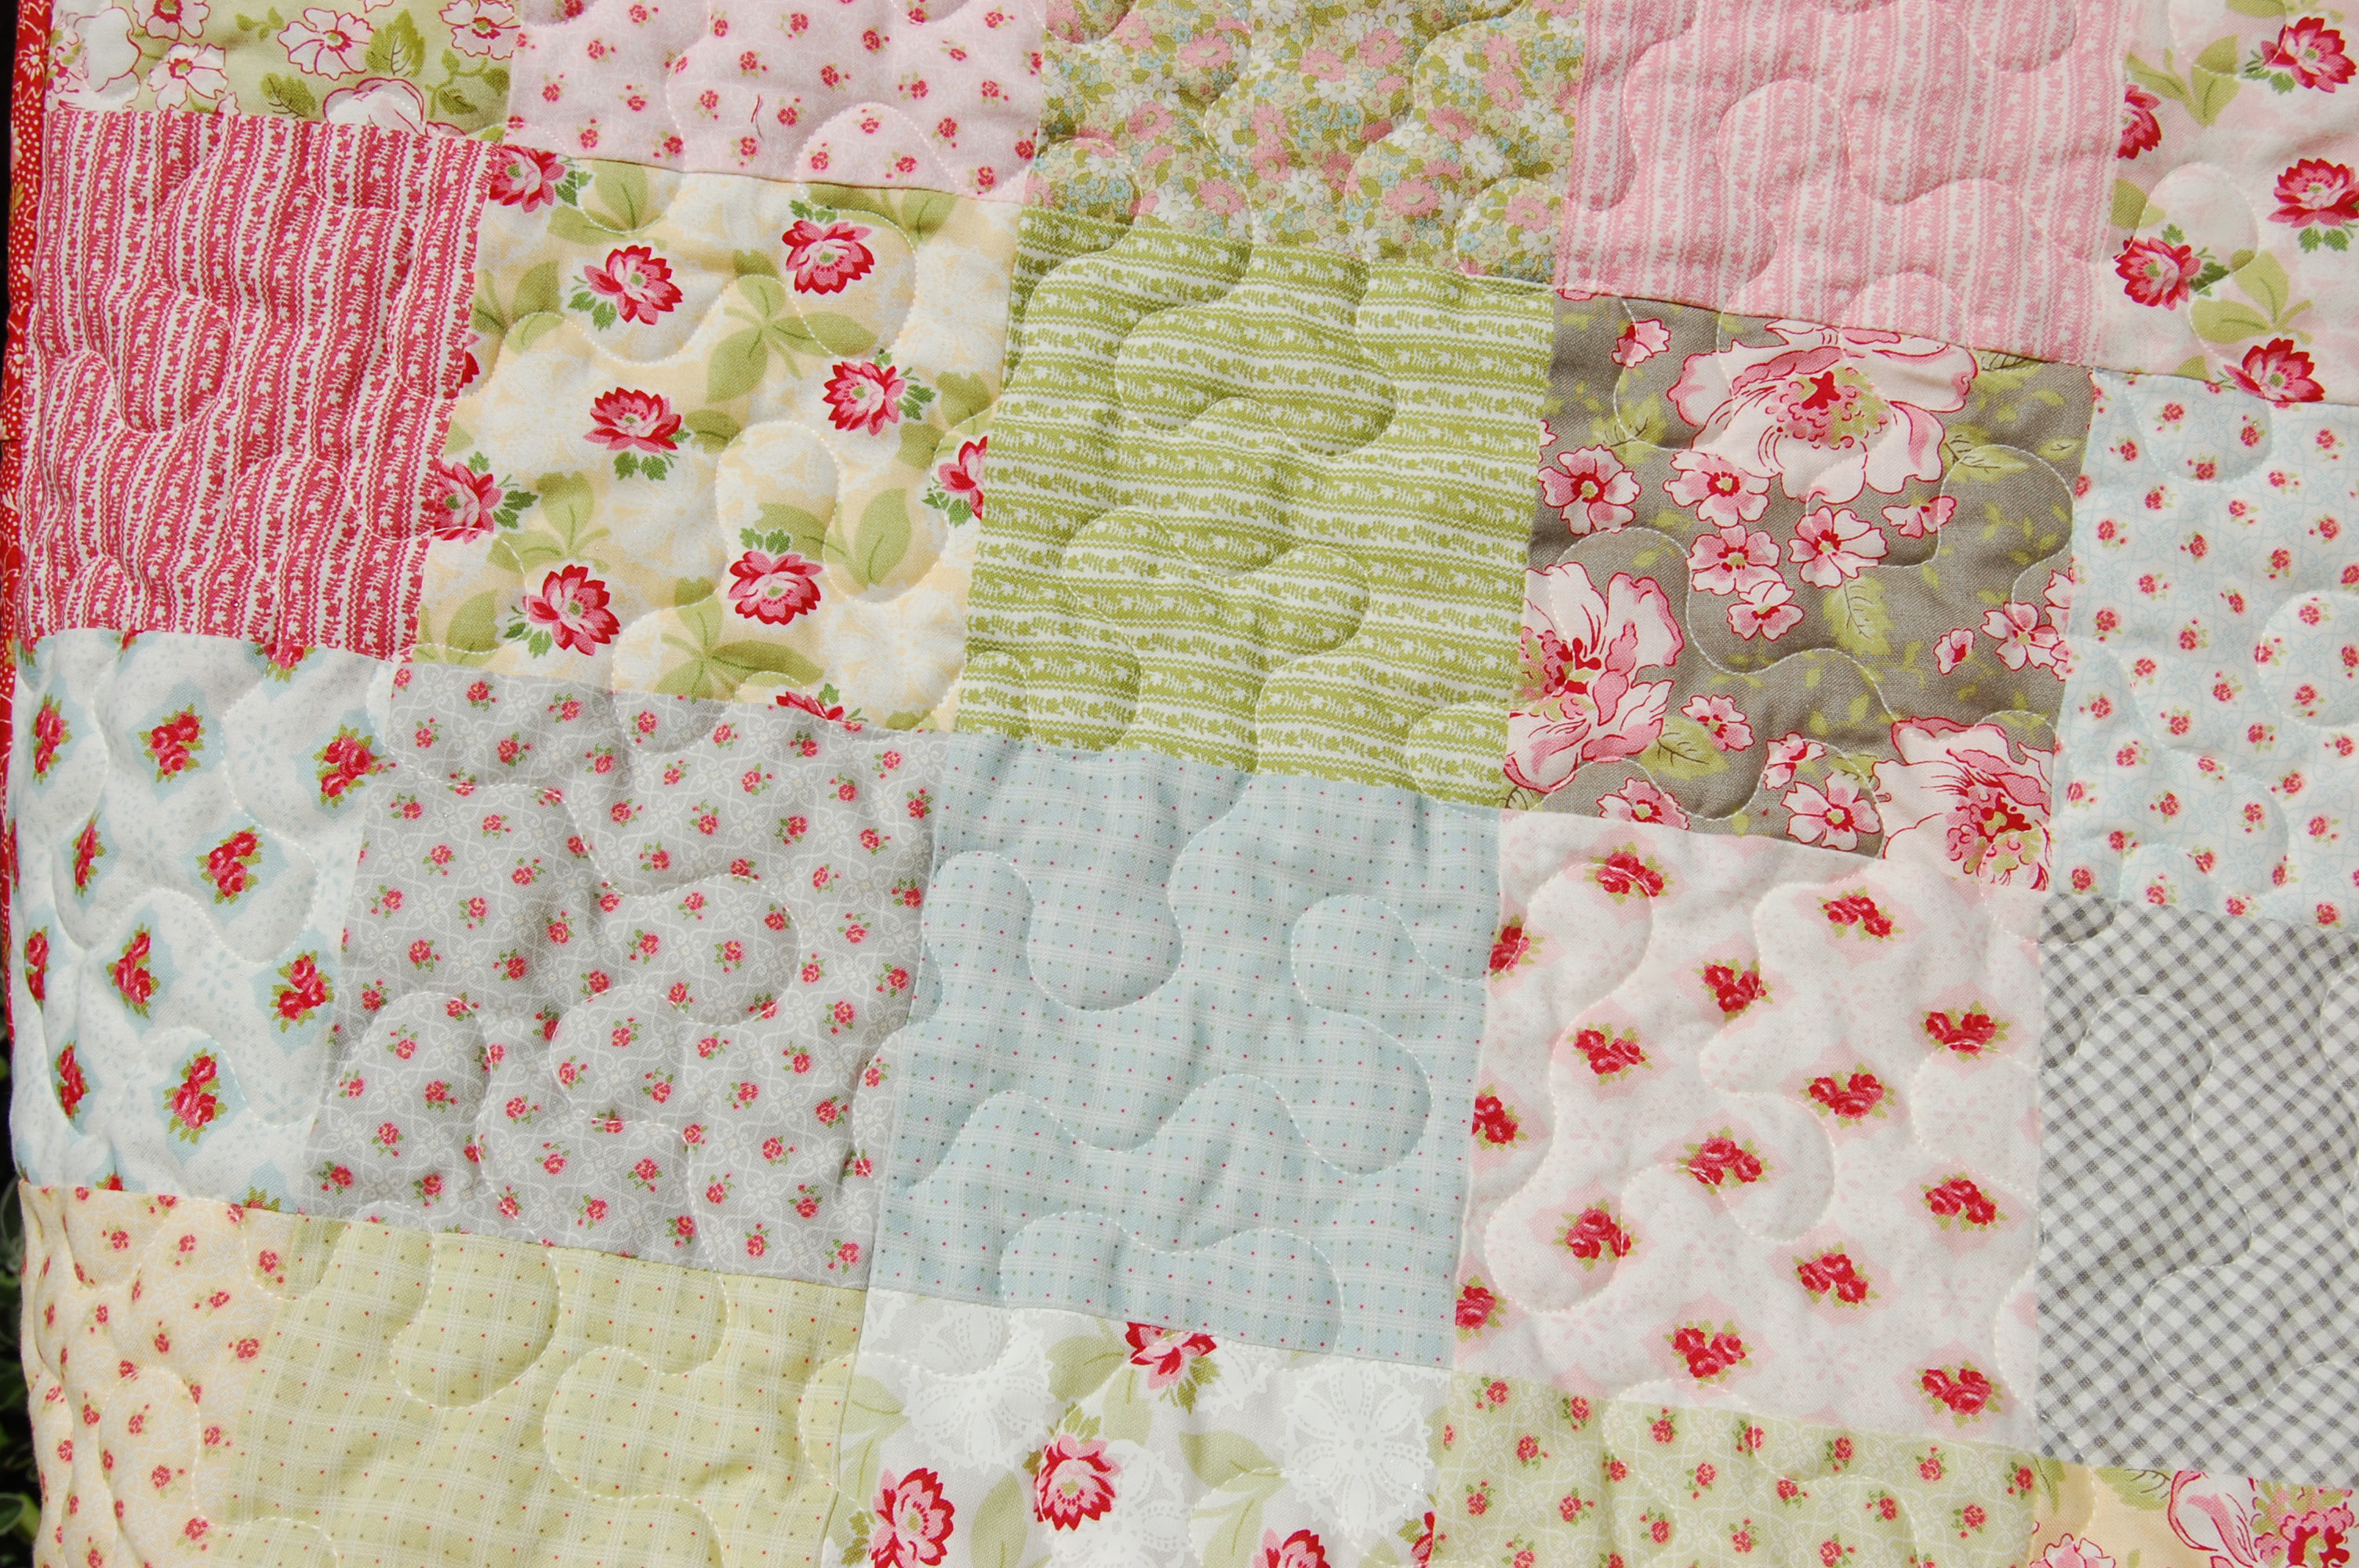
The big squares were cut to 8.5″ and the smaller ones making up the 4-patches were 4.5″, and I just alternated them. You would need 13 fat quarters or 26 fat eighths or equivalent to make this quilt which finishes at 61″ square with a 3″(ish) border. It’s a great throw size – big enough for 2 on a sofa or someone to nap under.
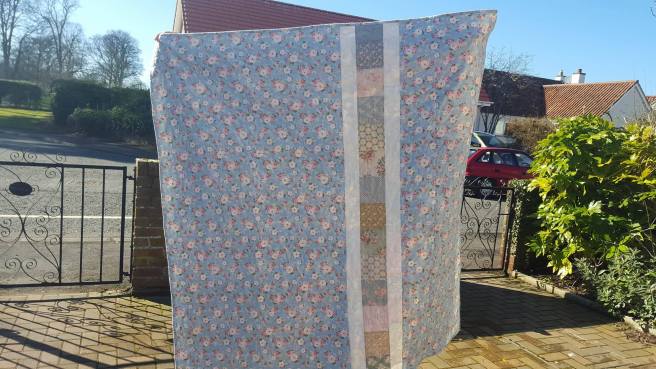
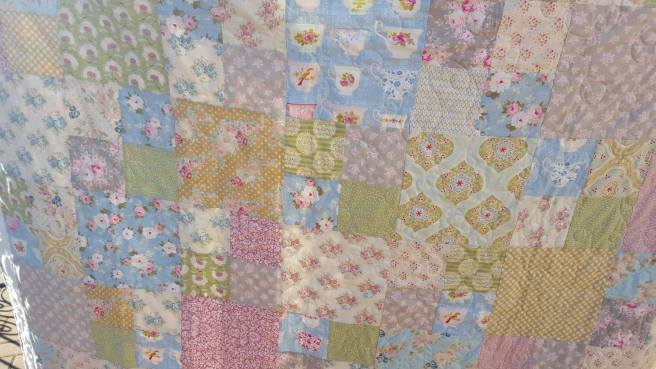
This is the back – Pernille in Cadet blue, pieced with some charms from the Tilda collection “Happiness is Homemade”.
I really love the back! Almost more than the front, always disappointing when it takes a fifth of the time… The couple’s bedroom is duck-egg blue, so I am hoping that this will make up for the pinks and greens on the front of the quilt; a certain degree of reversibility. I hoped that the other colours would make this quilt fit into their home even if they re-decorated. They’re going to need to keep loving shabby-chic pastels though!
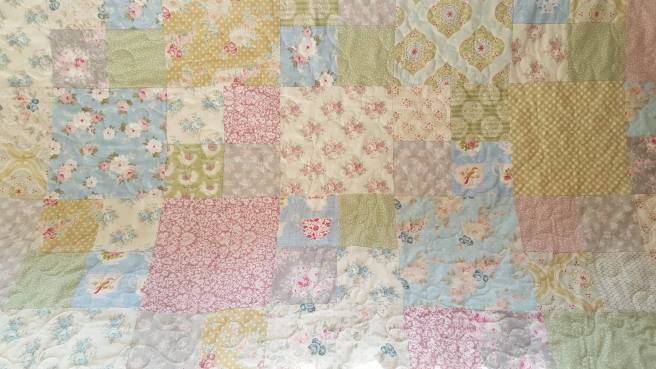
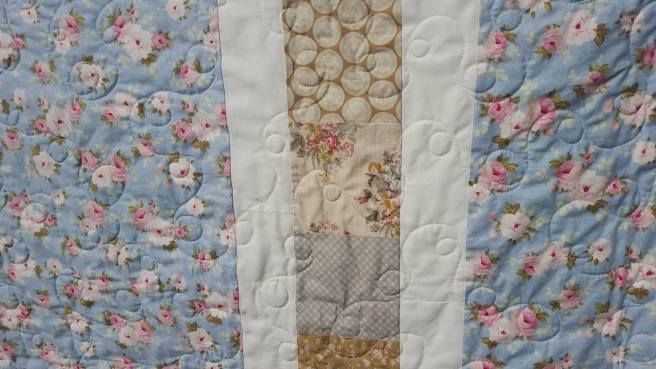
I quilted it in a loop + swirl pattern, and if you look very carefully you can maybe see a “L + M” quilted in the middle (the couple’s initials). It’s not showing up very well here, but that is kind of the point… Batting is Quilter’s Dream Orient, a natural batting made of cotton, silk, bamboo and Tencel (eucalyptus), which gives it a wonderful drape and softness, without a lot of weight. It is definitely my favourite batting for special quilts, although it is expensive.
That bright, bright sunlight to which we have become unaccustomed over the winter certainly shows off the texture that free-motion quilting gives a quilt. I love that all those curves soften the geometry of squares, but so subtly.
I feel pretty sure she’ll like it, if only because I had the opportunity to talk to her about her tastes. What I am less sure about is how I will feel about letting it go! Do I always say that? This time I decided to buy a few Tilda charm packs for a summer quilt for us, just to make the hand-over easier!
After all, with fabrics this beautiful and timeless, it’s worth allowing the name to share brain space with some slightly trippy childhood culturally-significant memories, huh?
Happy 2016 lovely creative folks! Thanks for stopping by – despite it being 4 months since my last confession. And since switching to WordPress I get stats, which shows you guys keep checking in, so double thank you for putting up with my prolonged absence!
SO much to tell you about; I had an amazingly successful craft fair and have some thoughts on that; some Christmas stockings for which a tutorial has been requested several times; I have some quilts in the making; I did some free motion embroidery; my EPP hexagon quilt top is 3/4 done; I wanted to show you how I made a wee felt mouse doll in a tin for a friend… it’s hard to know where to start!
(A few things from my craft fair)
But I’m going to show you the postage stamp quilt that I am currently so into that I am finding it difficult to do anything else, despite it supposedly being a side-project. Including neglecting the shabby-chic commission quilt for a wedding which was 4 months ago… don’t panic, they knew I’d be busy! They didn’t know I would be seduced to the Dark Side of the, er, superbright & scrappy, admittedly. (I don’t think I’ve got the hang of Dark Side quilty metaphors…)
I have had this yearning for an ultrabright, not very grown up, superscrappy, rainbow, box of sweeties, star-bright, flowers and unicorn vomit quilt for a while, having been inspired by the bazillion amazing, scrappy postage stamp quilts out in blogland, but was actually pretty shocked to discover that I didn’t have many scraps big enough to cut a 2.5″ square from. You need 1,024 X 2.5″ squares for a 64″ square quilt. I was reluctant to cut into uncut FQs in case I needed them for other projects and found myself short. I had about 300 mostly different, big-enough scraps, in the colours I wanted, which I cut up but obviously I needed a whole heap more:
So I decided to use charm packs. I have a terrifying weakness for charm packs and precuts. To have a tiny bit of a whole collection of beautiful coordinating fabrics in my hand makes my heart flutter a little. But it does mean that there are more errant charm packs hanging about having a fabric party in my cupboards than there will ever be quilts. That’s scrap, right?
that I truly fell head over heels. I think it’s because a lot of the scrap quilts you see have a tendency to go quite dark, and I really wanted a crazybright quilt; hers kind of all coordinates and still manages to look happy-scrappy. So I started with a base of the same collection as she did, my favourite collection, Happy go lucky, by Bonnie and Camille for Moda, and then added a few other packs which used similar colours; adding a bit of pink, but no brown, black, dark green or purple.
I highly recommend visiting that blog page btw, she shows off a variety of utterly gorgeous quilt confection perfection, as well as listing the charm packs she used for her quilt.
Once I partly pieced this 16 x 16 square piece (about 32″ square) I reflected on how it looked a little “flat”. Maybe the colours were too coordinated? It used some “happy go lucky”, “beach house”, “one for you, one for me” (it’s just OK) and “garden project” (which is really really nice) – all for Moda. So I chopped up and threw in some “Sunkissed” and “Ambleside” which I had left over from other projects. Once it also had my own scraps in, it seemed to have a bit more depth from the varying shades of each colour, which I think helps, although it will be paler overall.
Some more 16-patches ready to be sewn at some point, this time with scraps in:
But… I think the thing I will enjoy the most is looking at the pieces of scrap fabric I used from my stash. Already, my eye sees them immediately + recognises them as fabrics I bought with love and have used. I like the effect of the charm pack squares but I don’t have that same feelingyou know, I think I might have to raid my stash after all to make it feel more unique and like it’s mine.
By the way I am doing most of this as a “Leaders and Enders” project. This is a technique devised by Bonnie K. Hunter I think (http://quiltville.blogspot.co.uk/). You know how when you finish a line of sewing, you cut your thread, leaving long ends of thread which essentially get wasted? Or when you start sewing, esp piecing triangles or delicate fabrics, your machine tries to eat the fabric? My mother-in-law always uses a piece of scrap fabric to start and finish her sewing (the needle stays in this fabric piece when you finish sewing/ switch off the machine).
Well, a leader/ender is a small bit of patchwork you want to sew together; you use that instead of scrap fabric so it doesn’t eat the corner of the HST you’re making for your proper project, chain piece everything you want to, and then finish with another small piece of your “leader/ender” quilt.
That’s my “Ender”, which I left in the machine for whichever quilt I decide to work on next time, when it will act as my “leader”.
Before you know it, within a few quilts you have sewn together lots of small 2.5″ squares, first into pairs, and then into 4-patches. Without you really noticing you’ve done it. Well, it slows you down a little I admit. But I certainly didn’t notice sewing 1,100 little squares into 4-patches, as much as I would have done had I tried to just piece them all at once (I might have sworn off quilting forever!).
I kept them all in a shoebox next to the machine, which was also good for the ten min mindless sewing break. Healthier than fags and booze… 😉
Once you put the 4 patches together, the 16-patches seem to go together pretty quickly, and because it’s scrappy, it’s all pretty mindless. Instead of trying to keep your rows in order, you just sew randomly. Bliss.
There are other ways to do this of course. The amazing goddess of modern square-based quilting, Rita from Red Pepper Quilts has a great tutorial on doing postage stamp quilts using 2″ x 7″ strips cut from scrap or stash. (her squares will finish smaller at 1.5″). I can see that working very quickly, though not as a leader/ender. Her fabulous tutorial is here:
Meanwhile… My New Year’s resolution after playing more guitar and moving more is to sew less for others and more for us! My boy wants a Spiderman quilt, which is making me very happy, and I envisage a scrappy string quilt (I have lots of strings), a liberty quilt, 1030s feedsack repro picnic quilt, Heather Ross quilts for my two nieces and of course a bright bright postage stamp quilt! There, it’s in black and white – you’re my witness. After the 3 commissions I have to do first. I’ll start after that 😉
Until the next time, may 2016 bring you much love, joy, peace and happiness,
Sometimes, that usually fair and just muse, er, Quiltiopoeia, eschews all her principles of “it will be beautiful if you take your time and take care” and her rebellious streak wreaks havoc in your quilty life. I have no idea where I’m going with this fable – but I tell you, this sweet, simple little baby quilt has caused me no end of trouble.
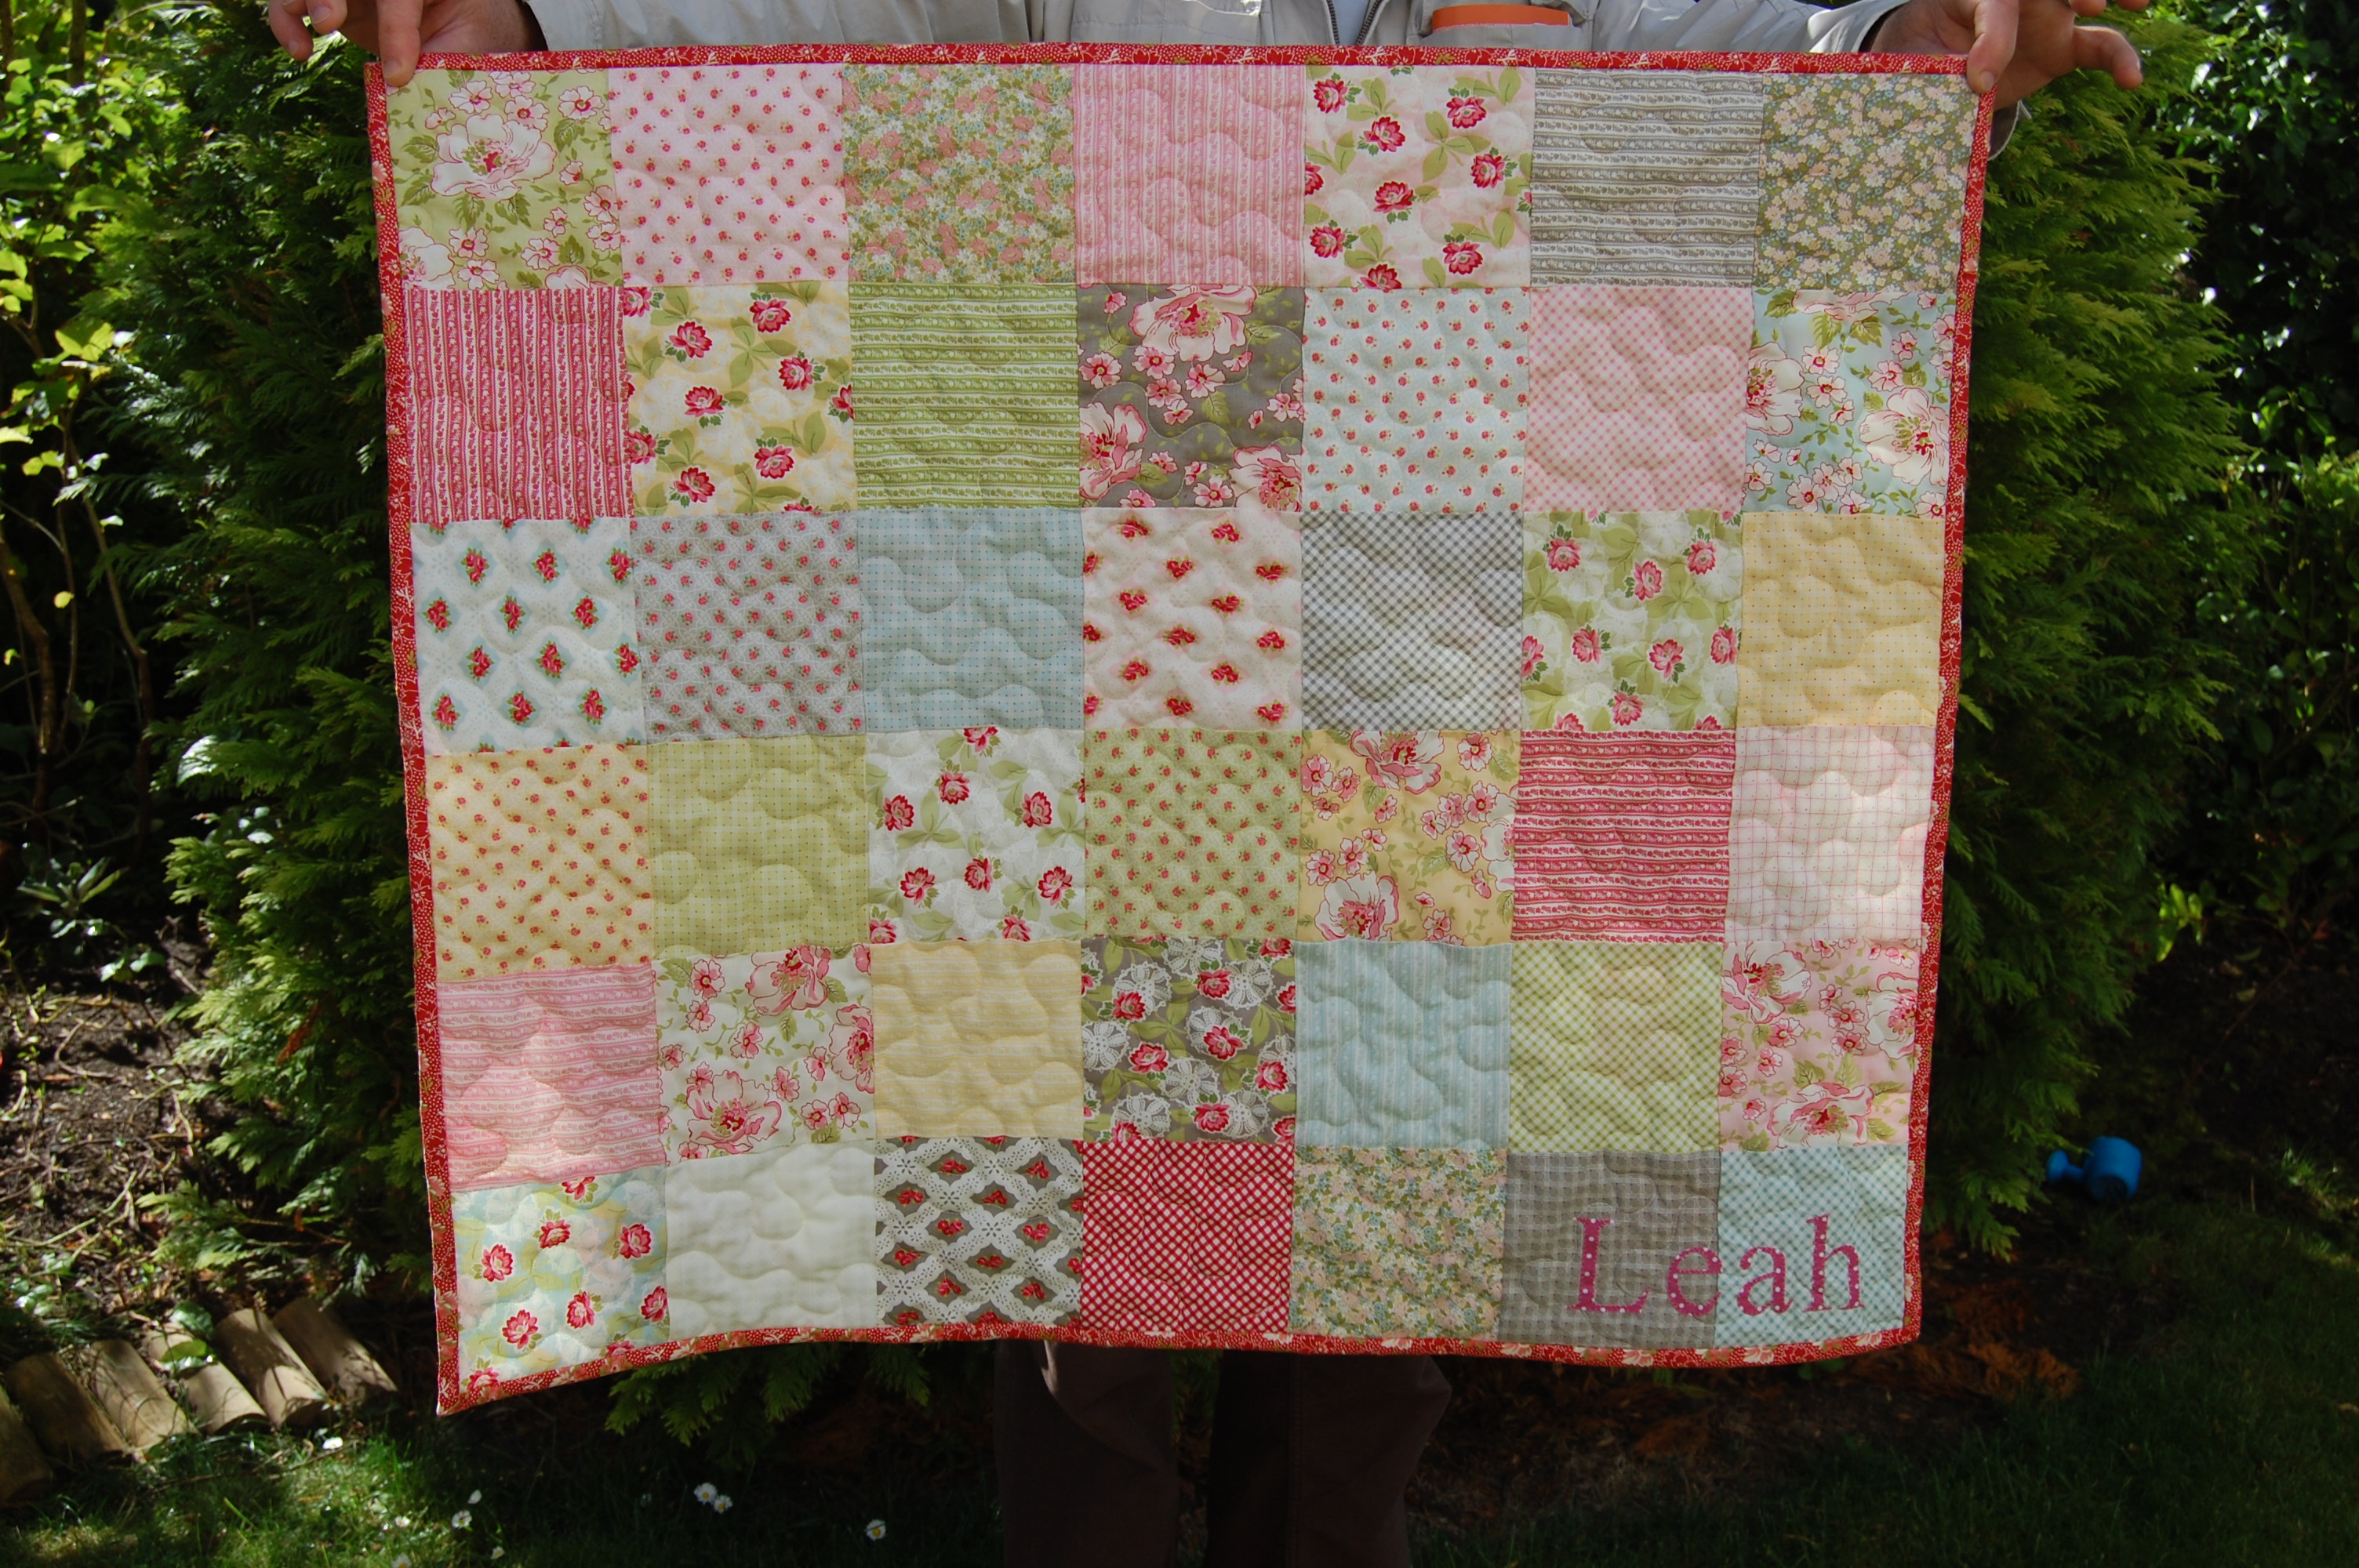
I know, right? It’s one charm pack of Ambleside by Brenda Riddle for Moda, sewn together and quilted. How hard can it be? I tell you though, do not be fooled by her gorgeousness; she’s a tricksy minx.
Earlier this year, we had that rarest of rare things – builders whom you actually like having around, who don’t say one thing and provide another, who work until the job is done, who fix problems promptly without complaint, who don’t suck air through their teeth every time they tell you about a minor problem as though you are going to have to sell your right femur to pay for this one, Missus. The father and son team did a great job replacing our decrepit bathroom for us with a “hotel bathroom” (cue clasped hands and joyous musical theatre exclamations from Mrs Cuckooblue). So when young master-builder saw me sewing and asked if I would make a small baby quilt for his niece-on-the-way a few months hence, I said yes, despite vowing to take on no new commissions this year. After all they were so nice, and it wouldn’t take too long, right?
He chose my charm squares of Marmalade Flannel by Bonnie and Camille for Moda, left over from a little quilt my newest niece plays on, and an Ikea print, Rosalie, apparently designed by Cath Kidston. Oh, I was so on top of it, although somehow I fretted over every stage, the size, the quilting, the batting (Quilter’s Dream cotton). 2 weeks before the due date, I got it to the stage in the picture above, and then went to visit my aforementioned baby niece who was playing on her quilt. I had never used flannel before and was a bit disappointed in how it had washed. Soft, yes, but also kind of old looking. I guess like flannel pyjamas get old and comfy looking quickly..? In my experience, quilts made with regular high-quality cotton fabrics remain beautiful, if not get more beautiful with subsequent washes, but somehow this flannel one didn’t. It looked better when first made. Disappointing. I think it’s one thing when it’s a gift, but another when someone has commissioned it, don’t you think?
So, some emailing of alternatives I thought they might like later, and all was going well. I used Quilters’ Dream wool batting, which is gorgeously soft with a higher loft than regular cotton batting but still washes pretty easily in the machine, and stipple quilted it. I had loop de loop quilted the Marmalade quilt above, but I thought it needed a bigger quilt really to show off the regularity of the design, I think I prefer the stipple on such a small one.
Aren’t the fabrics pretty? See that perfect binding too (from Butterscotch and Rose by Fig Tree Quilts for Moda) ? Well, I had been tossing up between this one and a blue floral one. I would like to tell you that I made the right decision immediately, but I didn’t. I unpicked it all before I thought to photograph it, but I’ve just laid the old blue binding on the quilt so you can see why it was all wrong:
I have learned to pay attention to backs and bindings over the years. Bindings in particular seem such a small thing, but they can make or break a small quilt like this. They DO show, and you need a nice frame. I just thought… oh, I don’t know what I was thinking!
Pretty fabrics…
And then the monogram he asked for. Was hoping for a beautiful swishy silvered calligraphic embroidered monogram I could tell – he had to settle for applique. And after 24 hours of me gradually discovering that LF in olde-world lettering doesn’t look good or recognisable, Fs and Ls being near mirror images of each other, he agreed to a simple appliqued name. Phew! And very sweet it looks too, I think. In my experience with small children, they love seeing their names, the first word they recognise really. It’s a shame to have some elaborate script, that they can’t read, on their first quilt.
Aw. It was worth the troubles for this little quilt. I love the softness and snuggly feel of the batting, love the classically sweet fabrics, even love the wee girl’s name. I hope Leah discovers her fingers and toes lying on it, watches the world go by under it in her pram or carseat, loves its snuggliness as she looks at picture books under it. Bless. Nothing like a new baby to tame that mischievous quilty muse.
Oh dear indeed. My camera wire malfunctioned whilst I was uploading 3 months’ worth of photos and makes onto the computer – losing almost all of them! Hence the absence of recent blog posts. But, less frustratingly, here’s the “Oh Deer”:
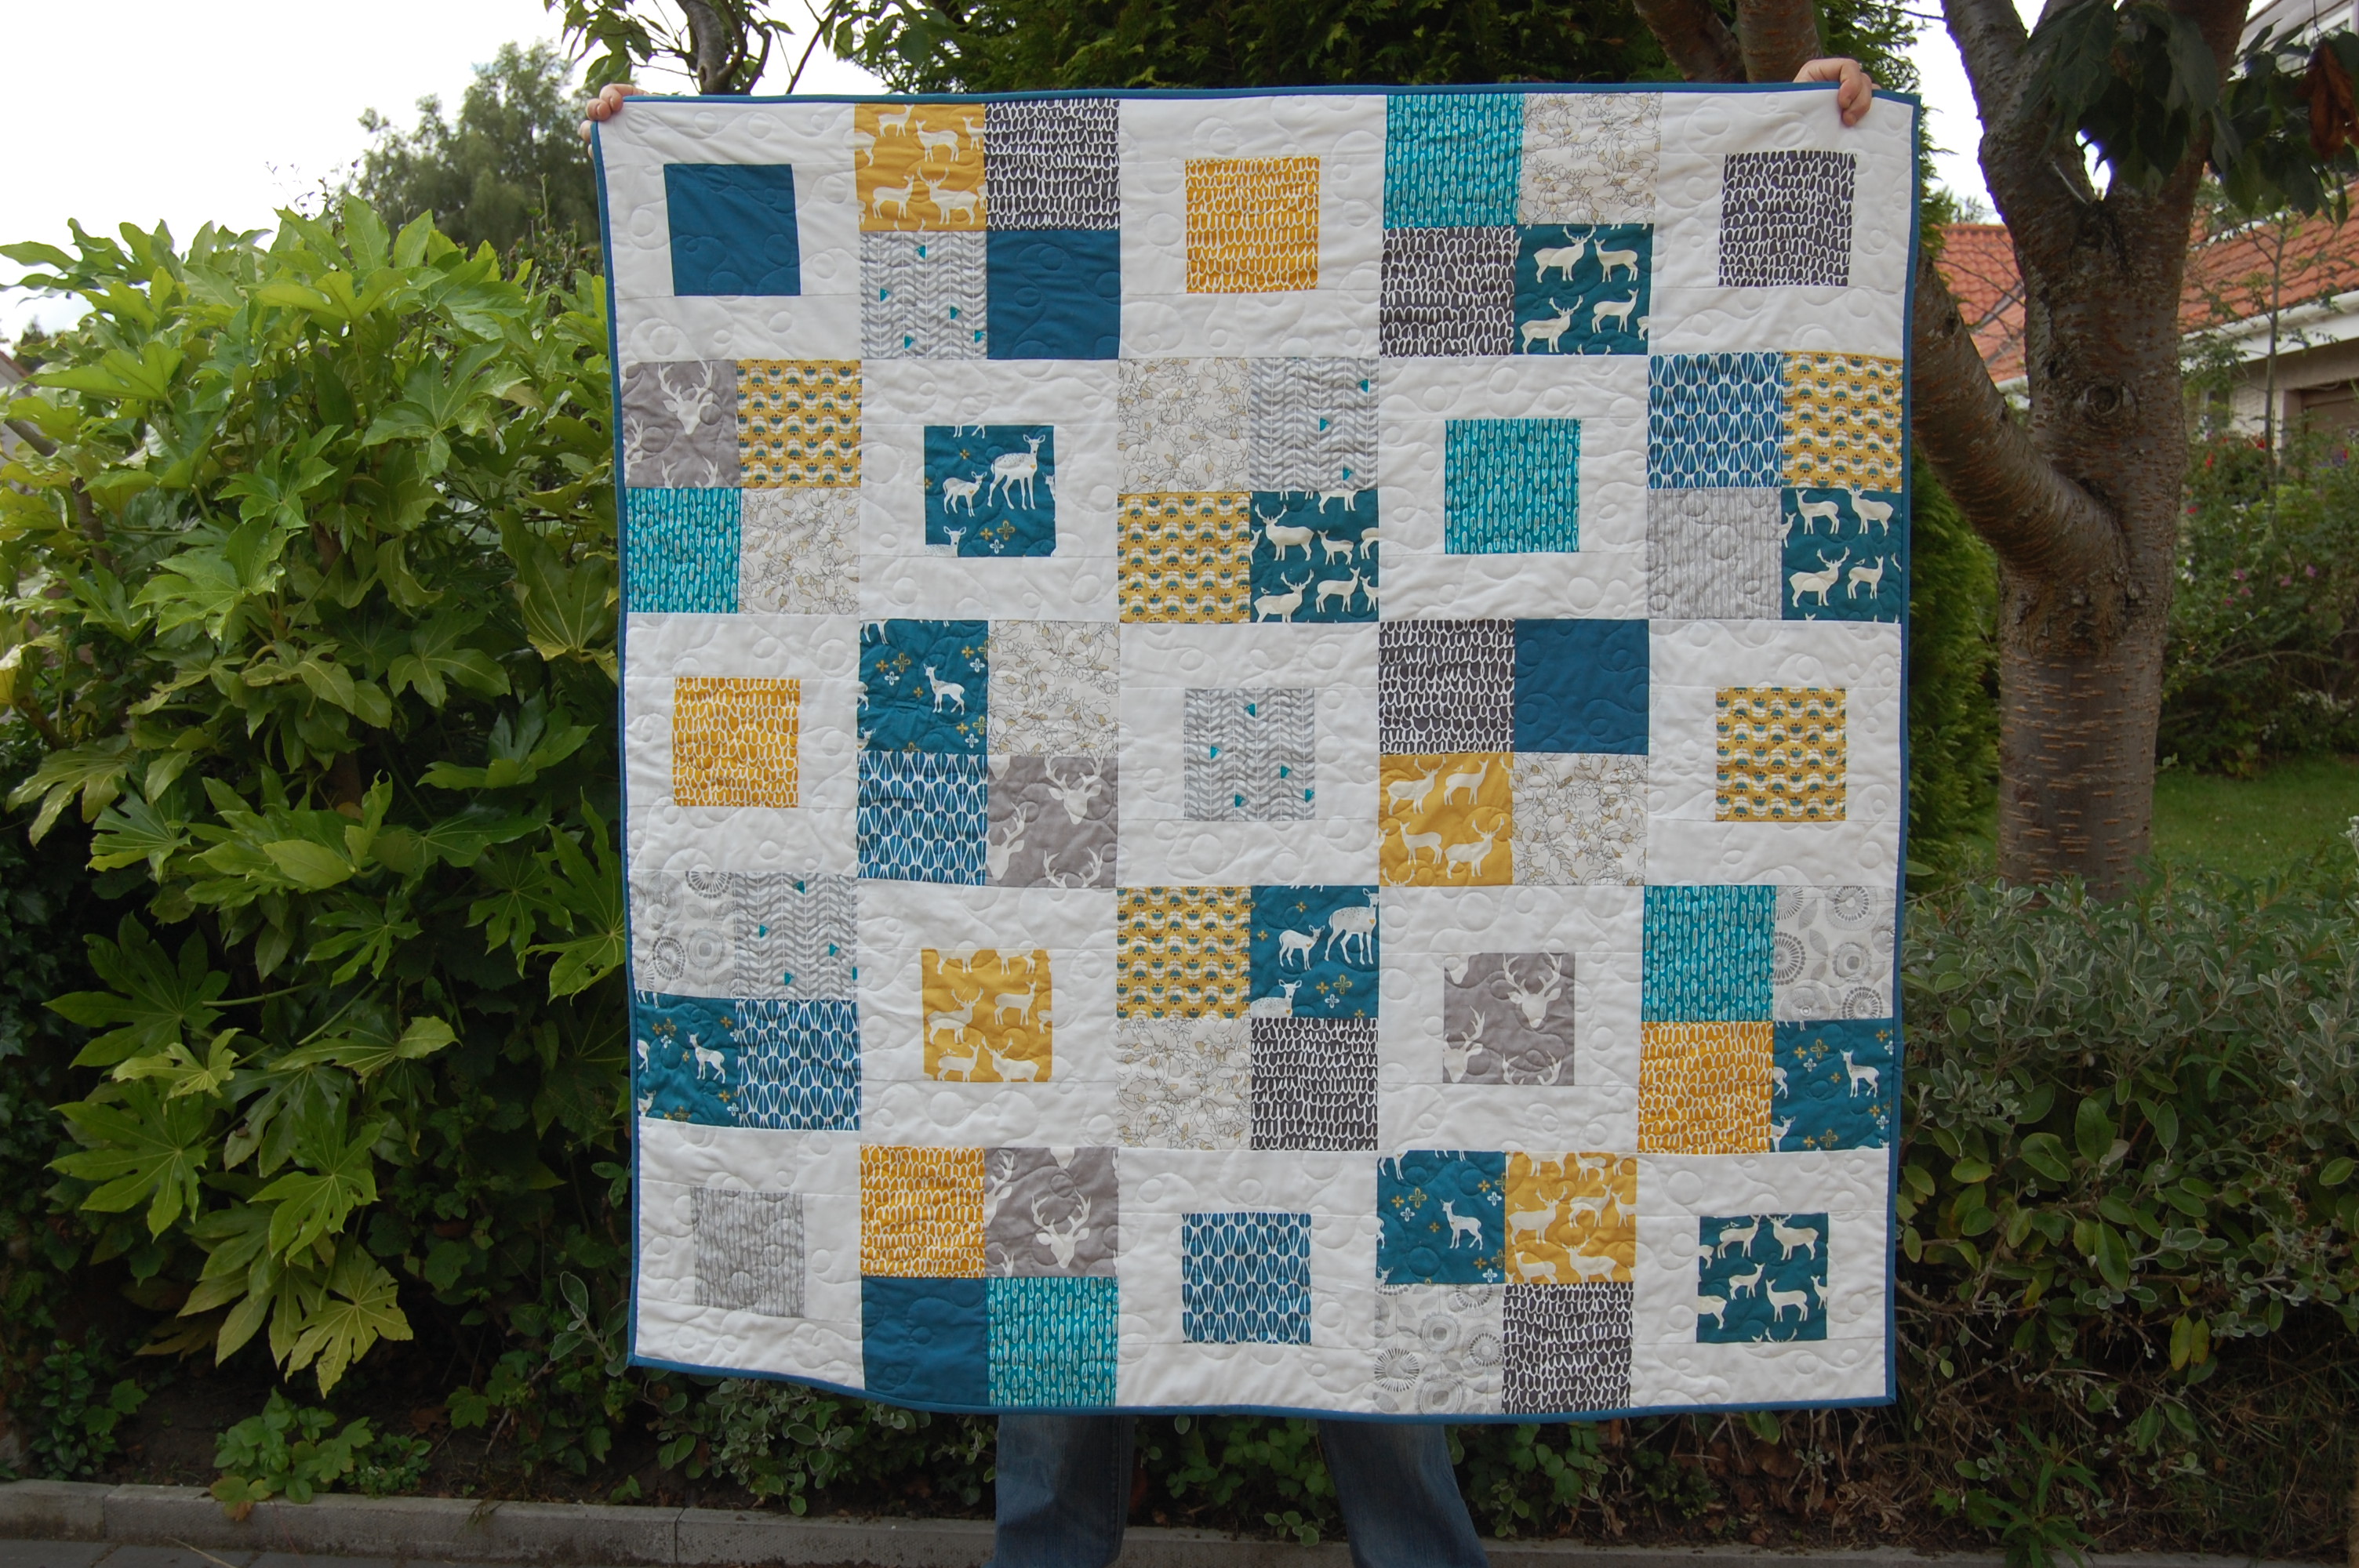
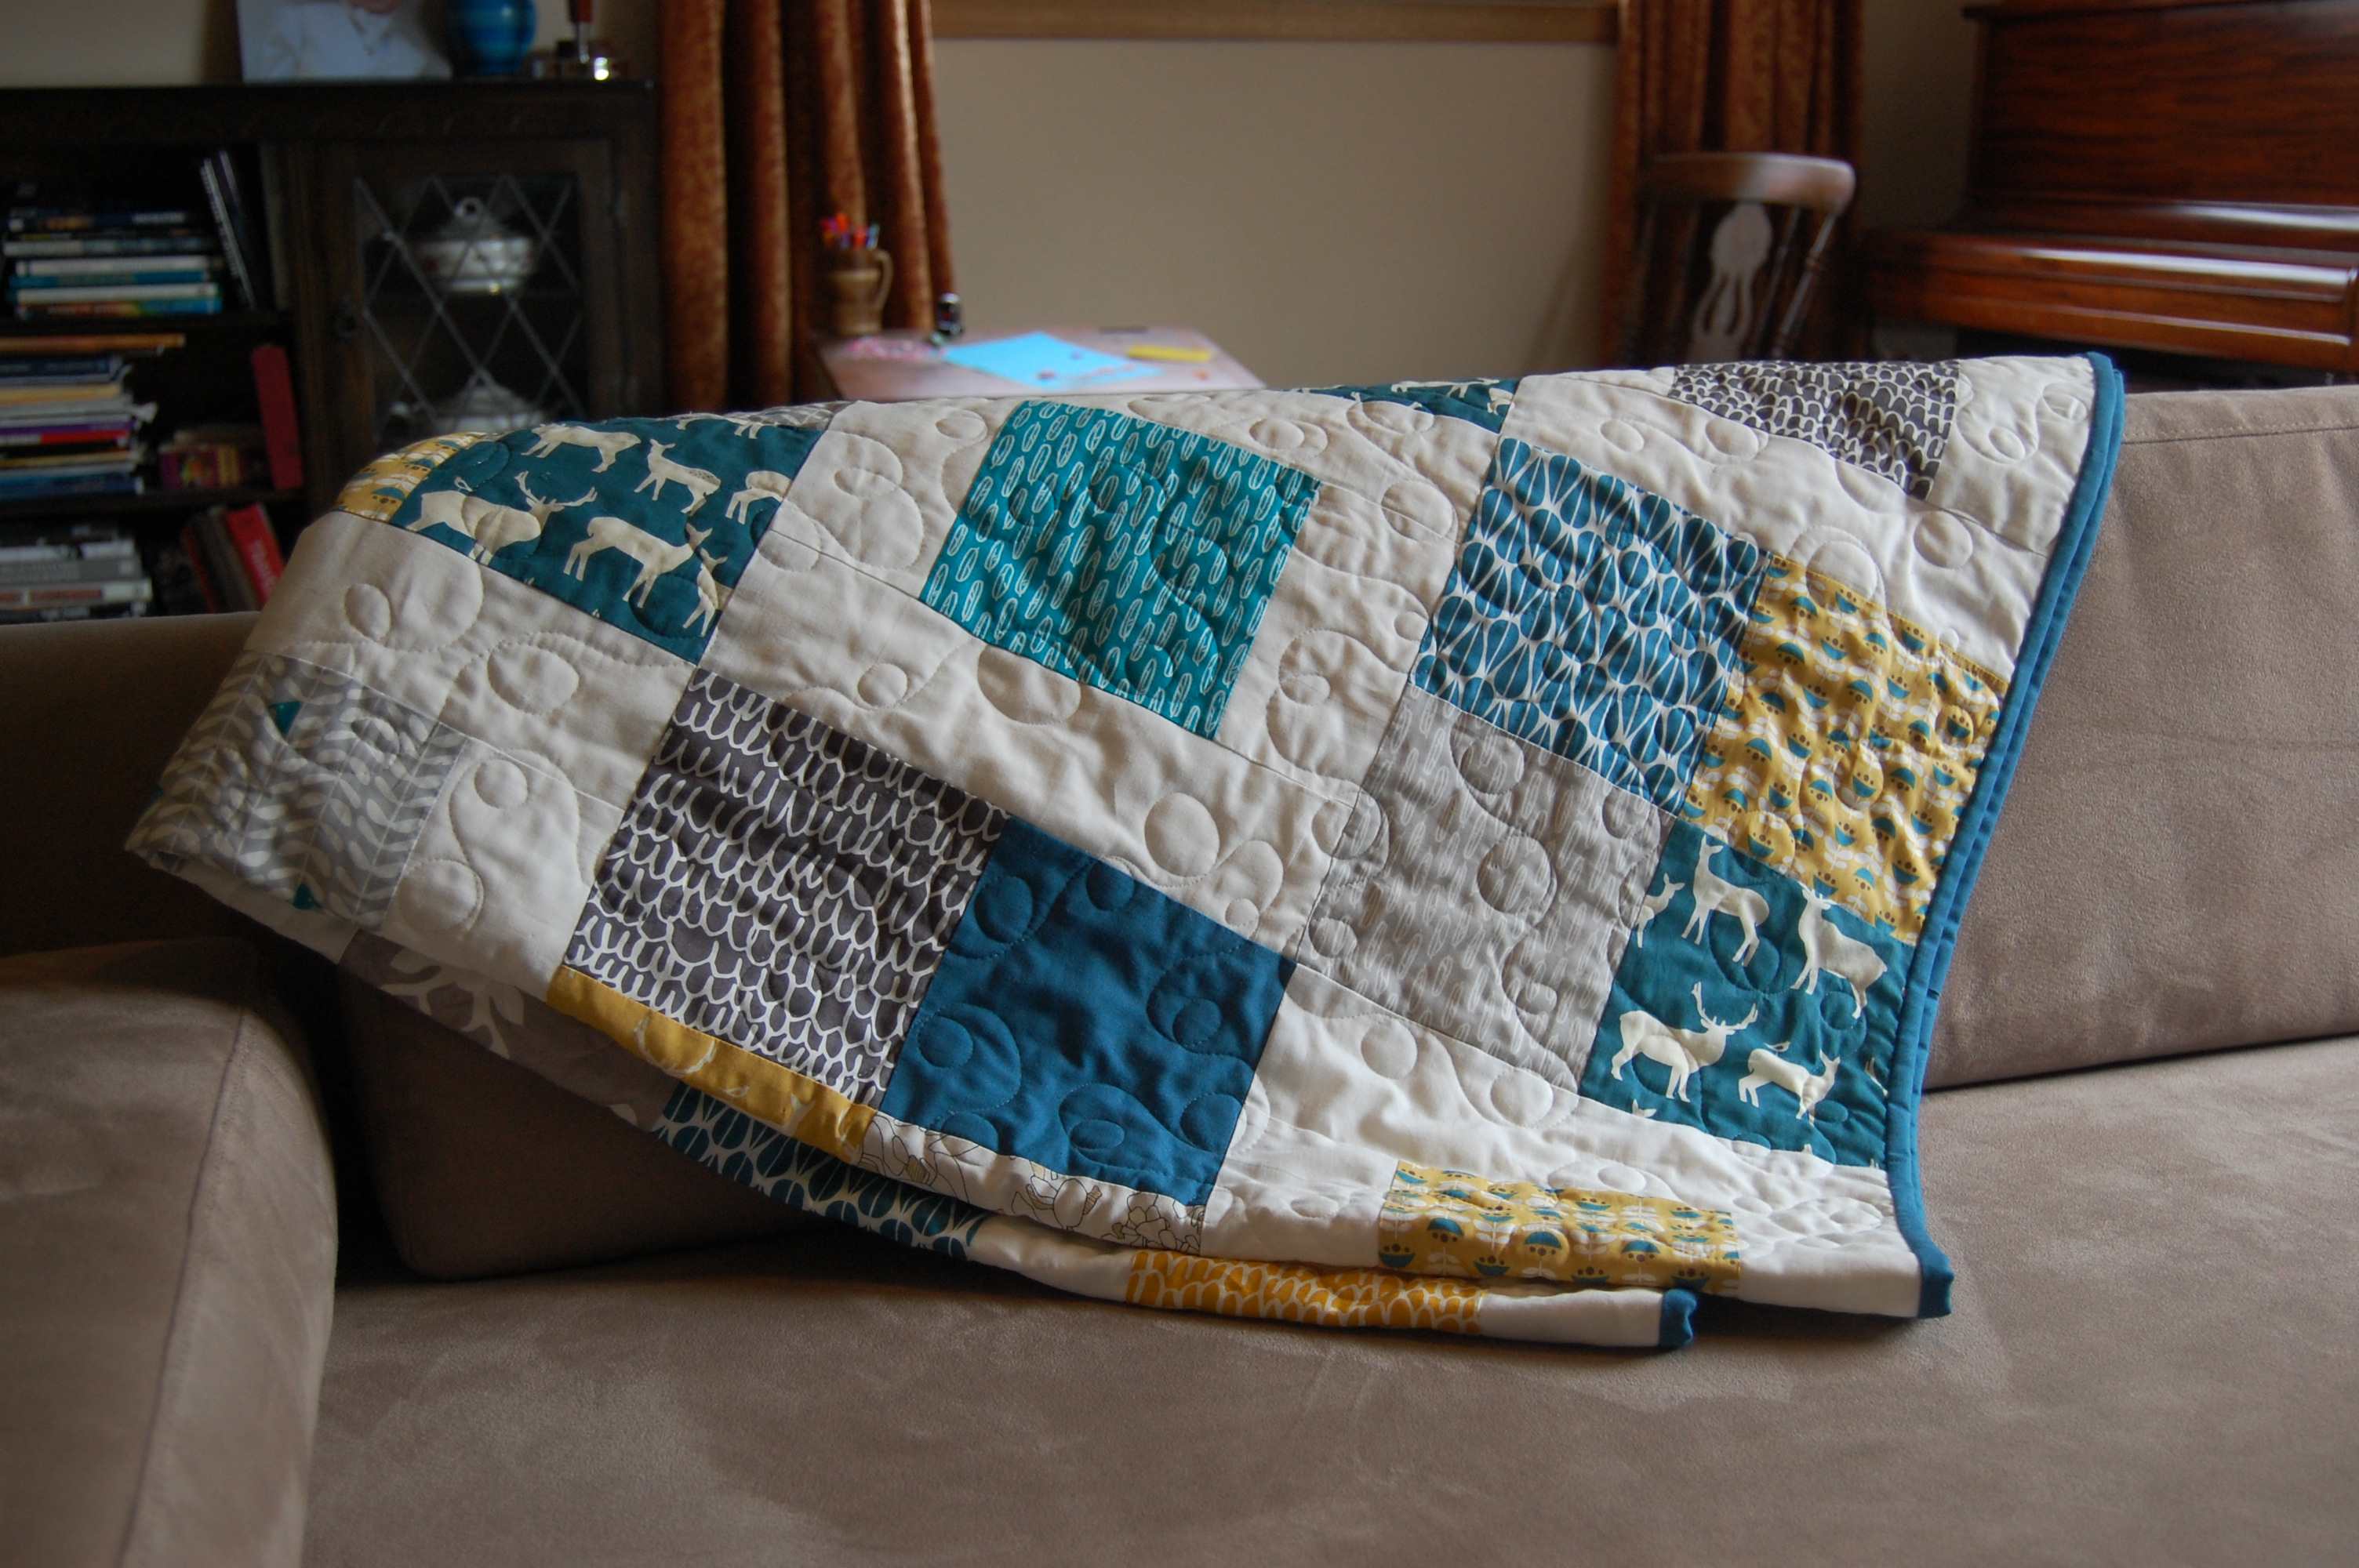
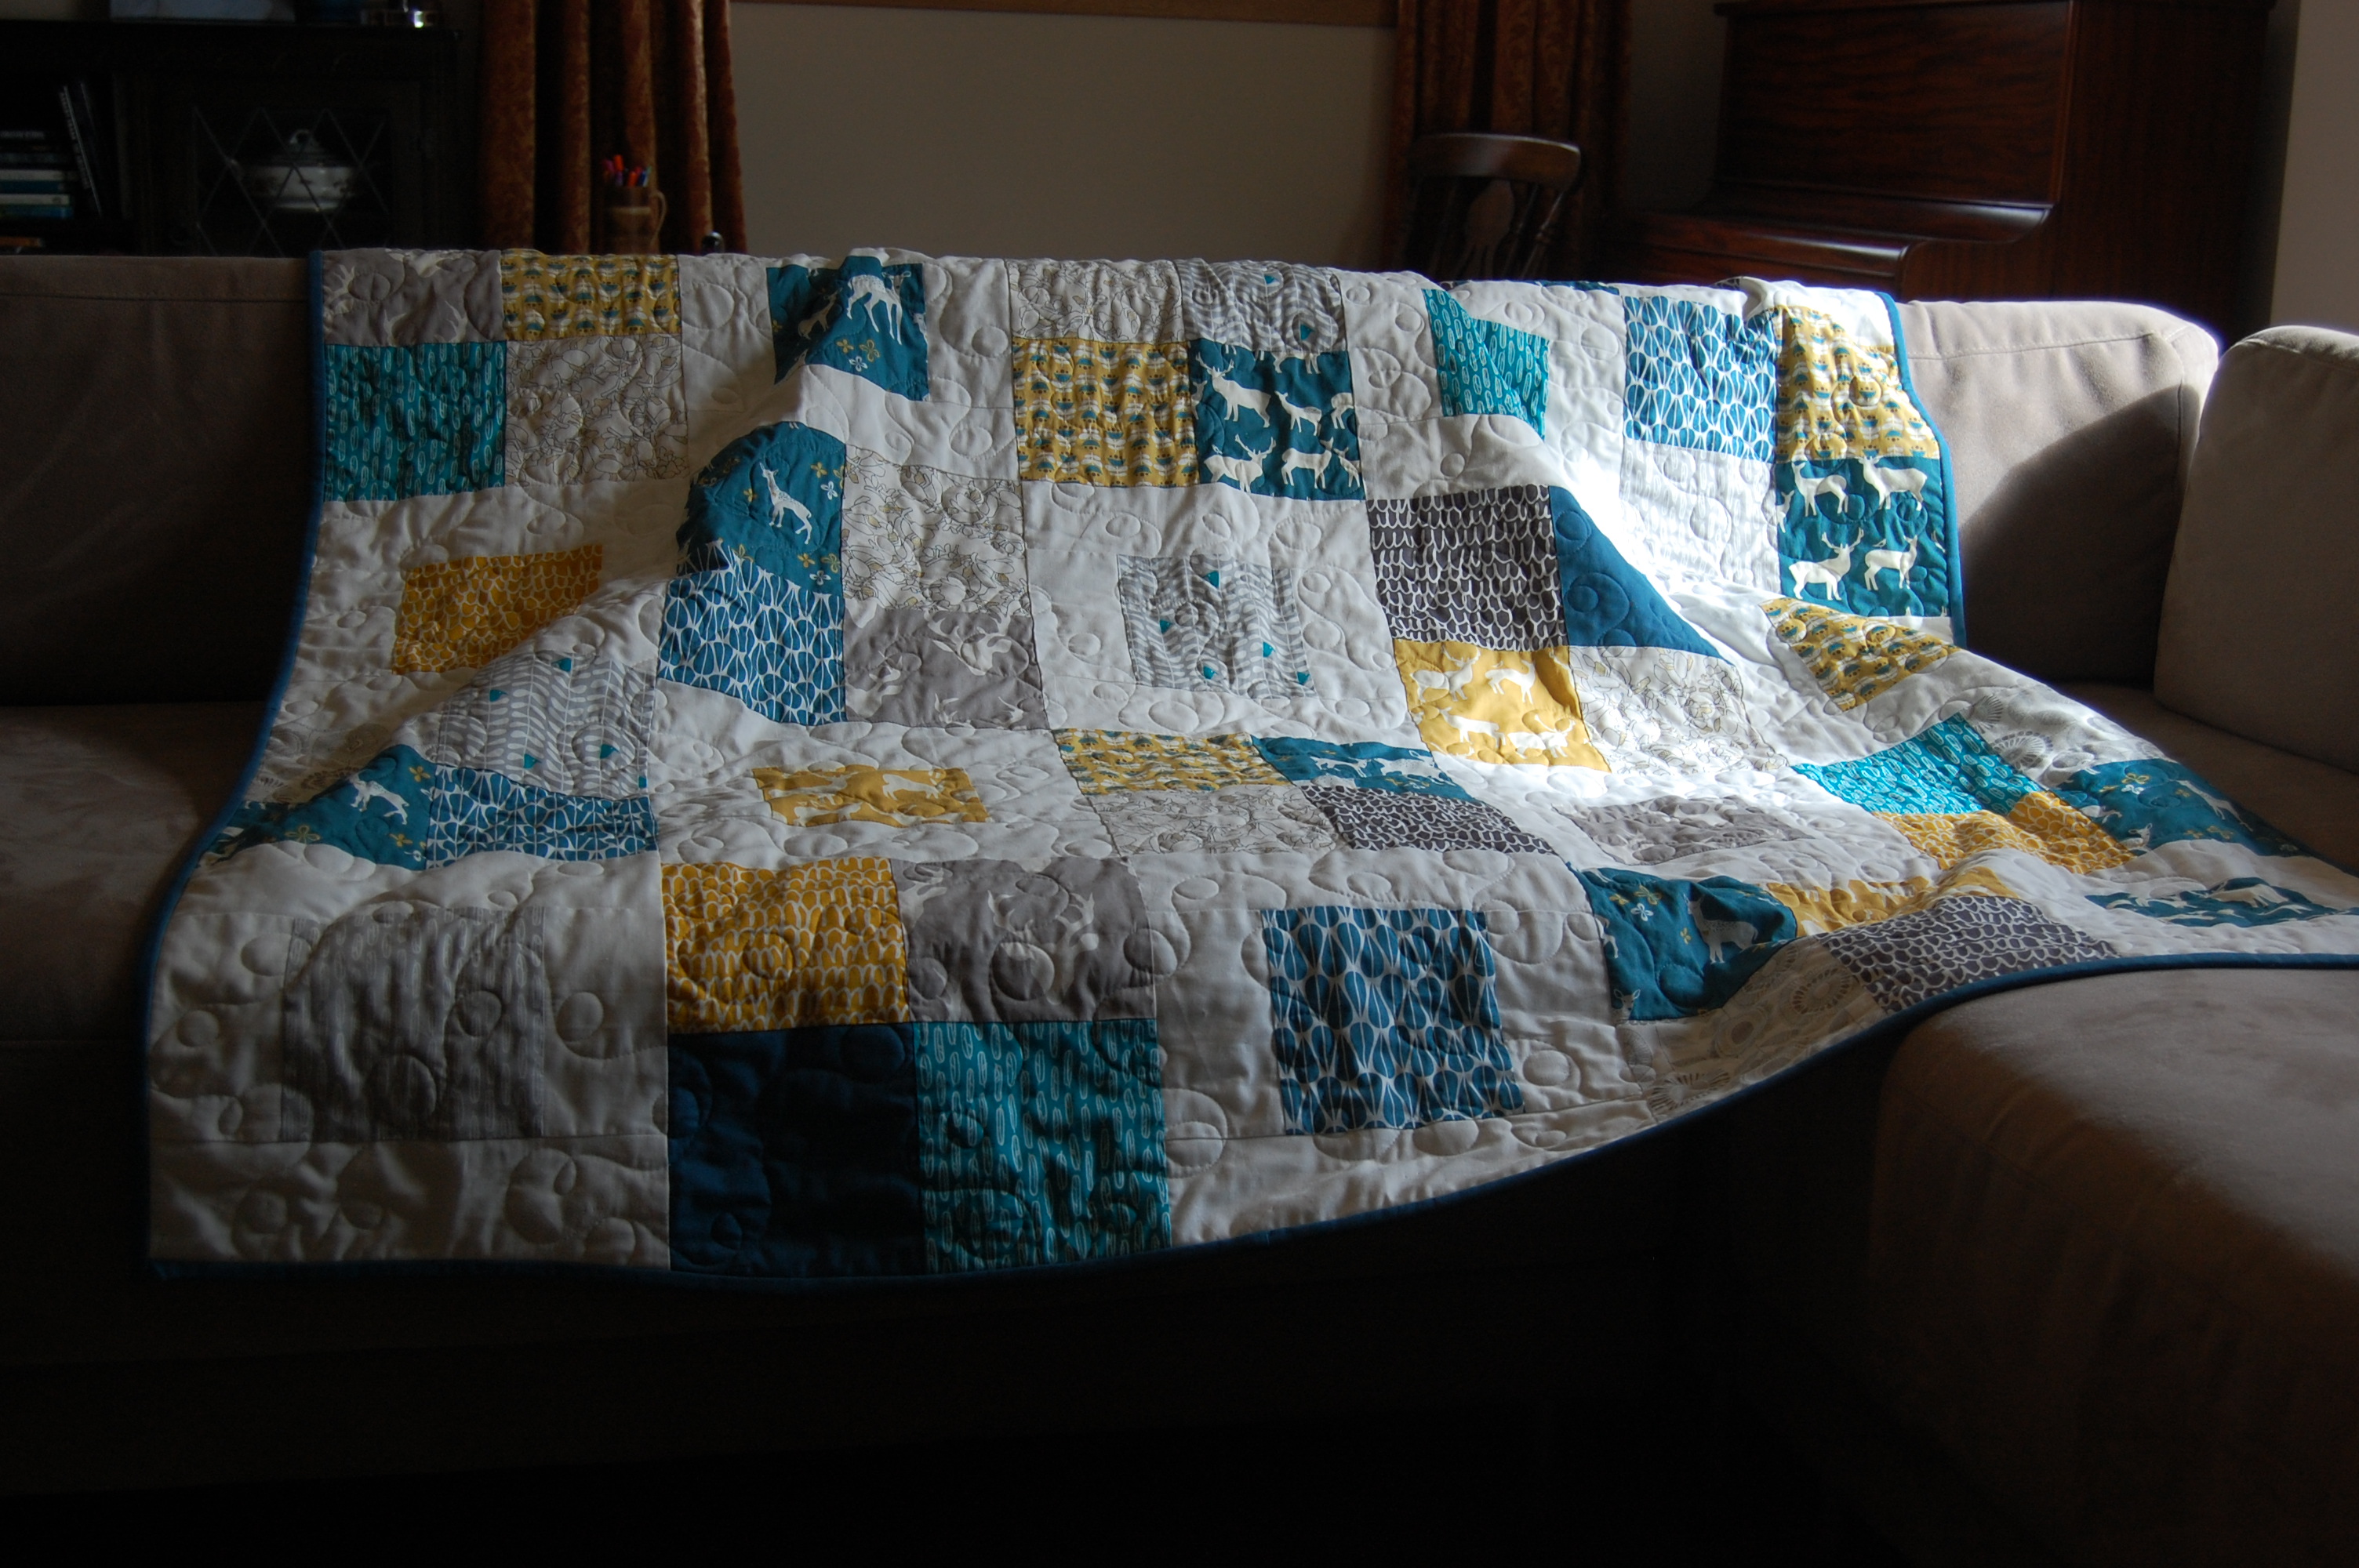
My good friend moved house recently and I really wanted to make them a throw quilt for their sofa. Their tastes are pretty clean and minimal; white, grey, subdued egg shell blue. They even manage to keep the children’s toys tidy! Ahem, yeah, just like me. 😉 And Ana seems to be slightly in love with the deer/ stag silhouette at the moment, which can be found in subtle places in their home – on a cushion, on a tea-towel and so on. So I set off through the UK online shops looking for a set of fabrics with a grown-up colour scheme, but bright enough to lift a room or grace a picnic – and preferably with a few deer too.
I have had this grey/ mustard/ teal colour scheme in my head for a while, and have been dying to make a quilt using it, so this seemed like the perfect opportunity. And, being the kind of fabric-obsessed web surfer that I am, I also immediately knew my best chance of finding modern, clean, grown up yet quirky prints. “M is for Make” is a really fabulous shop. The owner, Kate, has a definite style and fabric taste; the shop is full of modern, often geometric fabrics or stylised prints, but with a healthy dose of whimsy in there – not taking itself too seriously. Well I think so anyway – she’s like a “cool hunter”!
As you know, I most often quilt with precuts or collections – partly because there is no local quilt shop with a large selection of prints, partly because it is the cheapest way of getting a bit of lots of different fabrics, fat eighths only just being introduced in the UK (and fabric being twice as expensive as in the US). But choosing my own fabrics was SO. MUCH. FUN. And I was so thrilled to see that the colours on the computer did indeed match those on the fabrics I received. (Phew!)
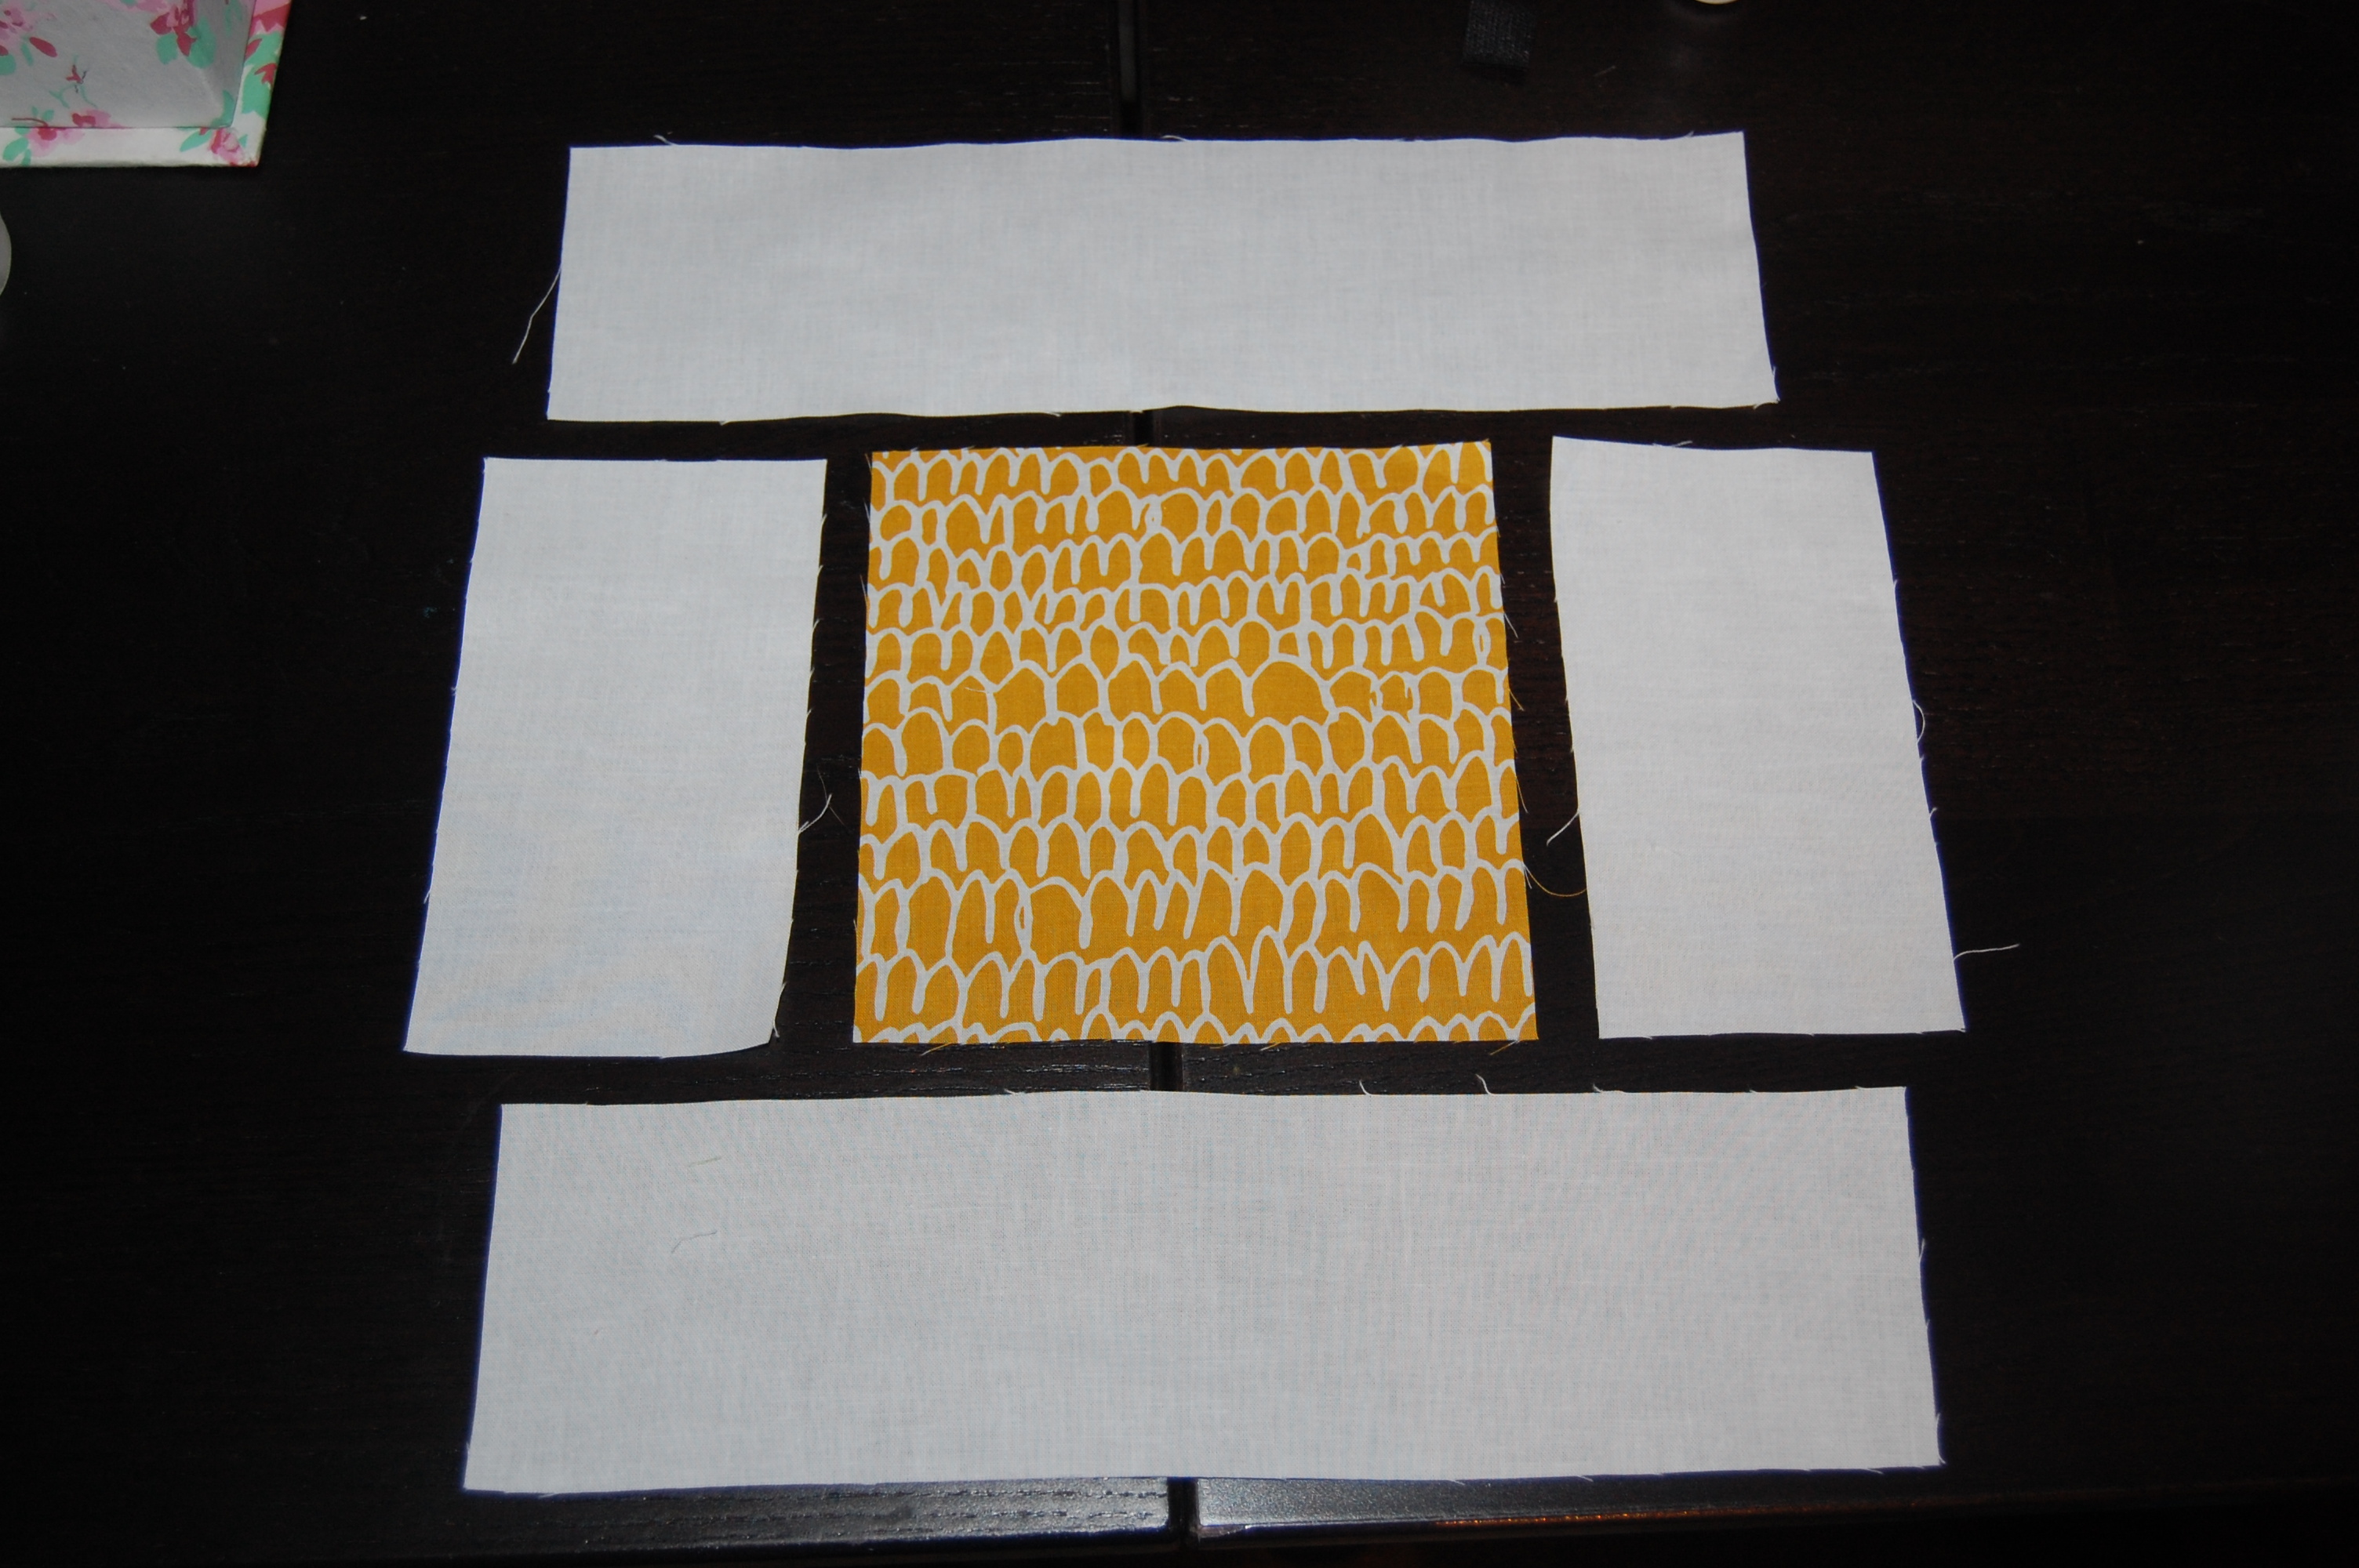
I had actually taken photos along the way in order to give you a bit of a tutorial and as an aide memoir for me for the next time, all of which are now fairy dust in the ether… although the construction is very simple and so it was probably unnecessary anyway. Here’s a bit of a guide, just in case you wanted the maths:
You will need for the quilt top (approx 55″ x 55″ finished) :
61 (sixty one) 6″ fabric squares.Assuming you have well-cut fat quarters and you can cut 9 (nine) 6″ squares from each one, you only need 7 fat quarters. Not all fat quarters are that well cut. If you had more fat quarters, you would have fabric left over but would end up with more variety in your quilt. I had 14 different fat quarters and have fabric left over.
A yard of white background fabric, cut into 3.25″ strips.
rotary cutter, decent ruler, thread etc etc you know the drill!
Cutting and assembly:
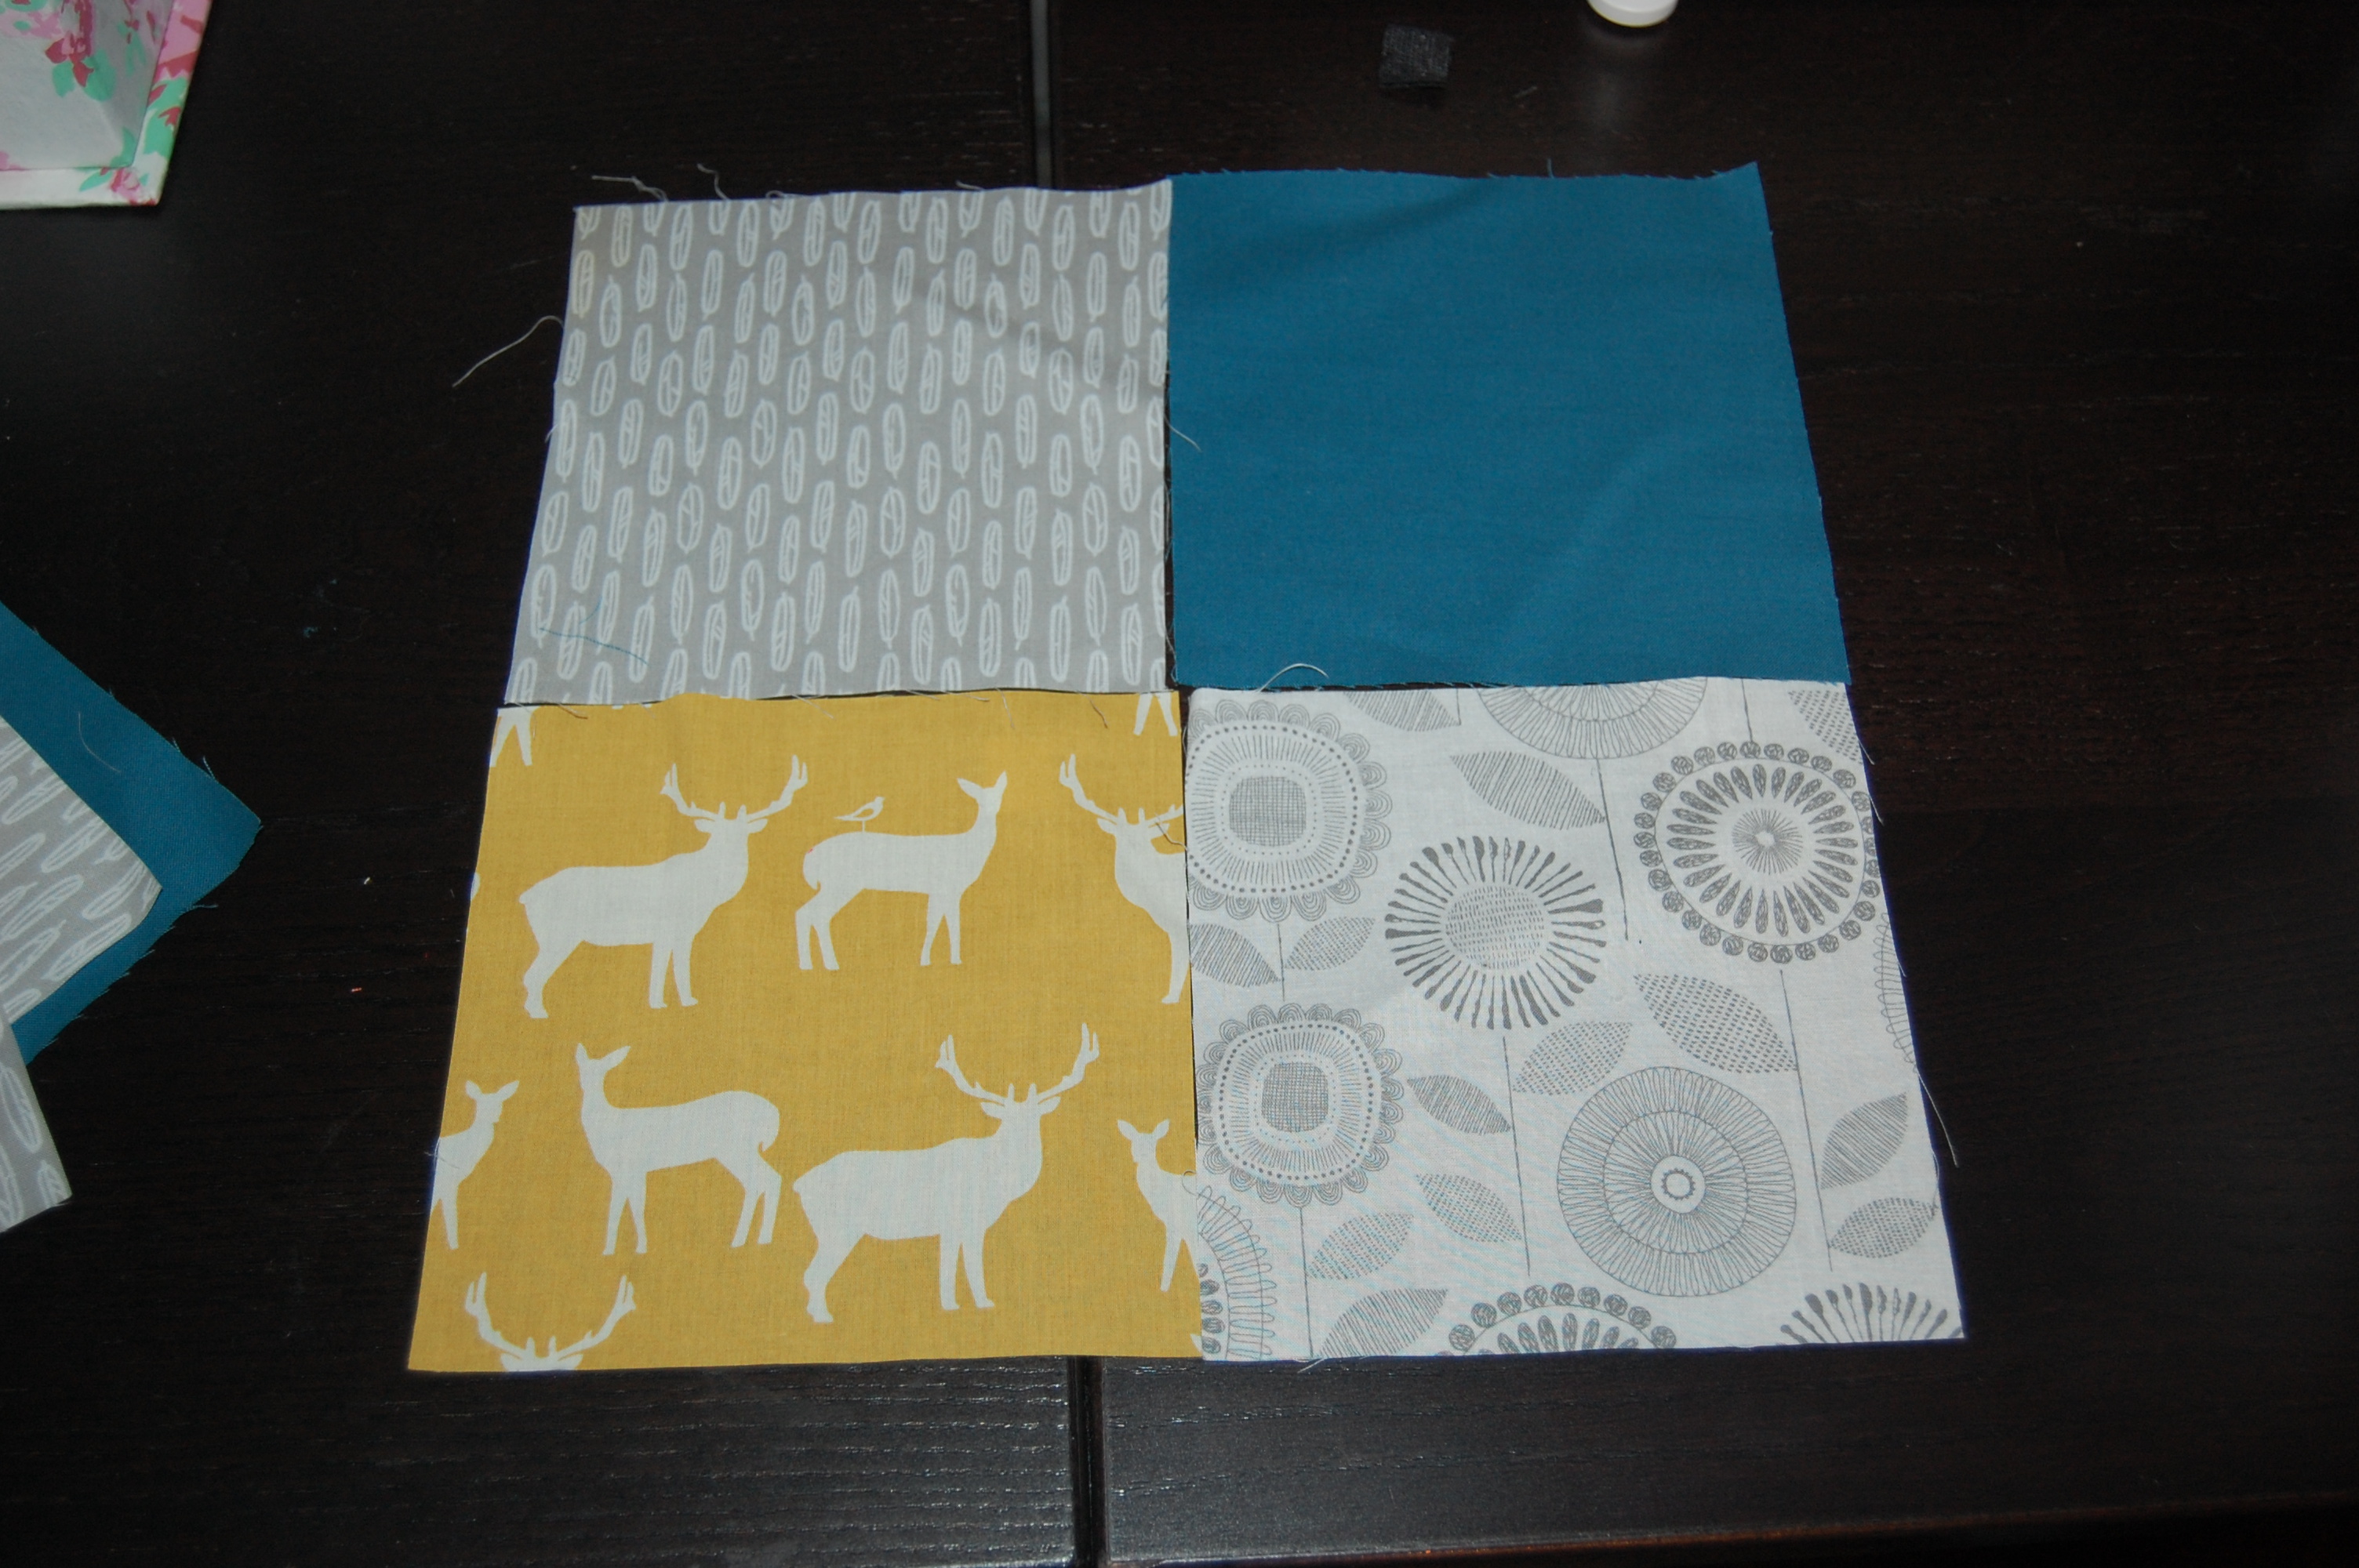
The quilt is made from 2 blocks. Sew everything together using a scant 1/4″ seam allowance.
Block A is a basic 4-patch. Take 2 of your 6″ squares and sew together, RST. Repeat with another 2 squares , open both out and sew together into a 4-patch. You need 12 of these.
2. For Block B,
You need to subcut your 3.25″ wide white strips into 26 (twenty six) 6″x 3.25″ rectangles and 26 (twenty six) 11.5″ x 3.25″ rectangles.
Then take a 6″ x 3.25″ rectangle and sew onto the side of a 6″ square. Repeat on the other side. Then sew a 11.5″ x 3.25″ rectangle to the top and bottom, finishing the block.
You will need 13 of these blocks.
3. Easy peasy! Really at this point you should check all your blocks are the same size. They should all measure 11.5″ square. but seam allowances being what they are when the fascist quilt police are looking the other way, they may not all be the same. It’s okay. Find your smallest block and trim them to be all the same size; even if that is 11.25″ or 11″, it’s better than not being able to sew your quilt together or it not lying flat when it comes to basting.
4. And now sew together, alternating block Band block A in a 5 x 5 grid, as below. Very simple 🙂
I decided not to put on a border, and just bound it in the beautiful Kona solid in teal. I used the number print from Ikea on the back, which looks great with this quilt – and such a bonus that it is 60″ wide, has a nice soft handle and is very cheap!
I used my favourite Quilter’s Dream Orient for the batting, which gives it a gorgeous snuggliness and drape, and quilted it in a freemotion all-over loop-de-loop pattern.
Obviously my house is not a Scandinavian inspired, white minimalist and modern looking house, so I appreciate that my sofa doesn’t suit this little quilt really -but I’m sure my friend’s sofa will!
Oh I nearly forgot to tell you the fabrics! They were mostly from the collections Yoyogi park by Heather Moore for Cloud 9 fabrics, Mod Basics from Birch Fabrics, Westwood by Monaluna fabrics, the Kona teal and a lovely fabric from Botanics collection Carolyn Friedlander. I could have just kept adding fabrics from that shop I really could, but tried to be restrained.
Incidentally, the lovely Kate from “M is for Make” instagrammed my order picture and it got so many “likes” that she made some of them into a bundle called “forest bundle”. You can see it here if you are interested:
Right, I had better get off to bed. Why does the bloggy muse always float by so darn late in the evening? Hopefully my dreams will be filled with teal fabrics and peaceful deer tonight. May yours be too!
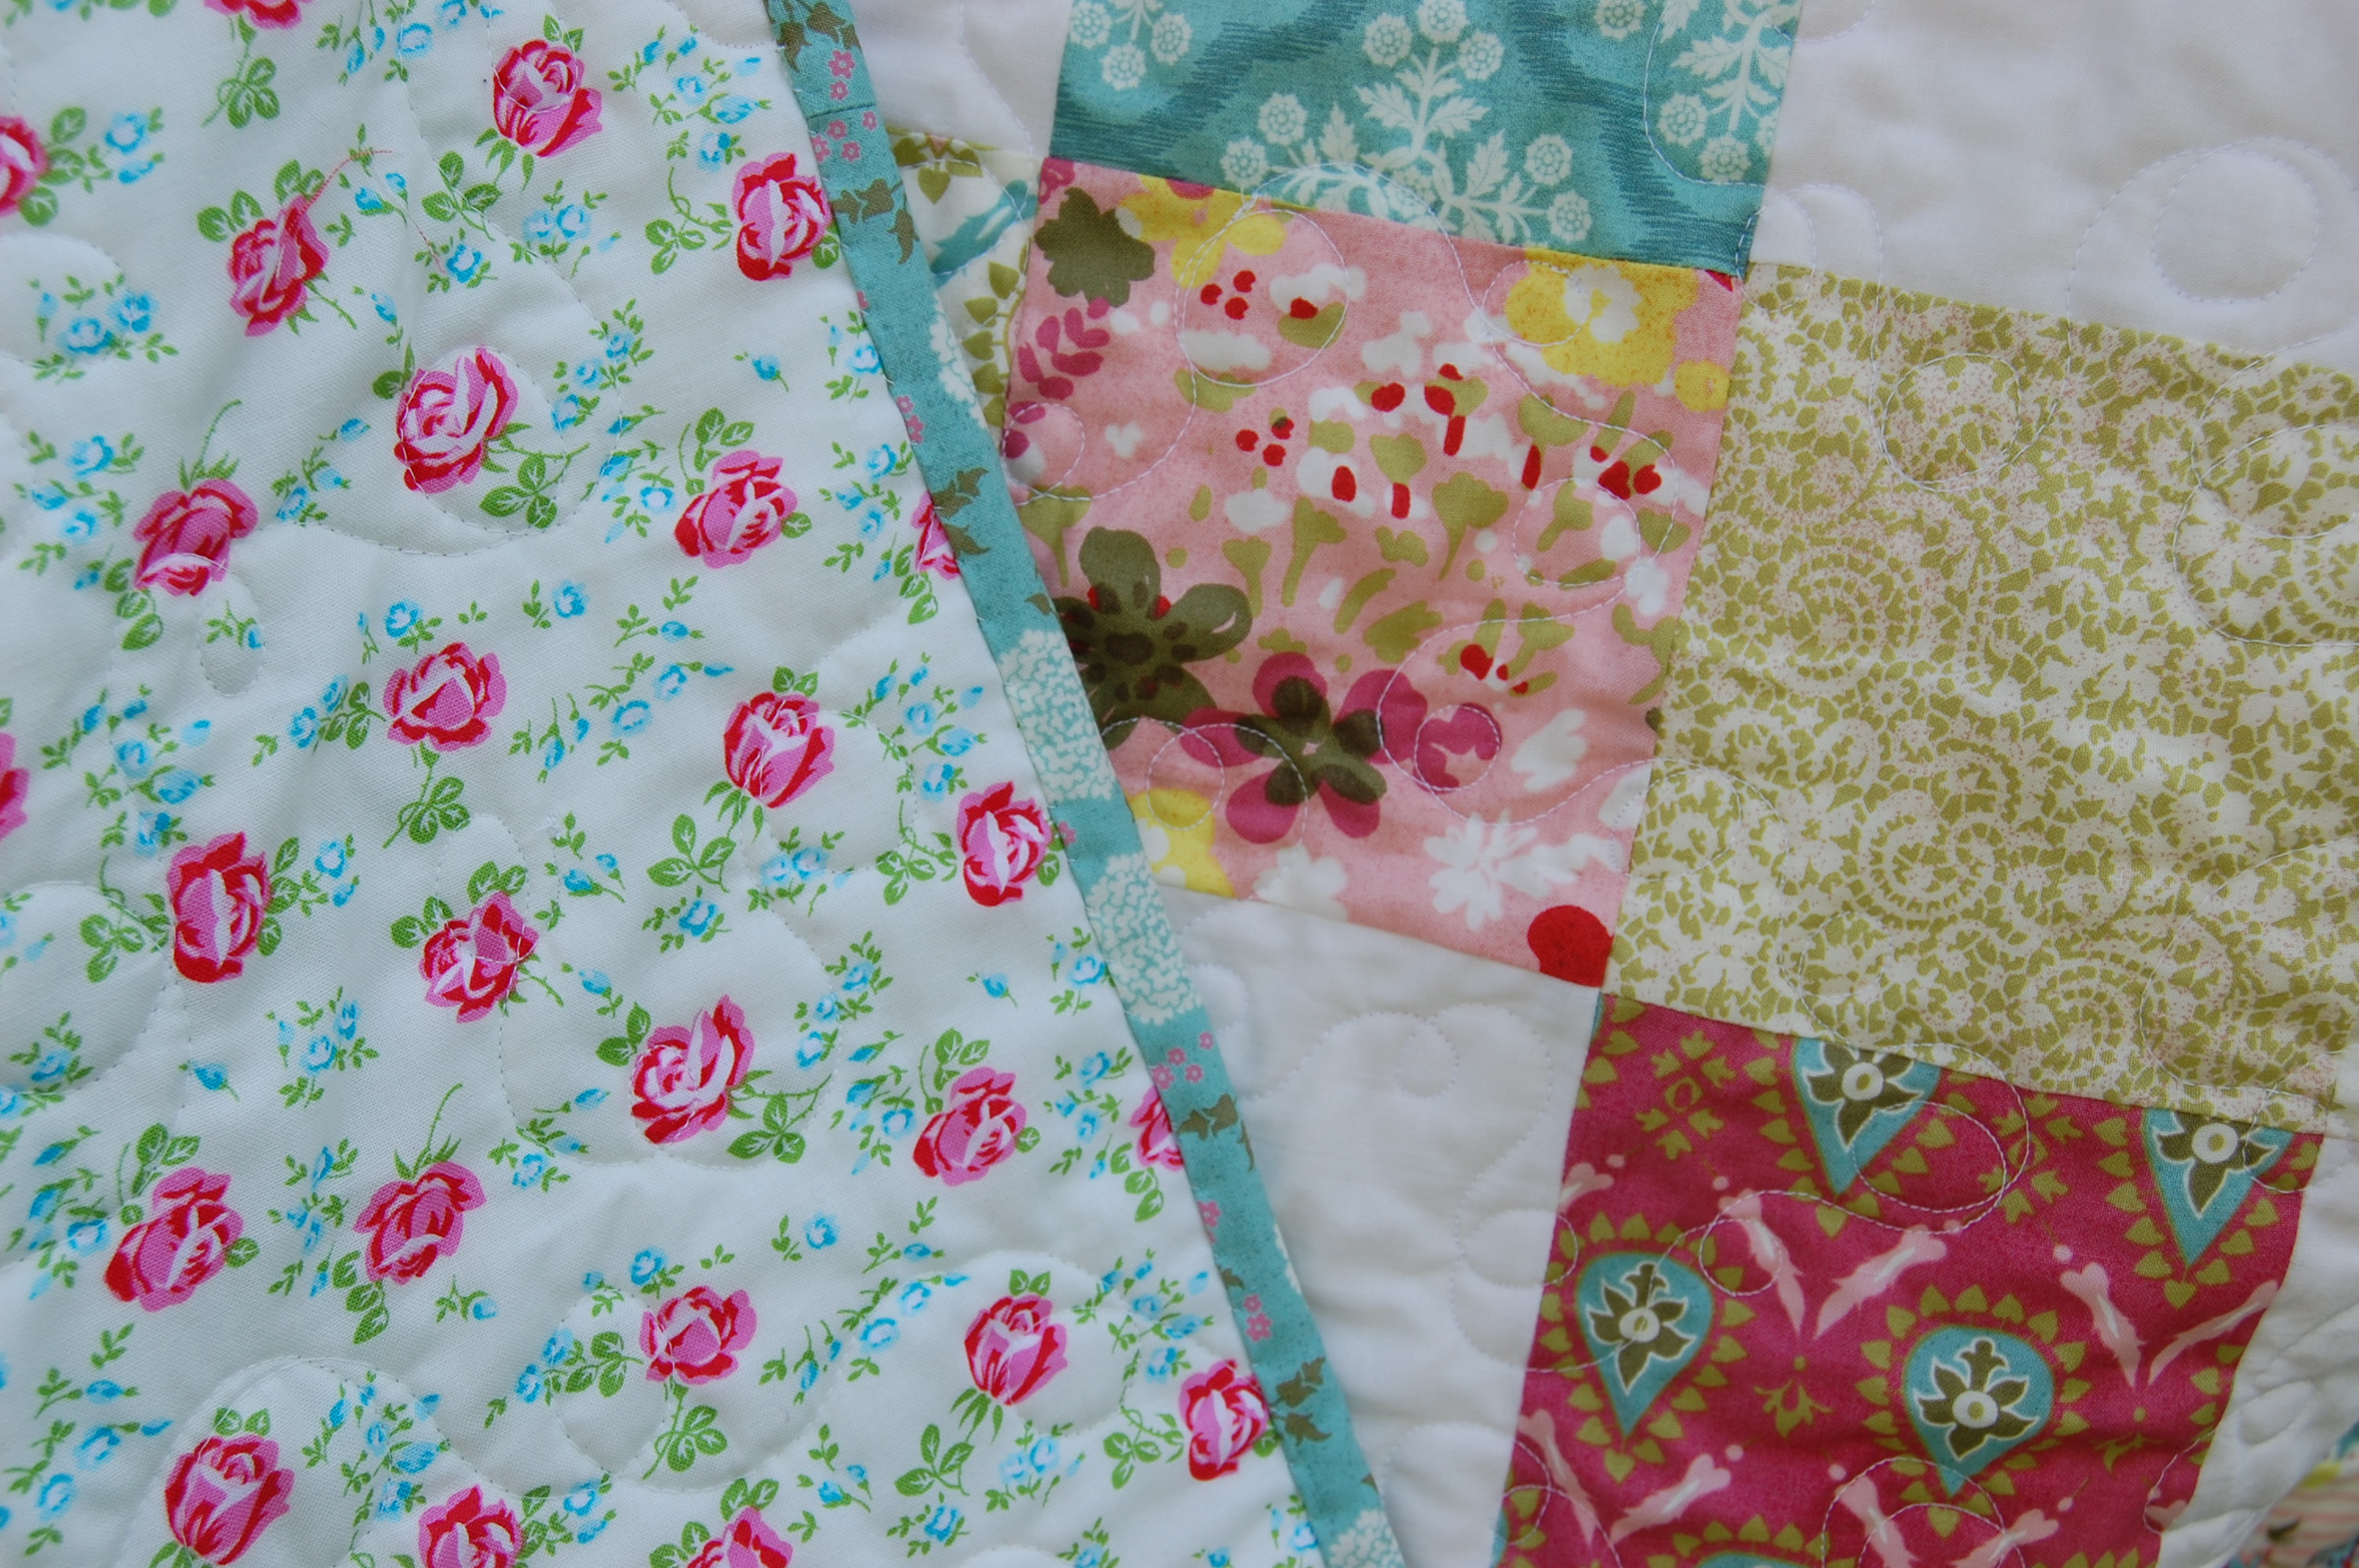
… are the perfect combination. At least when it comes to quilts.
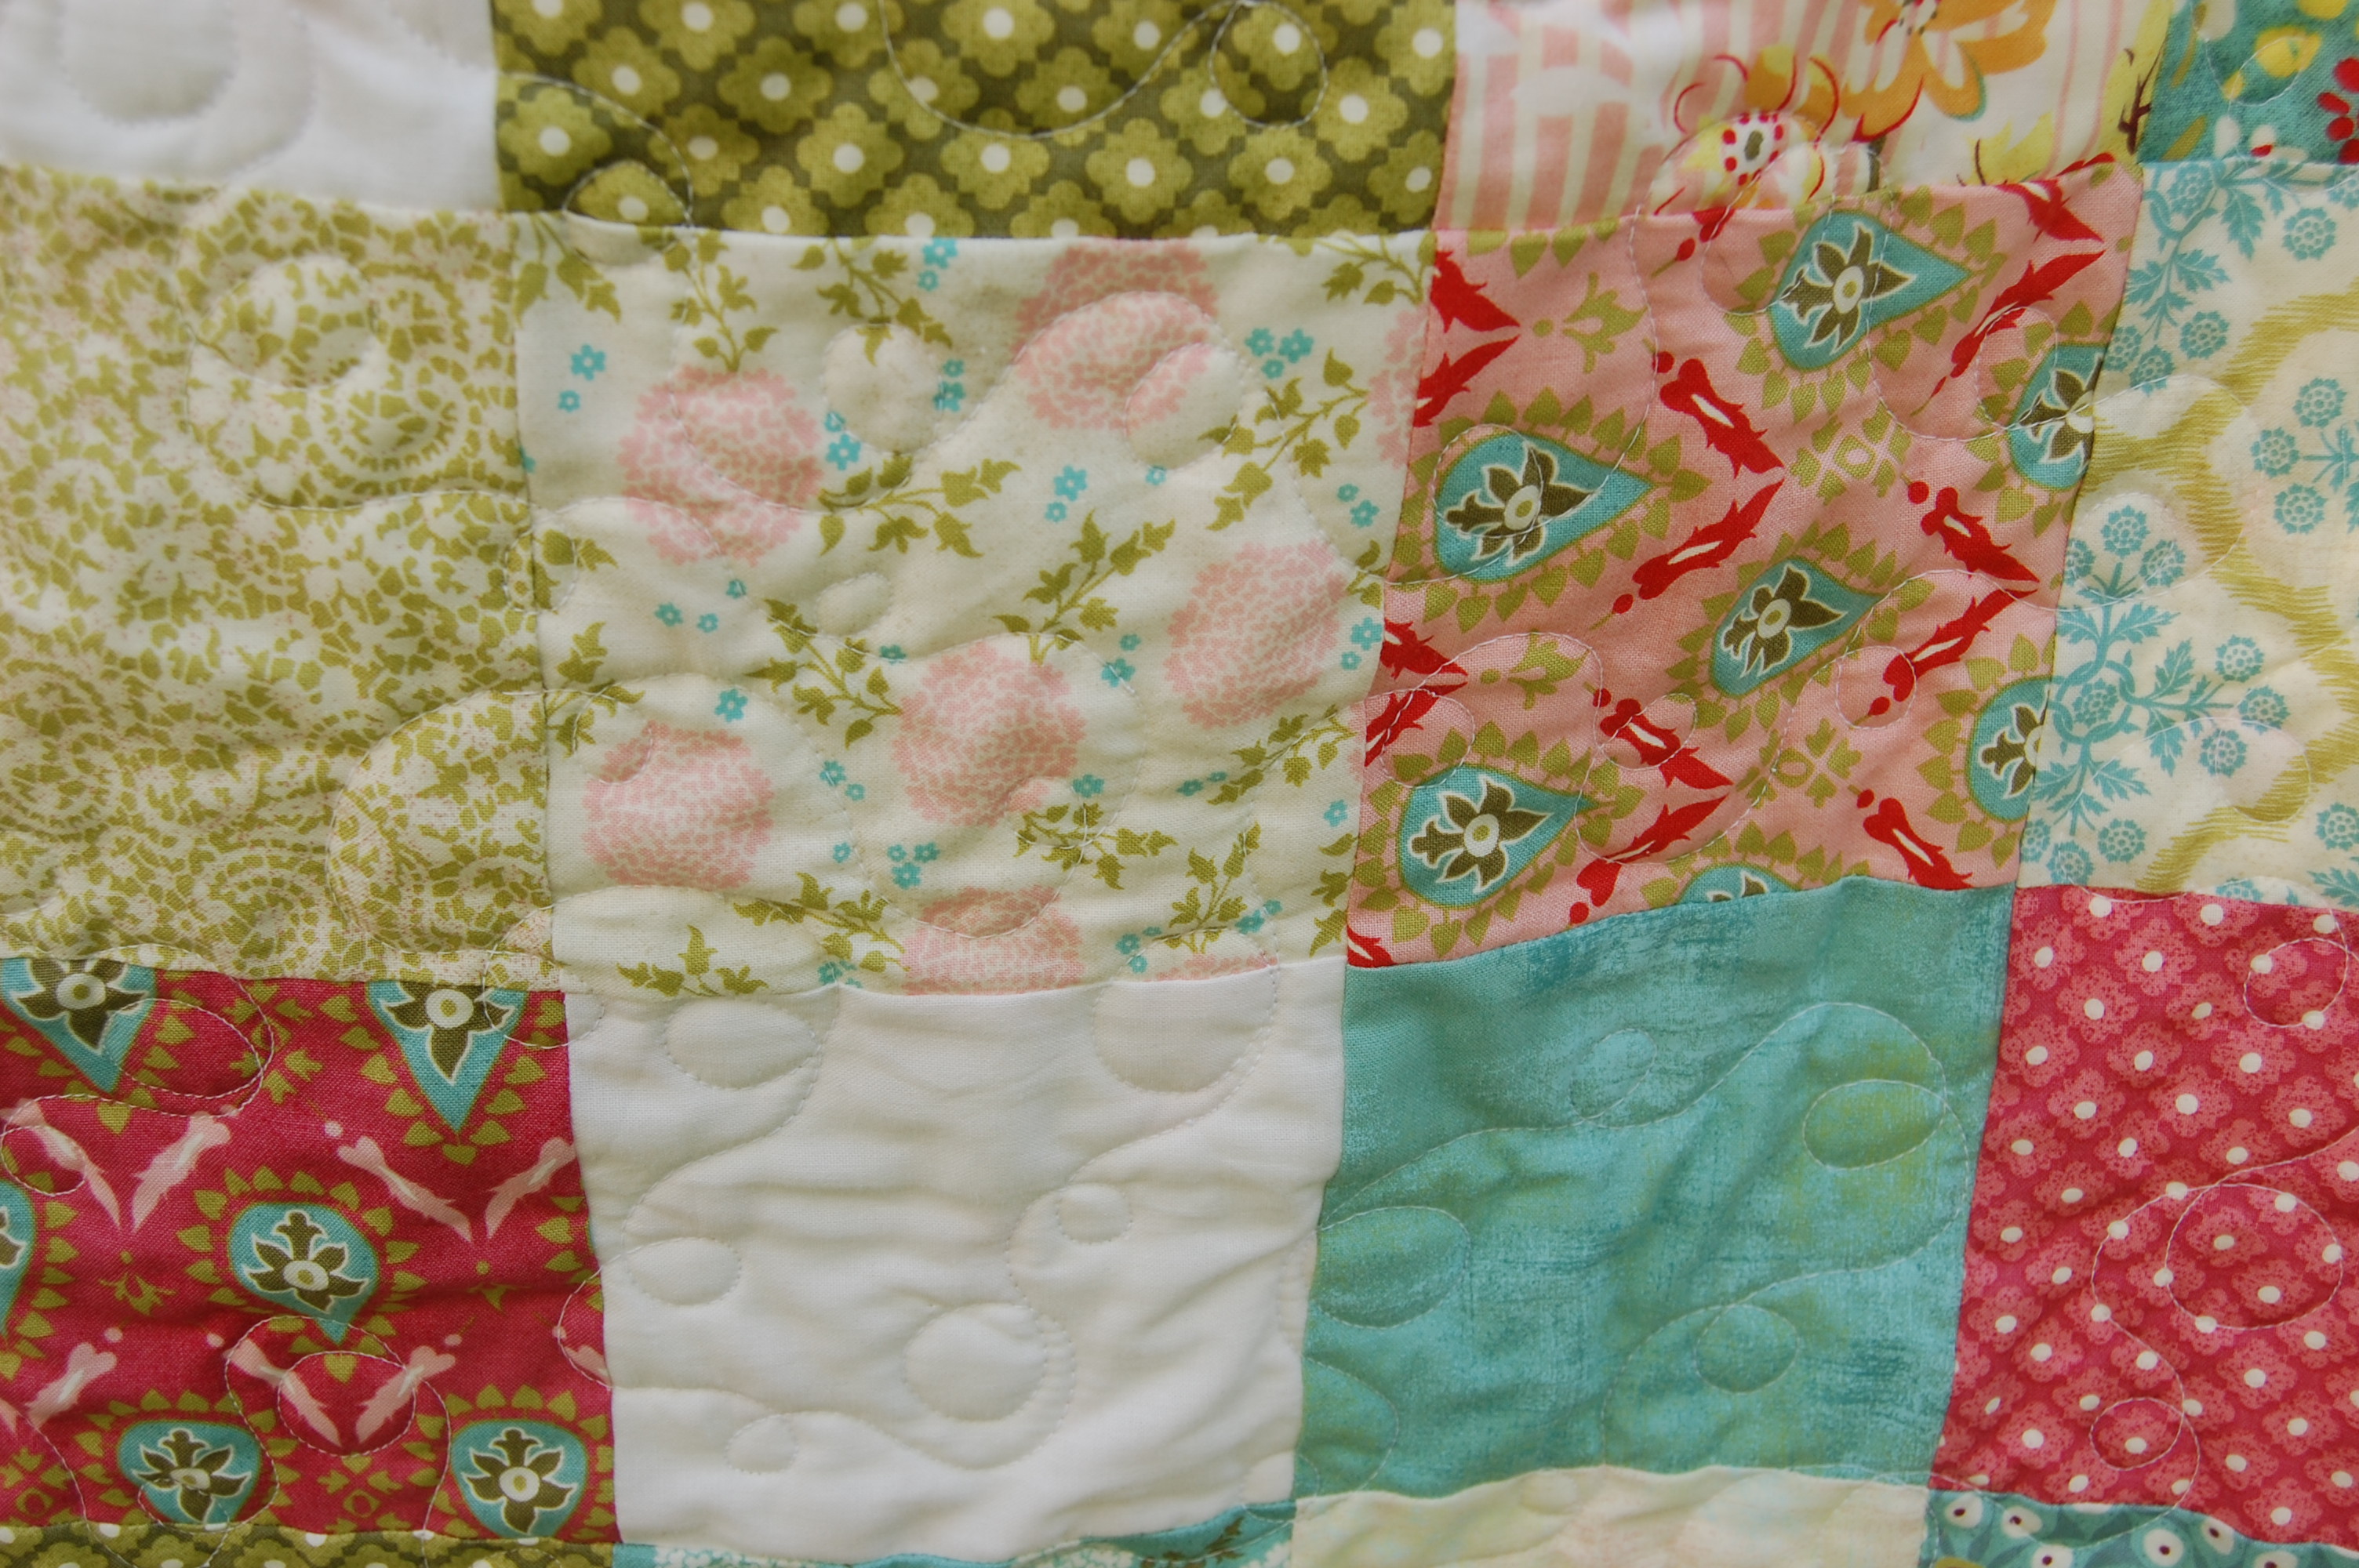
See? Clearly I have no need to further extoll the virtues of the Hello Luscious collection by Basic Grey for Moda, but apparently I’m going to. I LOVE it. If it had a scent it would smell of jasmine, freshly cooking doughnuts, baked peaches in brown sugar and syrup and vanilla ice cream. Outside on a warm summers day with the smell of cut grass faintly in the background. And a Pimms for the grown-ups. Hmmm. Seems I’m getting distracted daydreaming about the Scottish summer (it’s June! I need a shaman to come and do a sun dance. we have plenty rain this year), so will move on.
It’s such an old collection now that’s it’s super-hard to find. If you have any girls in your life and you find some, even one charm pack, snap it up because said daughter will always love it. I stashed a few charm packs, despite having no daughter – I used 2 for this quilt.
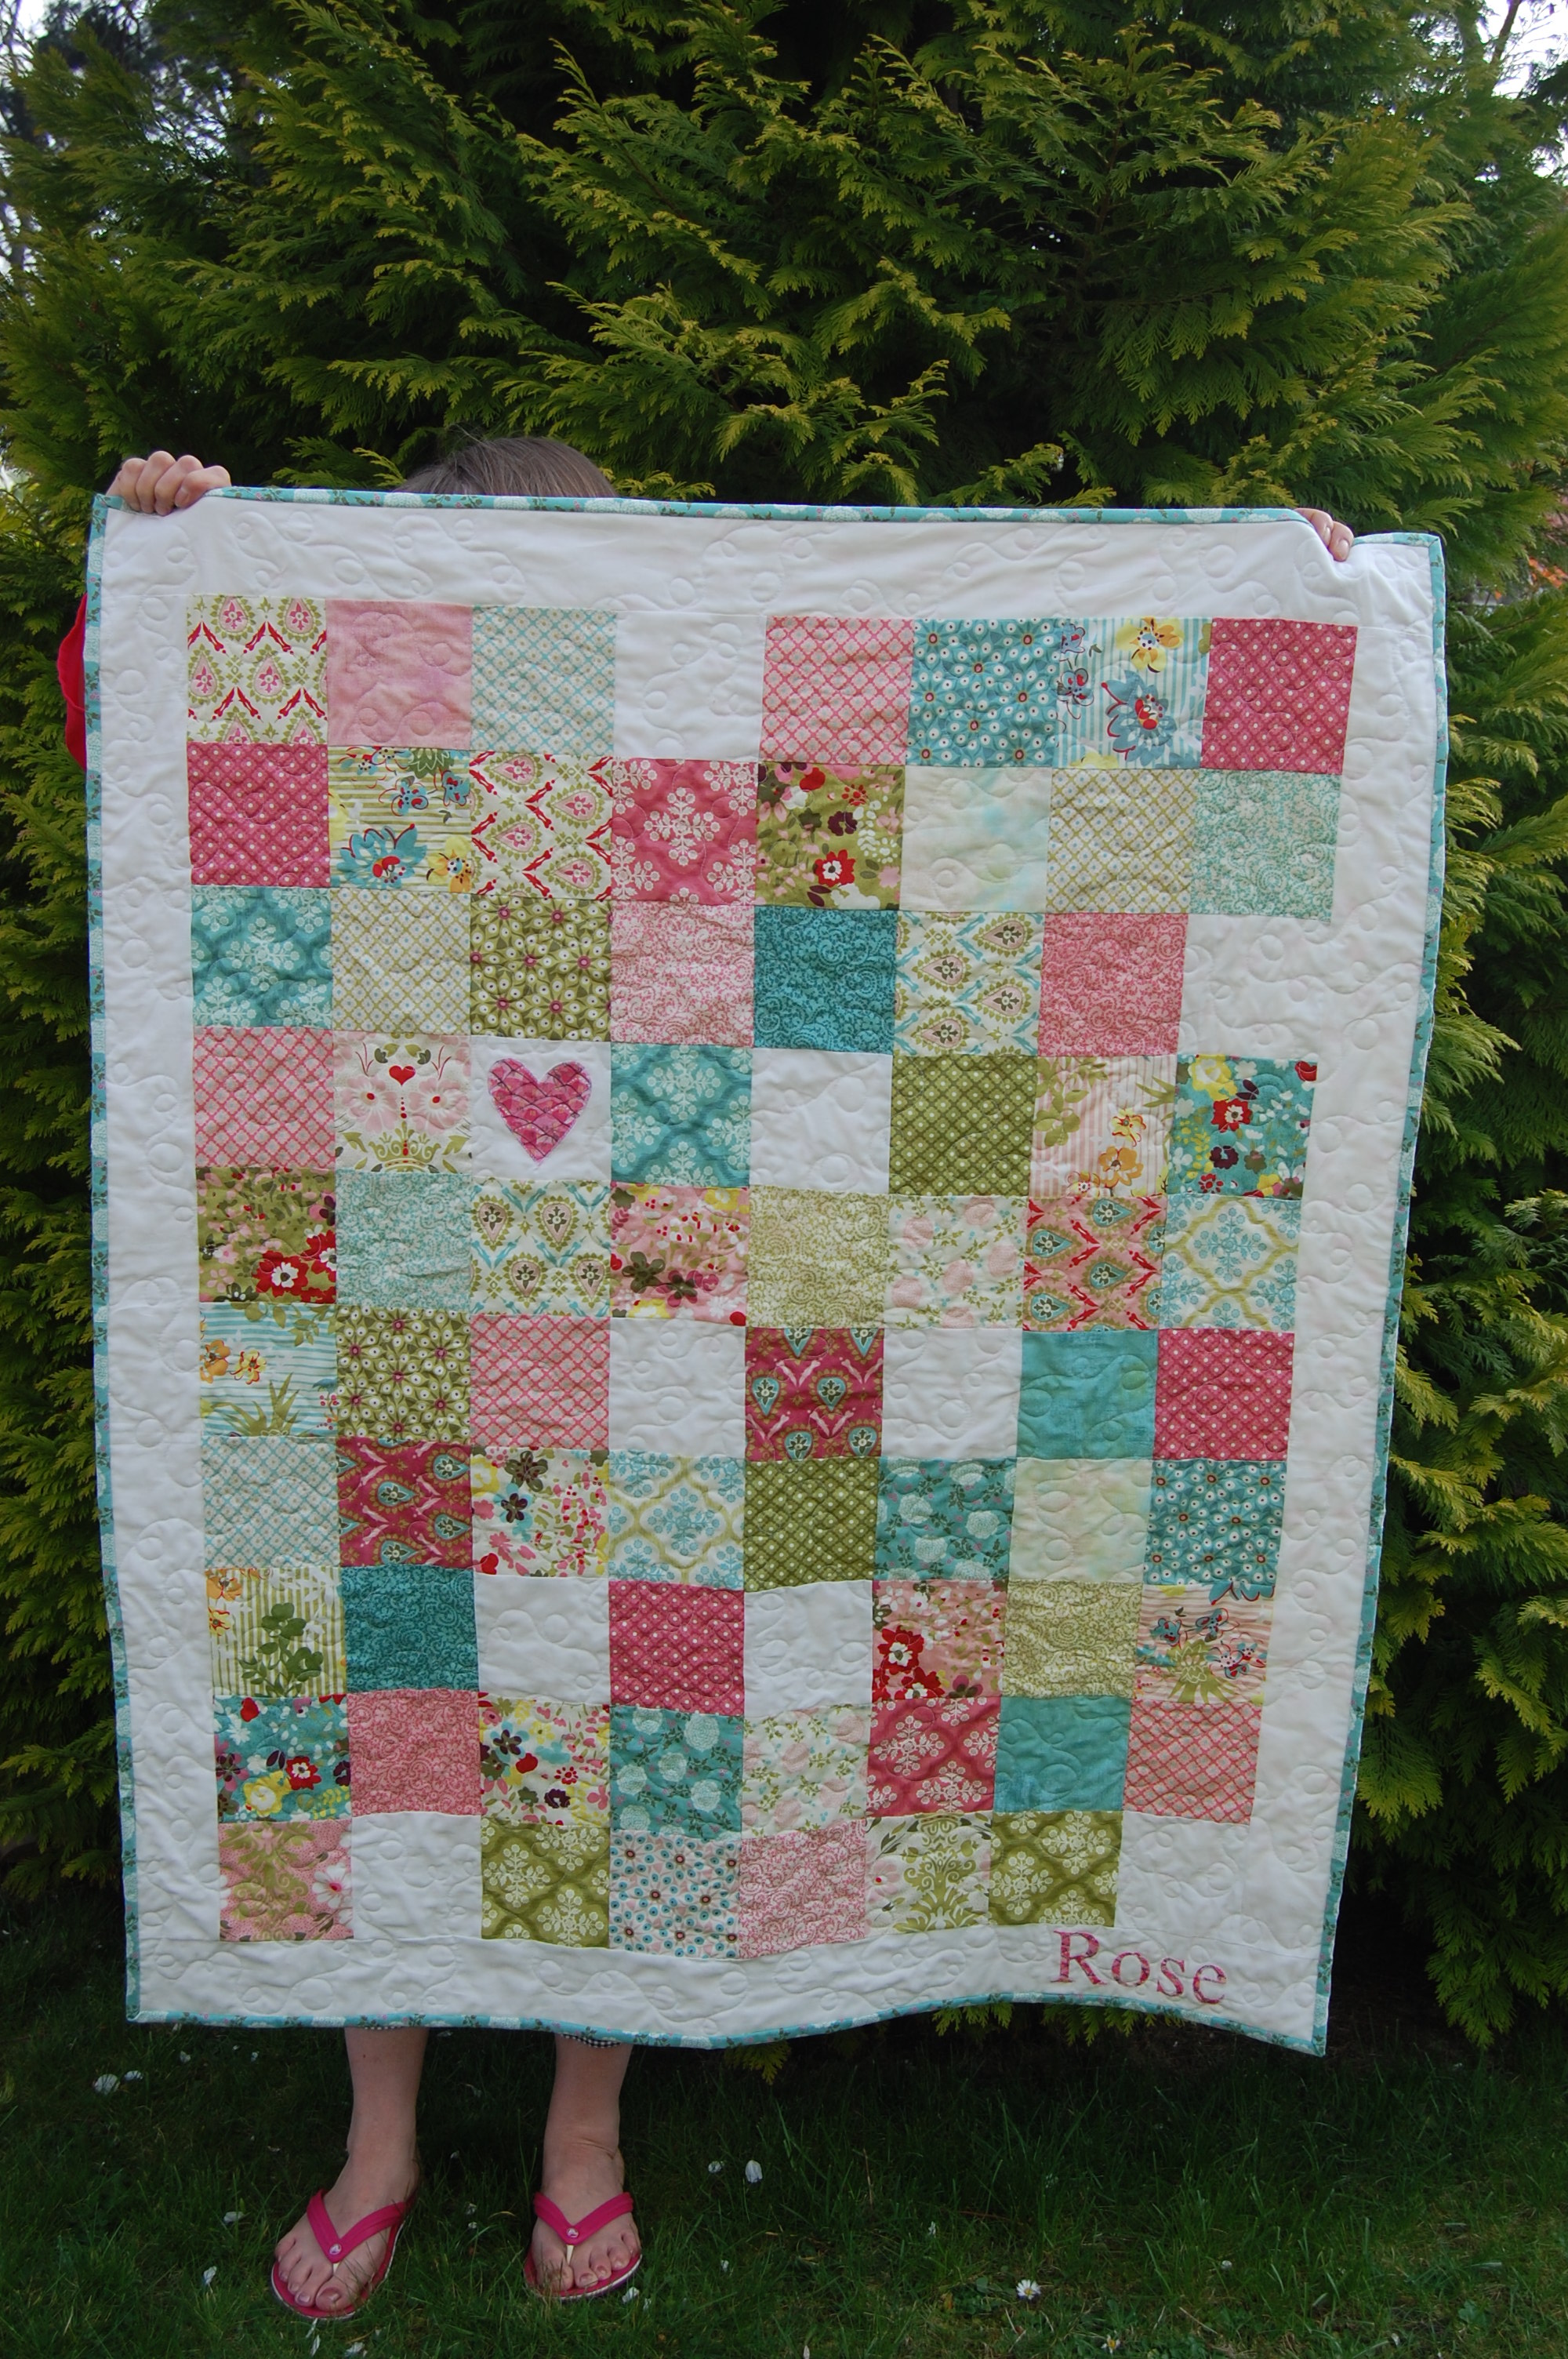
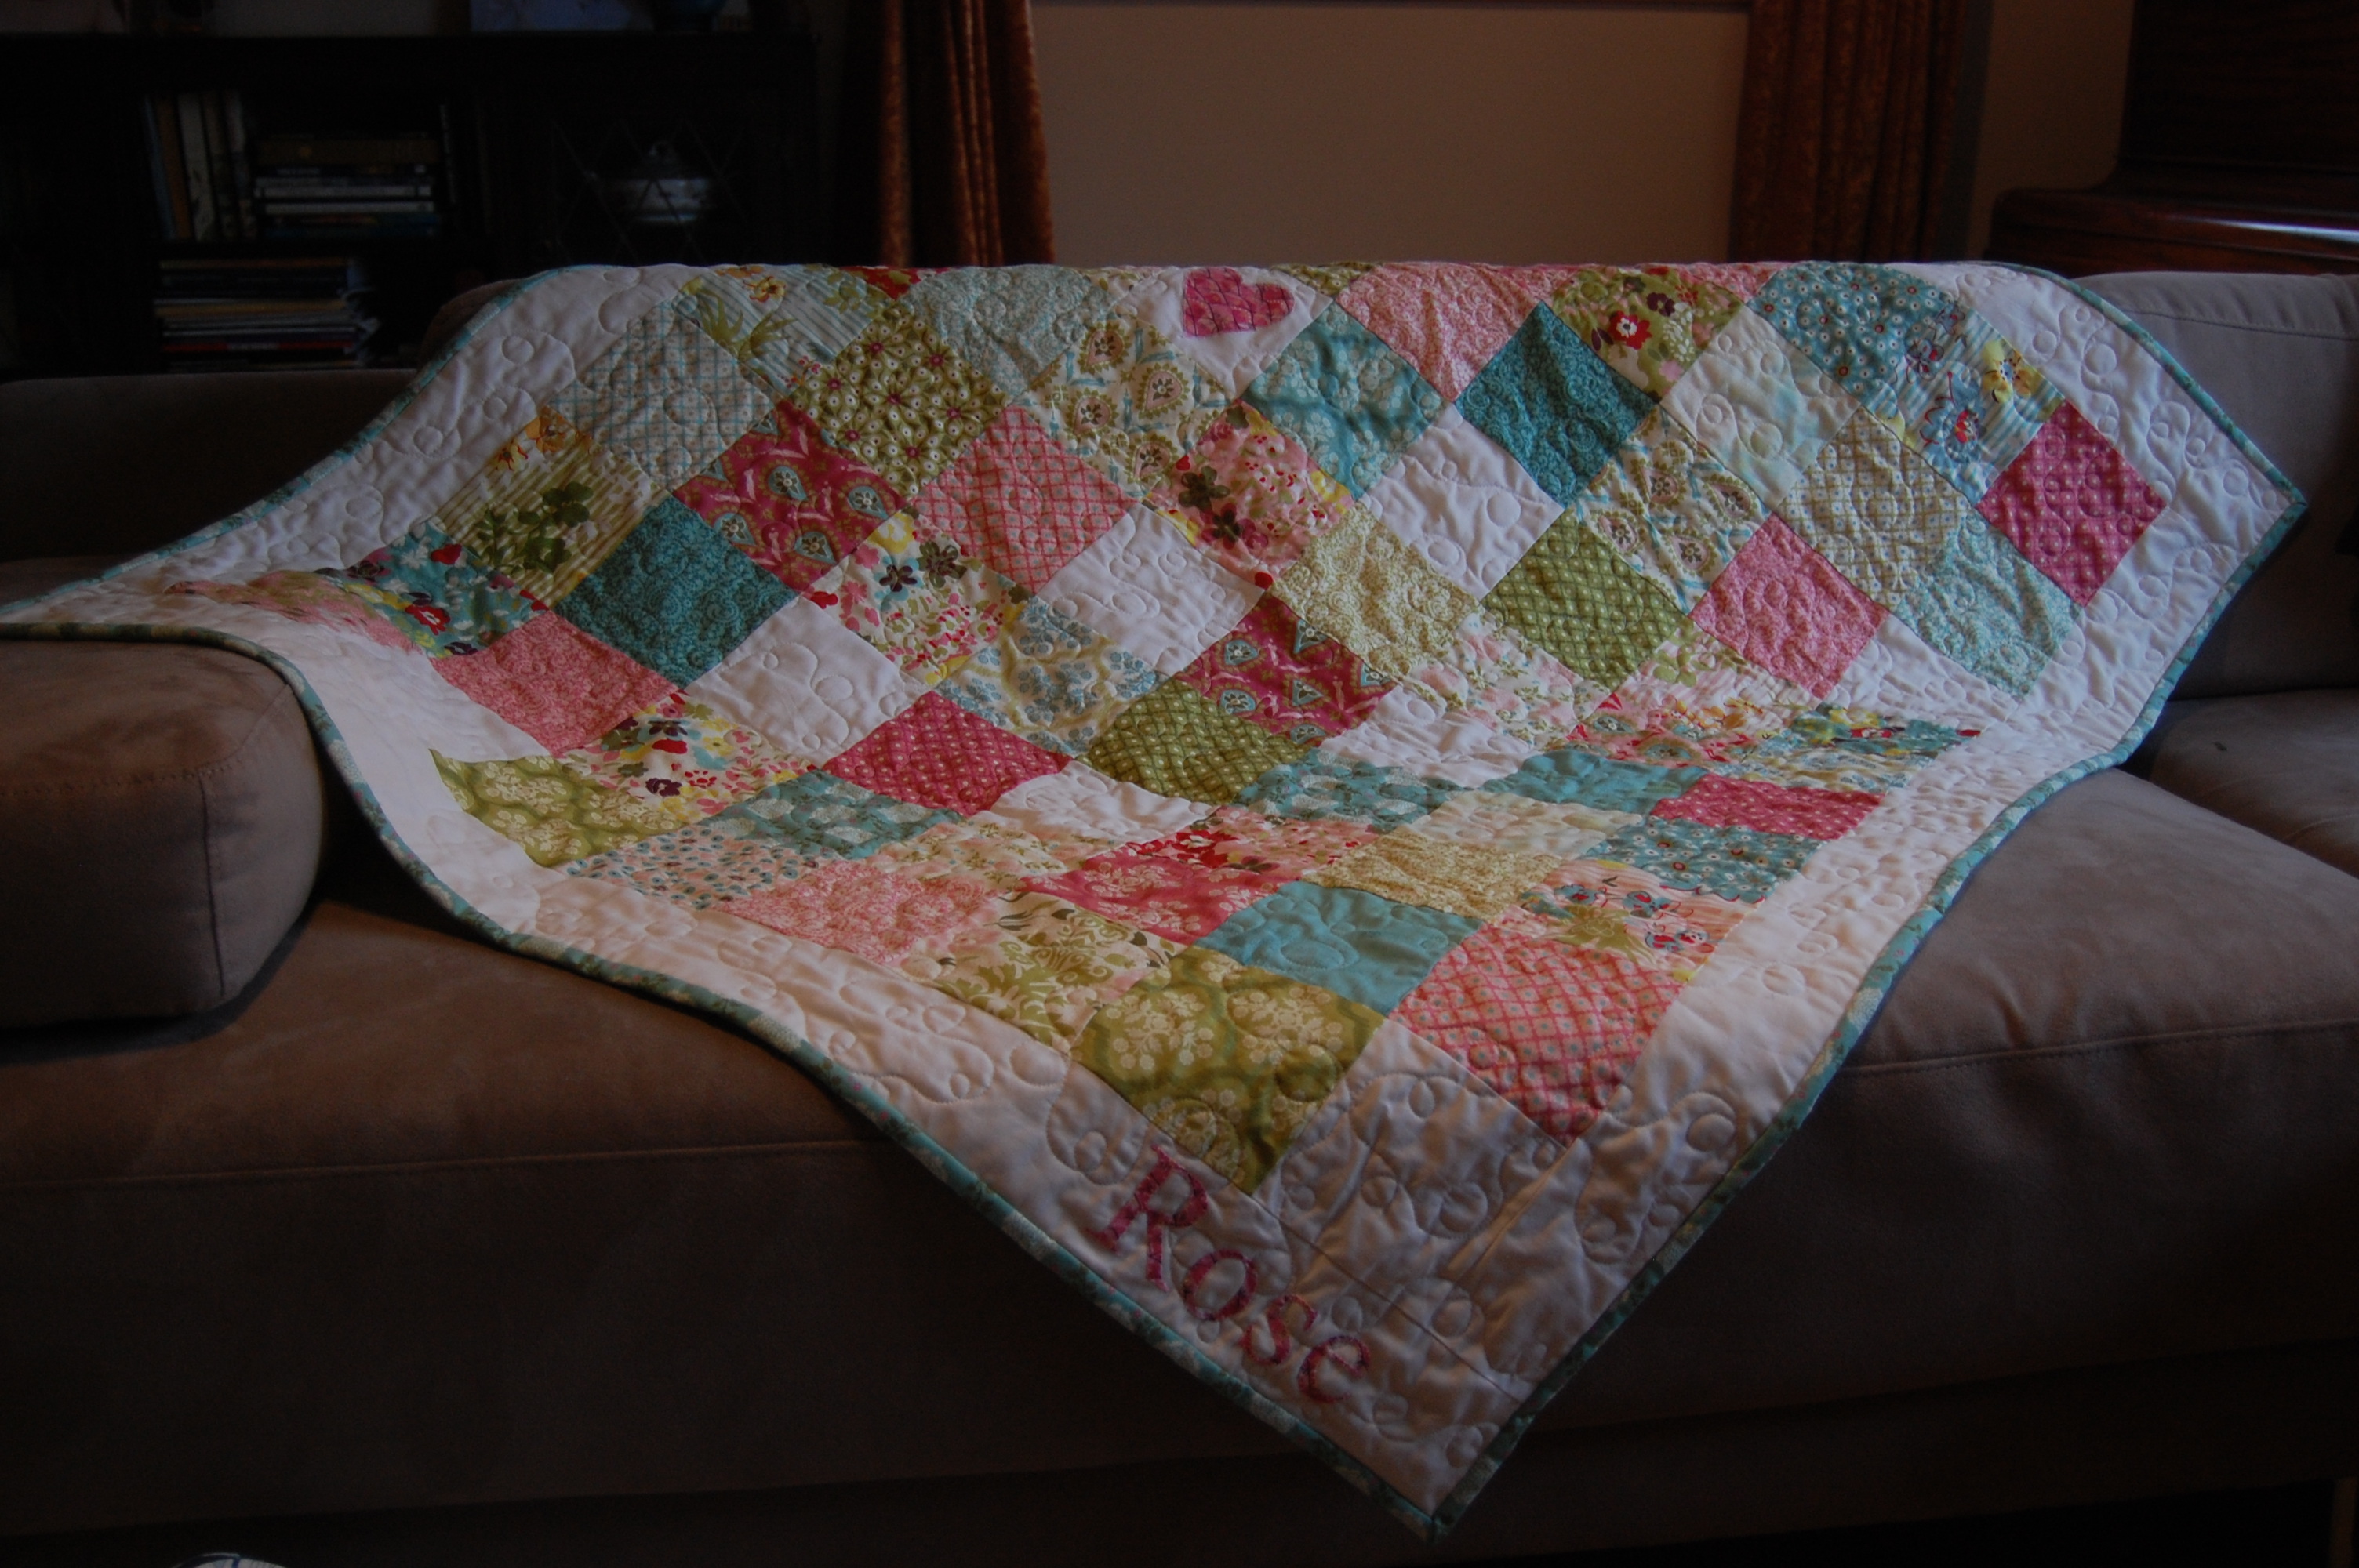
Pretty colours and patterns huh? Not too babyish and will grow with a girl until – well probably forever. Definitely late teens. I did take out some of the greens and replace them with white squares (cut from stash). I’m not a huge green fan and although I like it in this collection, I felt the balance was slightly off for my tastes. And I feel the colours are so rich and well, luscious, together that they somehow can seem a bit “muddy” when all together – hence replacing the greens with some white. It definitely made the rest of the colours “pop”.
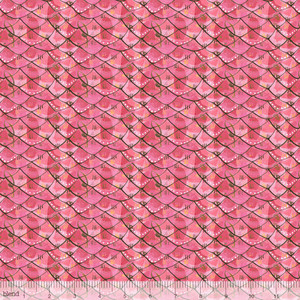
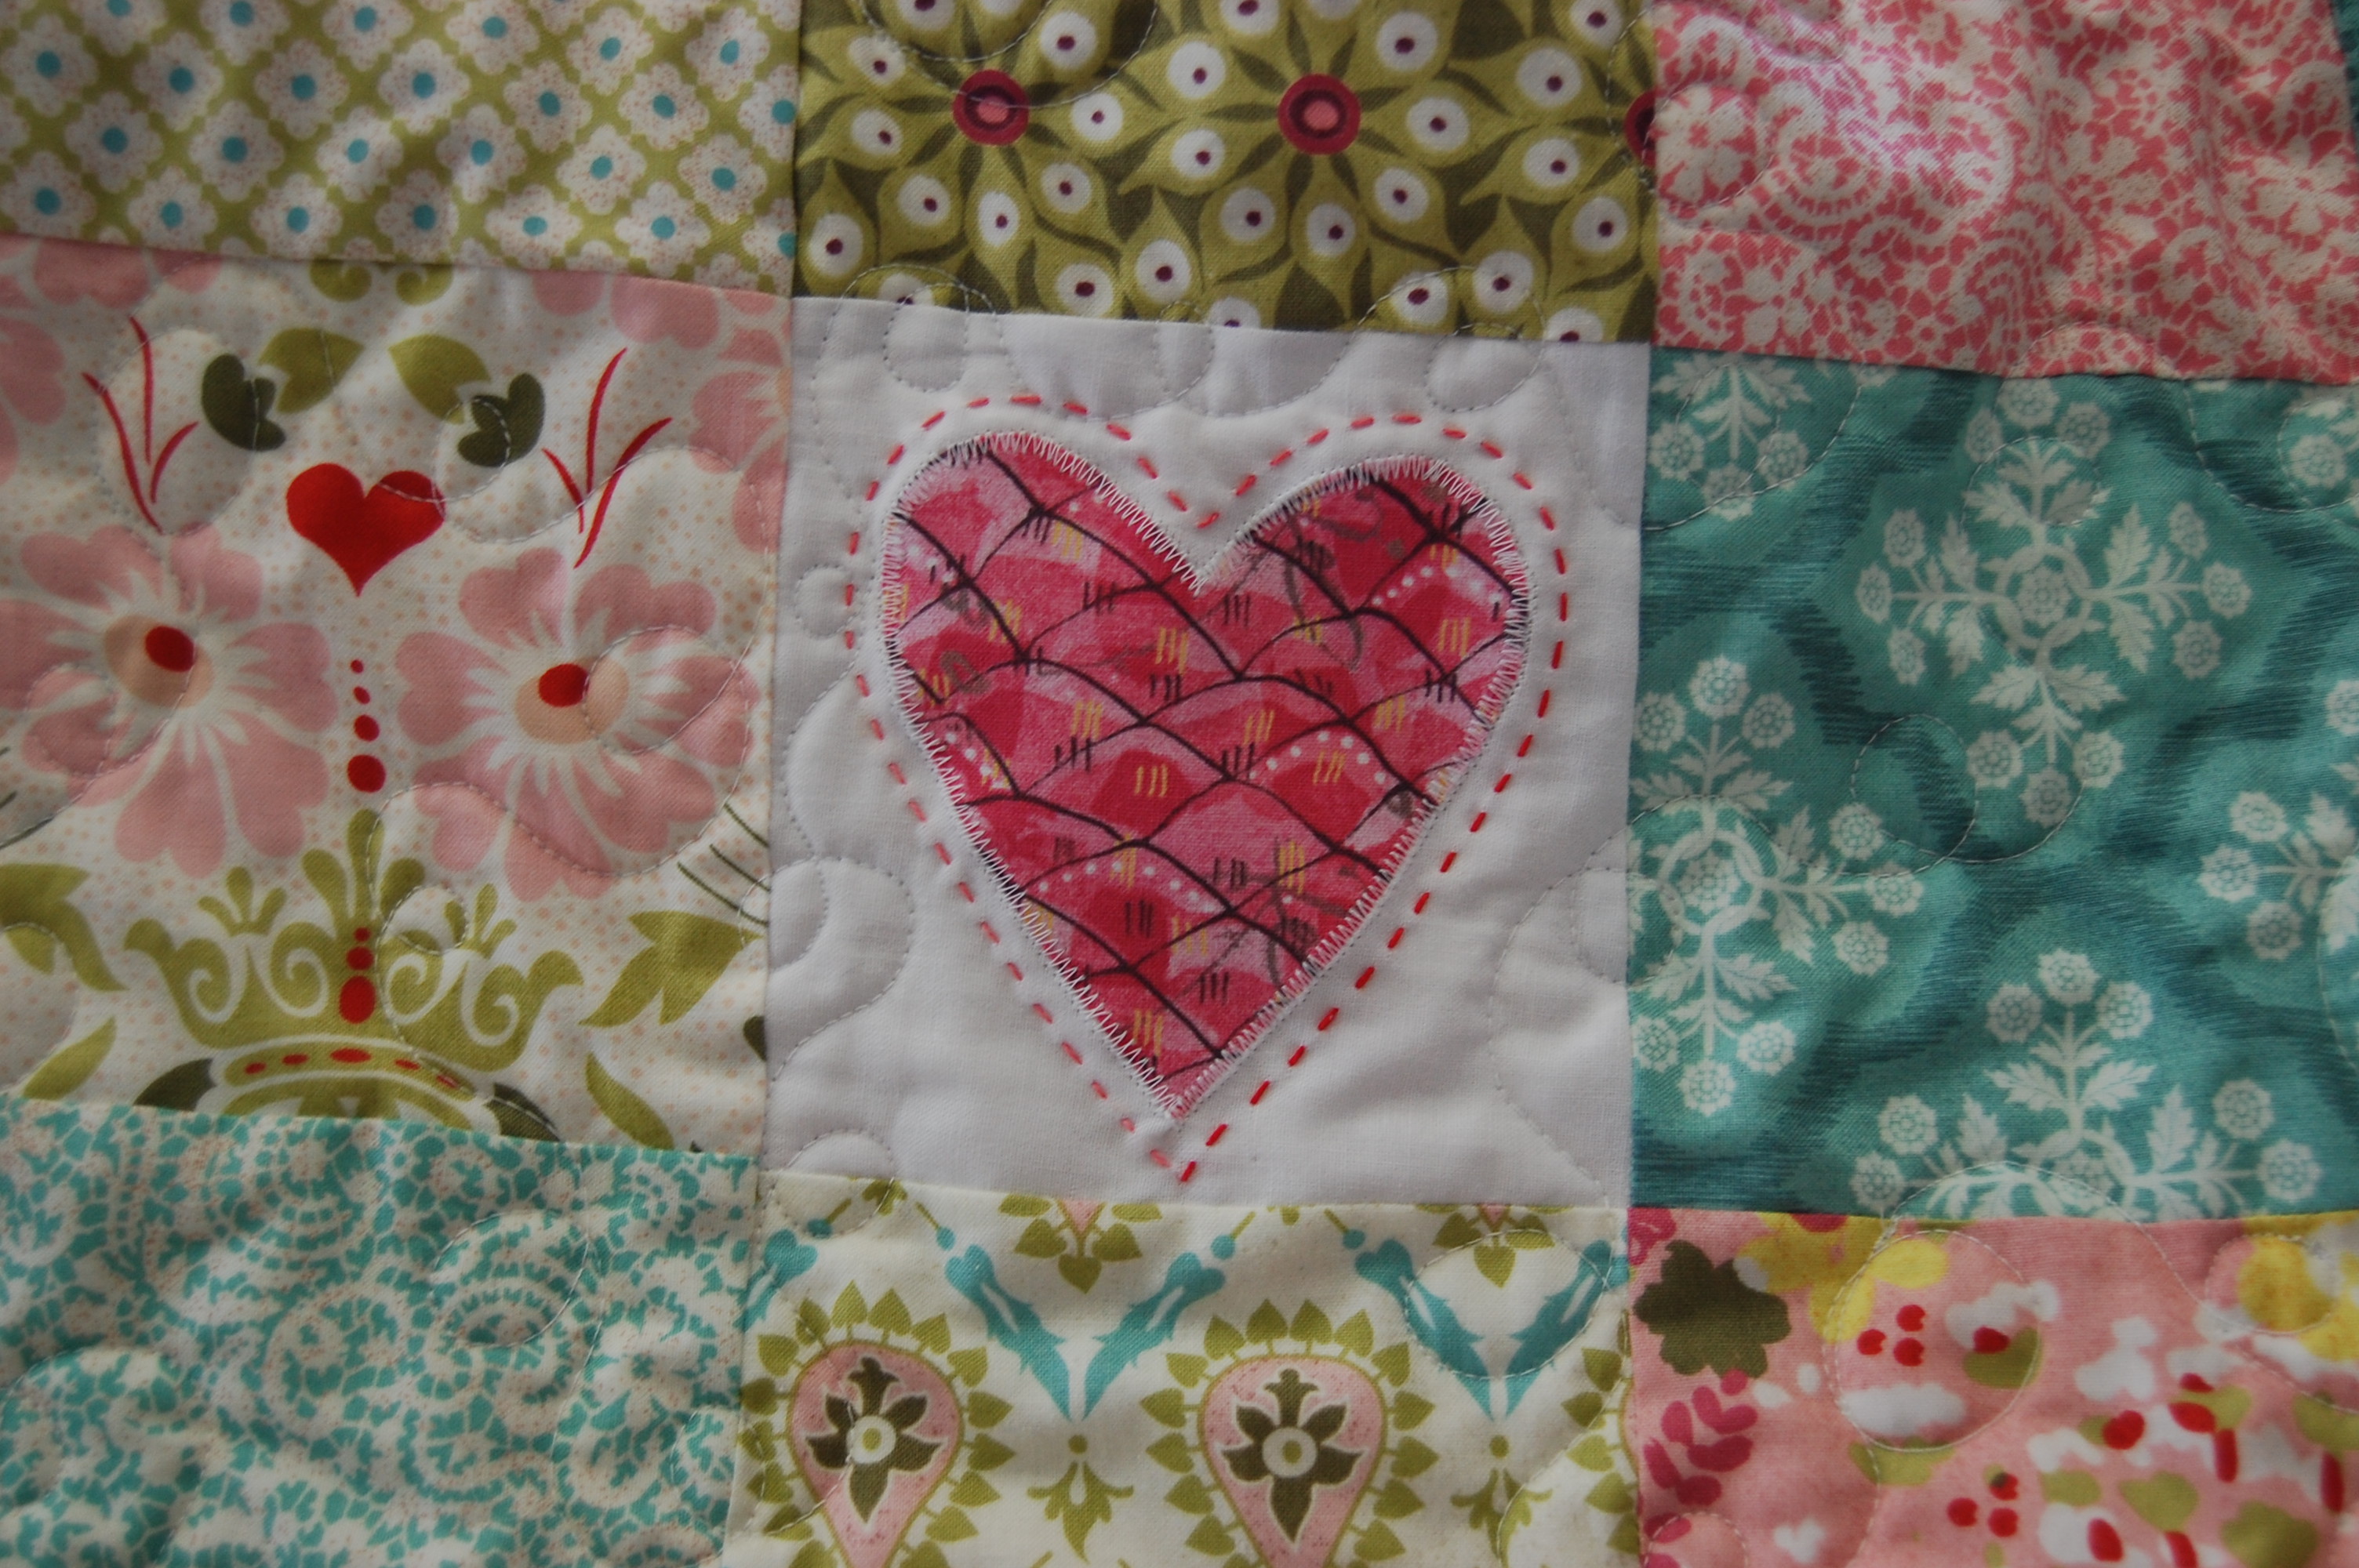
But after I made the quilt top I thought I had added a few too many white squares. 3 or 4 too many. I was on a deadline and really didn’t want to unpick. So I did a little applique heart using a lovely fabric from Cori Dantini for Blend fabric – So pretty… I have a quilt in the making in Cori Dantini fabrics, the colours remind me of a pack of refreshers, remember those sweets anyone?
And somehow that heart draws your attention to it and away from the slight white square imbalance. Or I tell myself that! I really like it, and it felt like a little special gift to the wee girl. A little hand stitchery in a variegated pink perle 8 cotton finished it off.
You can see the quilting on a few of these pictures; I did loop de loop quilting which I love on child quilts; actually I am beginning to love it on all quilts. Somehow the swirls and loops look fun and elegant at the same time. And it is a fun design to do – like when you are a kid, painting with bold flourish! Stippling is a much more restrained process; at least it is when you are trying to make it even and attractive.
Backing is a Tanya Whelan print from Sugar Hill which actually goes really well with the collection, although I was unsure when it was first picked out. This quilt was commissioned by my neighbour for her very precious first granddaughter – a neighbour whom I adore so much that I was willing to relinquish a bit of my precious Hello Luscious stash – and her really lovely daughter and son in law. The baby girl (who is a cutie) is called Rose, so we were keen to have roses on the back; Suzanne chose this from my stash. And her name on the front of course – again in the Cori Dantini print above.
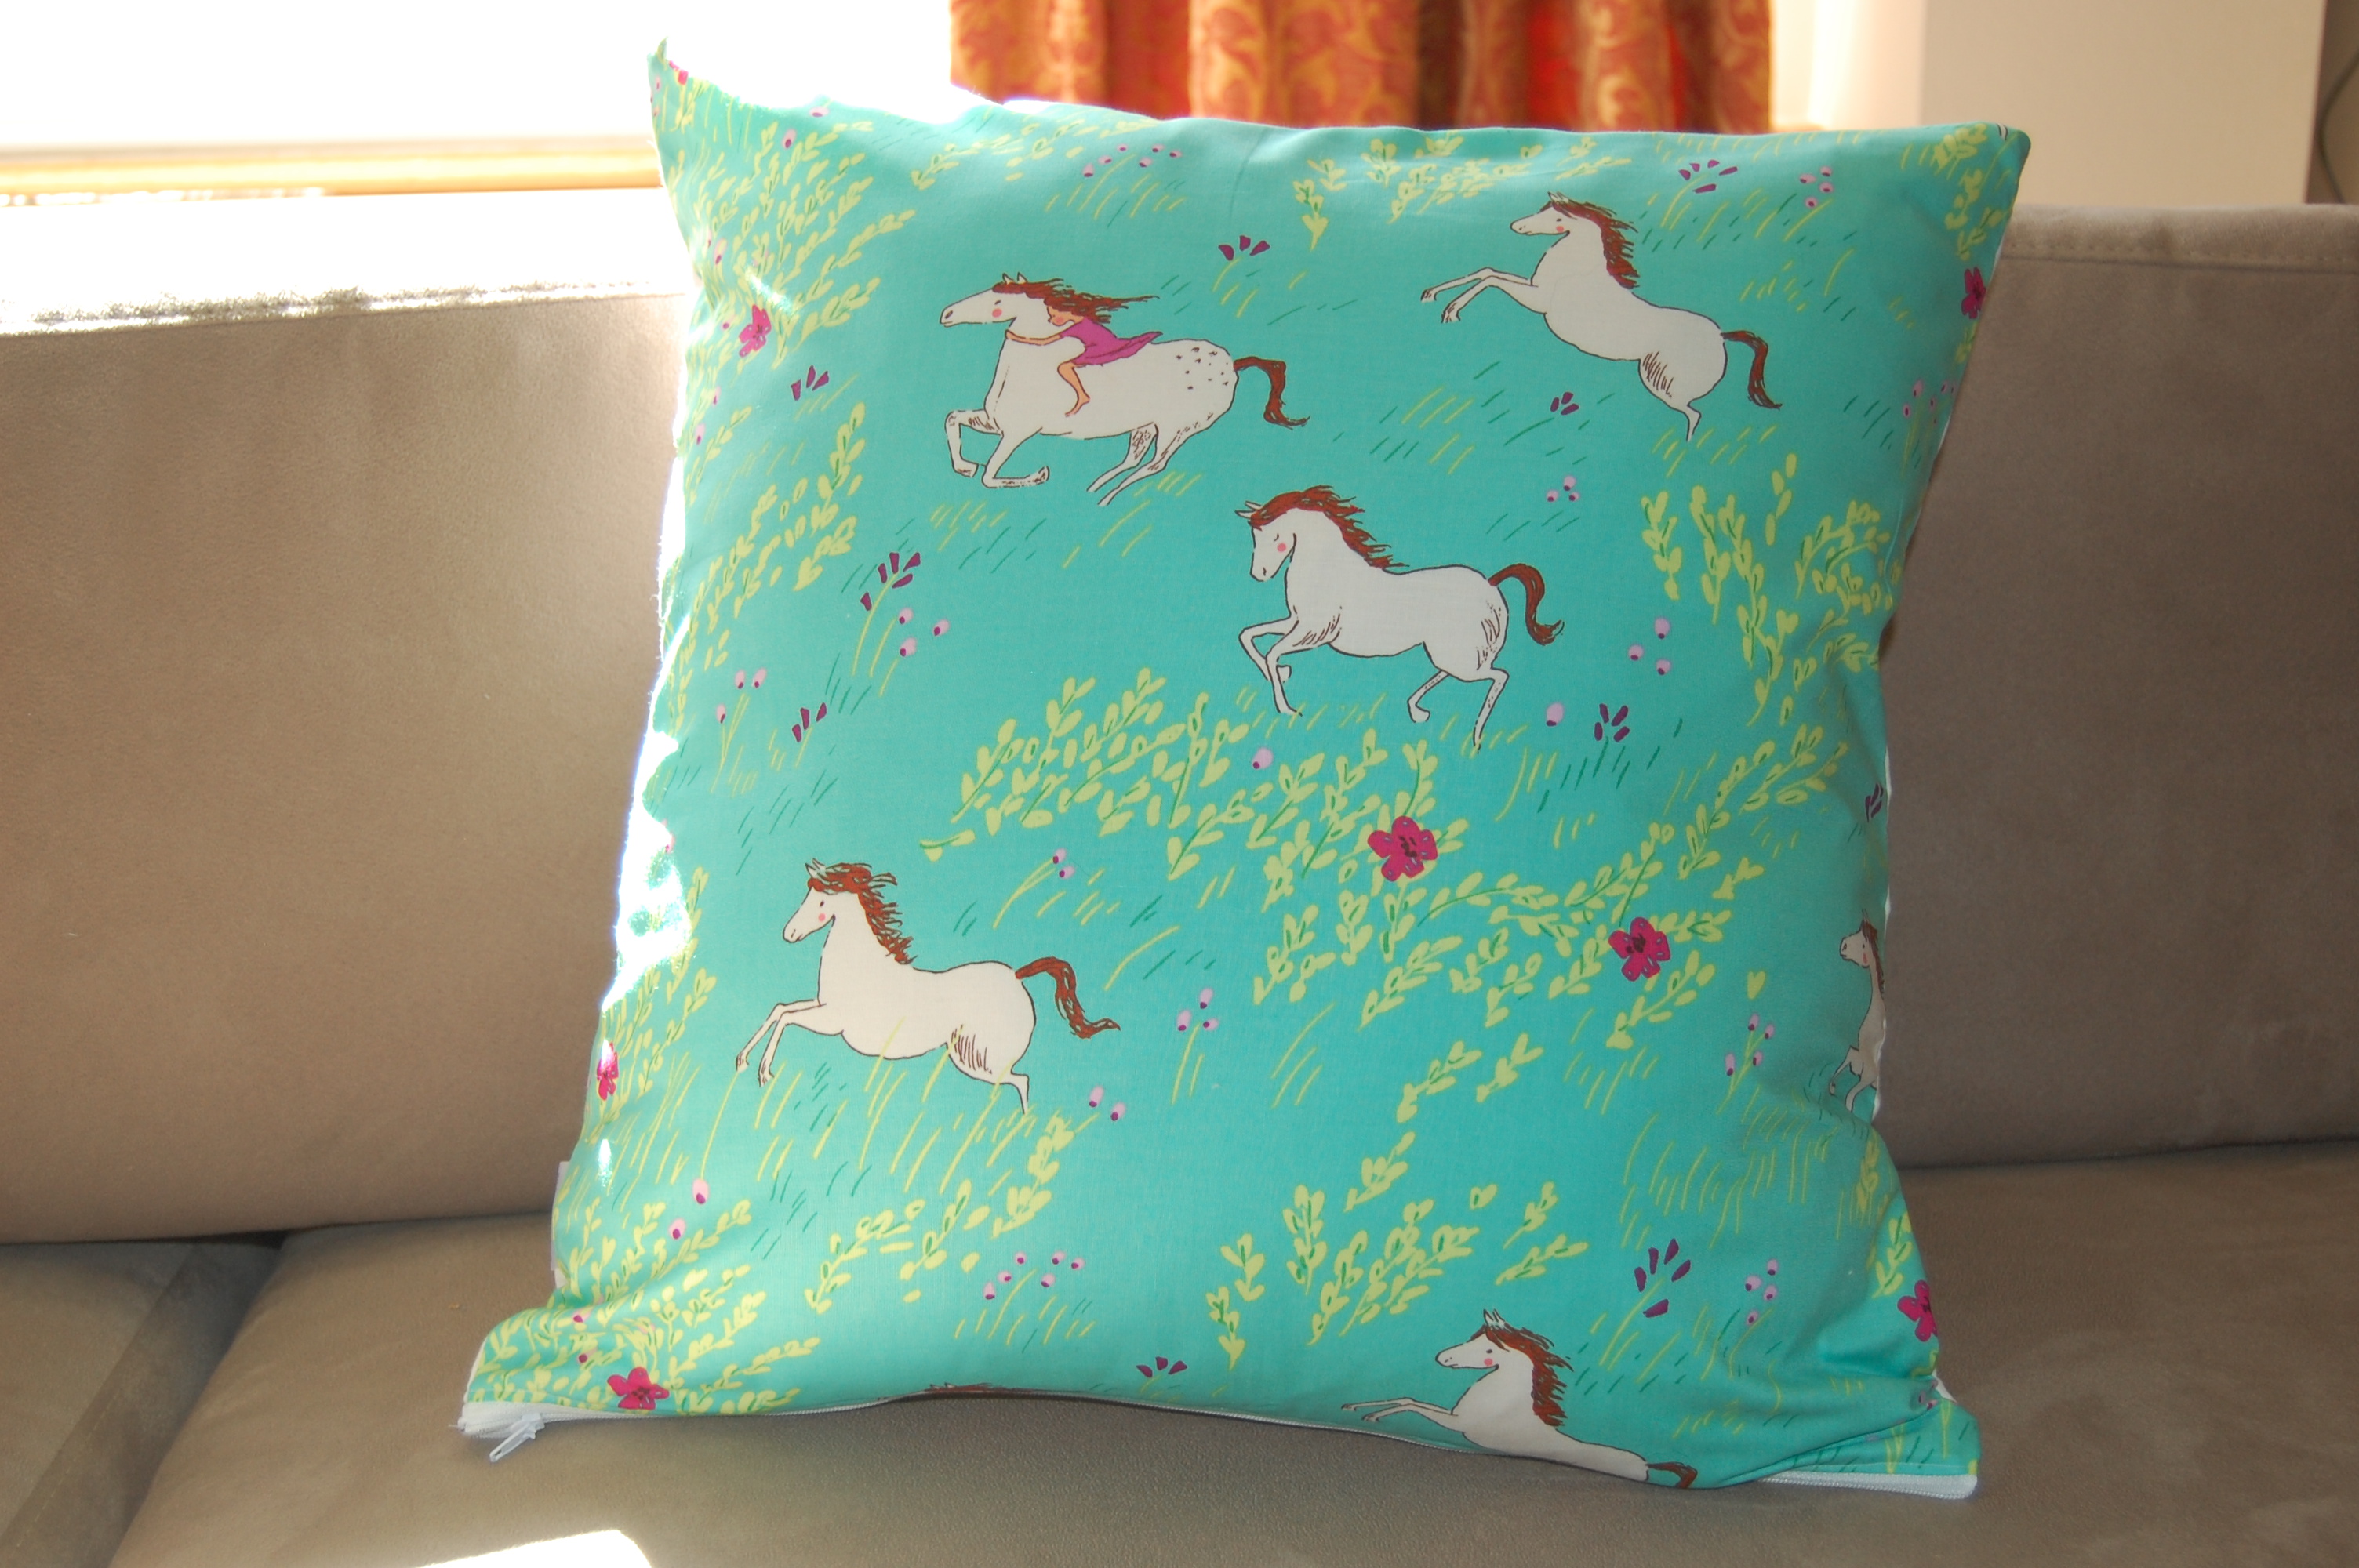
Her parents gave this to her at a little party they held for introducing the baby (the baby’s family lives in Norway), and it was so great to see how much they loved it! Incidentally I took a little present I made for her room – a quilted cushion made with a California girl charm pack (fig tree quilts for Moda) and Summer Ride by Sarah Jane on the back (I just love this print with a passion!), which also turned out very sweet.
I was kind of sorry to see this quilt go, despite having no real use for it in my house, but I’m really glad it’s gone to such a good home where I know it will be used and loved by a darling family. Batting is Quilters Dream Orient, size approximately 46″ x 52″.
I think I am feeling the need for making some quilts for our household now! So much letting go. Of quilts. Yes, I think I am a batty catless cat lady who needs to get a grip 😉
Night night lovely creative folk; hope your treasure making is going well.
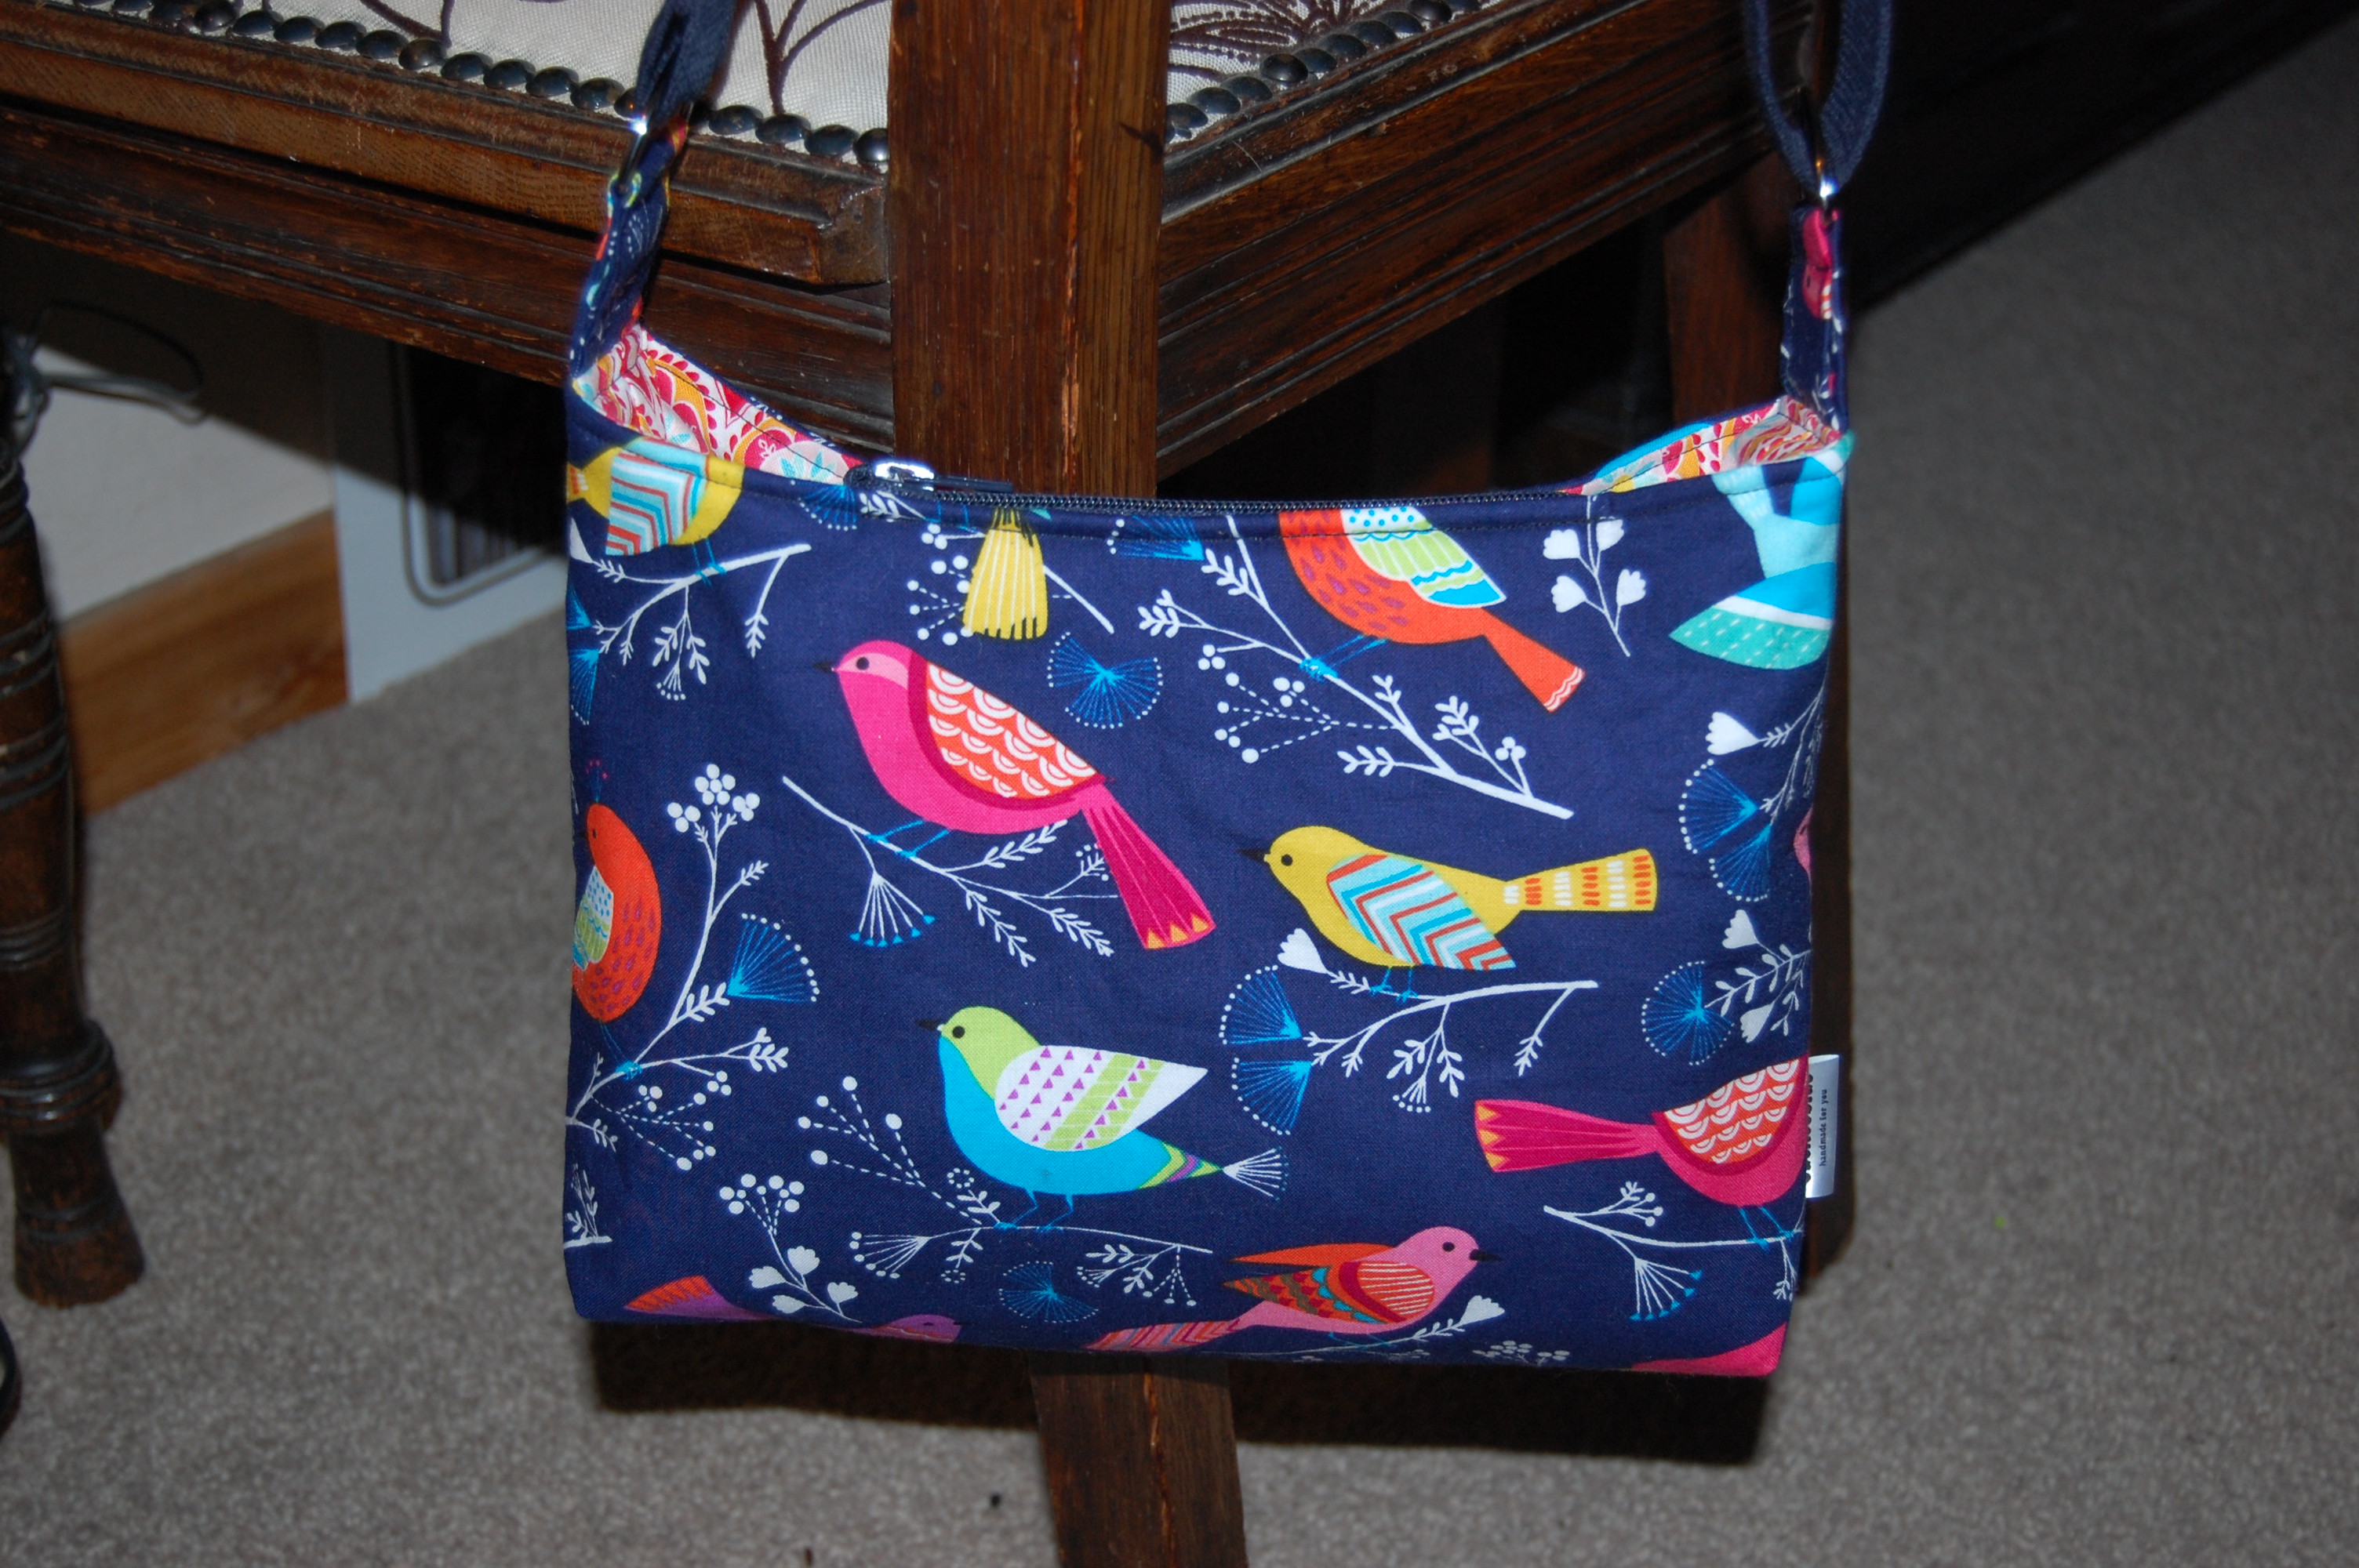
Well, they are ugly. When I worked at a hospice, working with especially with female patients, young and old, I used to think it all the time. Some people have to have a continuous infusion of either painkiller or anti-sickness medication or somesuch in order to stay comfortable. Whilst it’s one thing when people are in bed and sleeping, many many people walk around with this, live with it as a permanent fixture in their lives. And yet, the bags they are given for them are practical but ugly dark blue canvas small bags with straps and stuff, wires sticking out, and go round their necks (which can be painful), the overall effect screaming “I am extremely medical and weird, please look at me with that uncomfortable mixture of sympathy and fear”. Or are a bumbag. A BUMBAG I tell you! Chav circa 1987. Women are not impressed, particularly those who are trying hard to make an effort to look nice, and they used to complain often or really fight against having a drug which will make them feel better – because it’s so visible. So when I got asked to make this:
… I jumped at the chance.
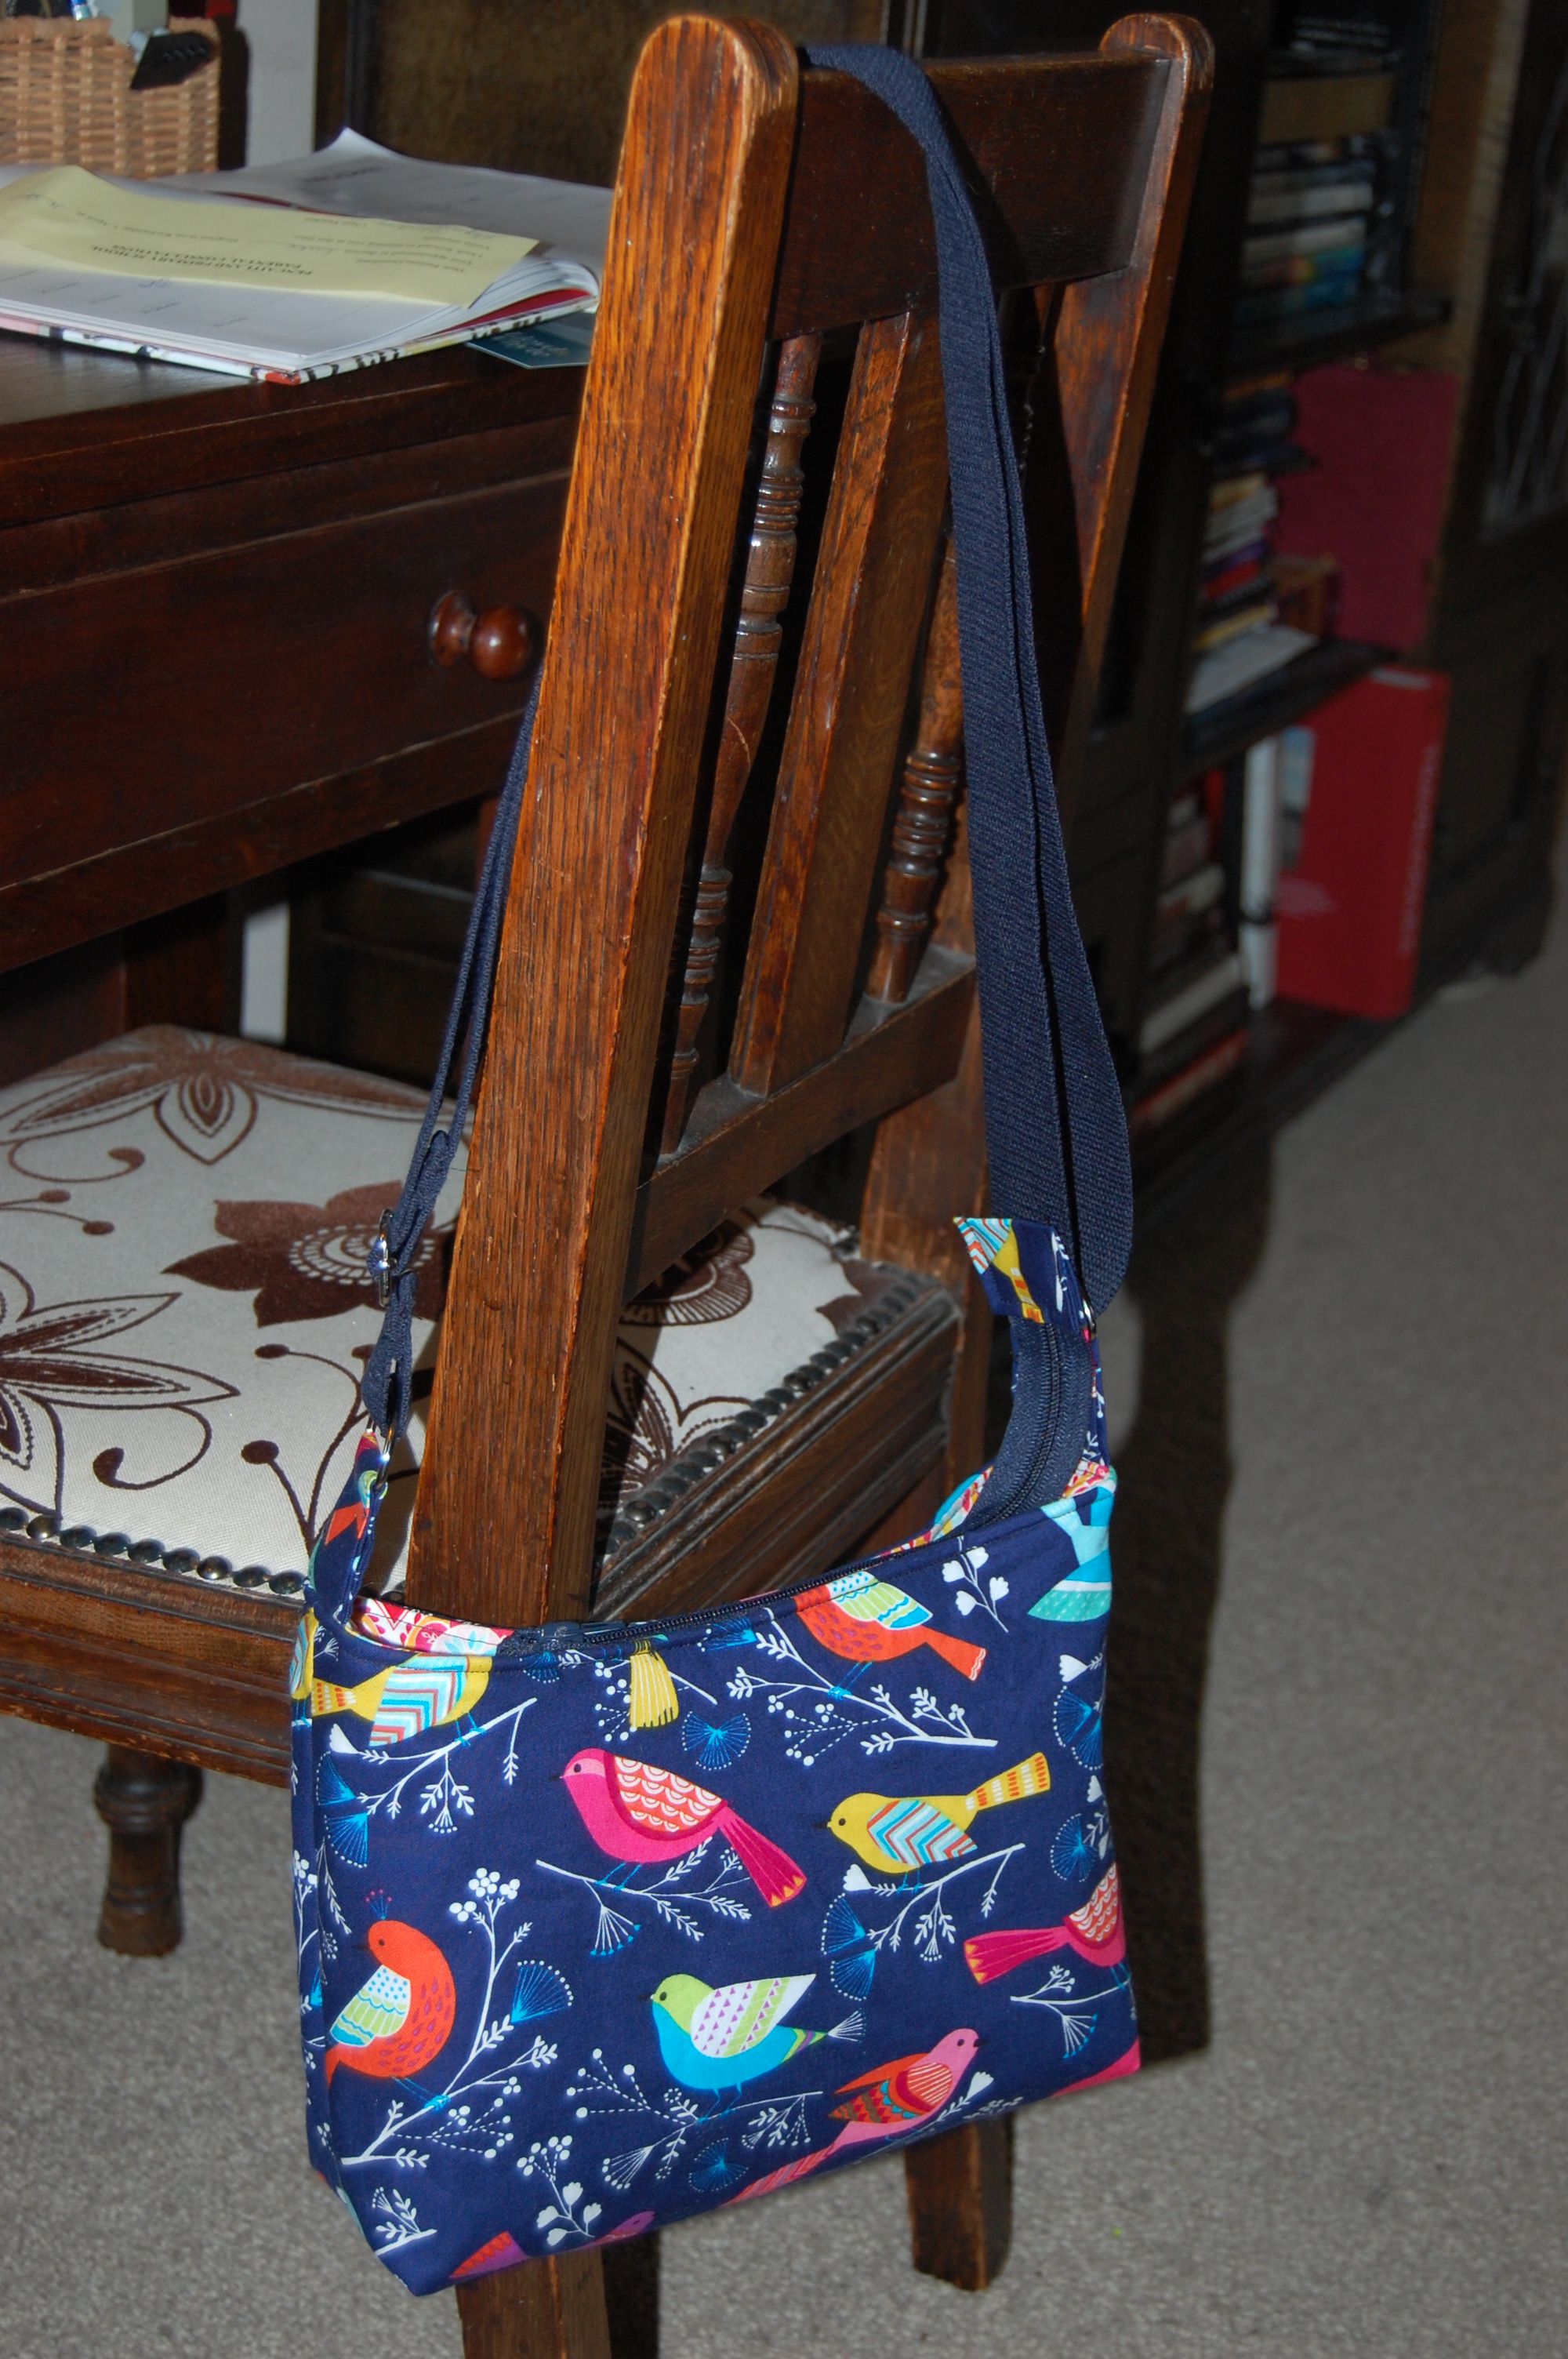
The lady, whose lovely daughter commissioned the bag as a present, has to have a syringe pump dispensing chemotherapy for a week every few weeks. Not only does this remind her of her illness, but she feels it draws attention to her illness from other people. She’s a smart, trim lady who likes to look nice, and HATED the bumbag she was given – not only was it ugly and something she would never wear, it was very uncomfortable for her. She asked for a cross-body, lightweight bag which could comfortably fit her pump in the base, have a gap at the top for the wires to come out – and most of all would look like a bag she had chosen to wear! Look at the the typical bag I’m used to seeing on patients, compared to a custom one:
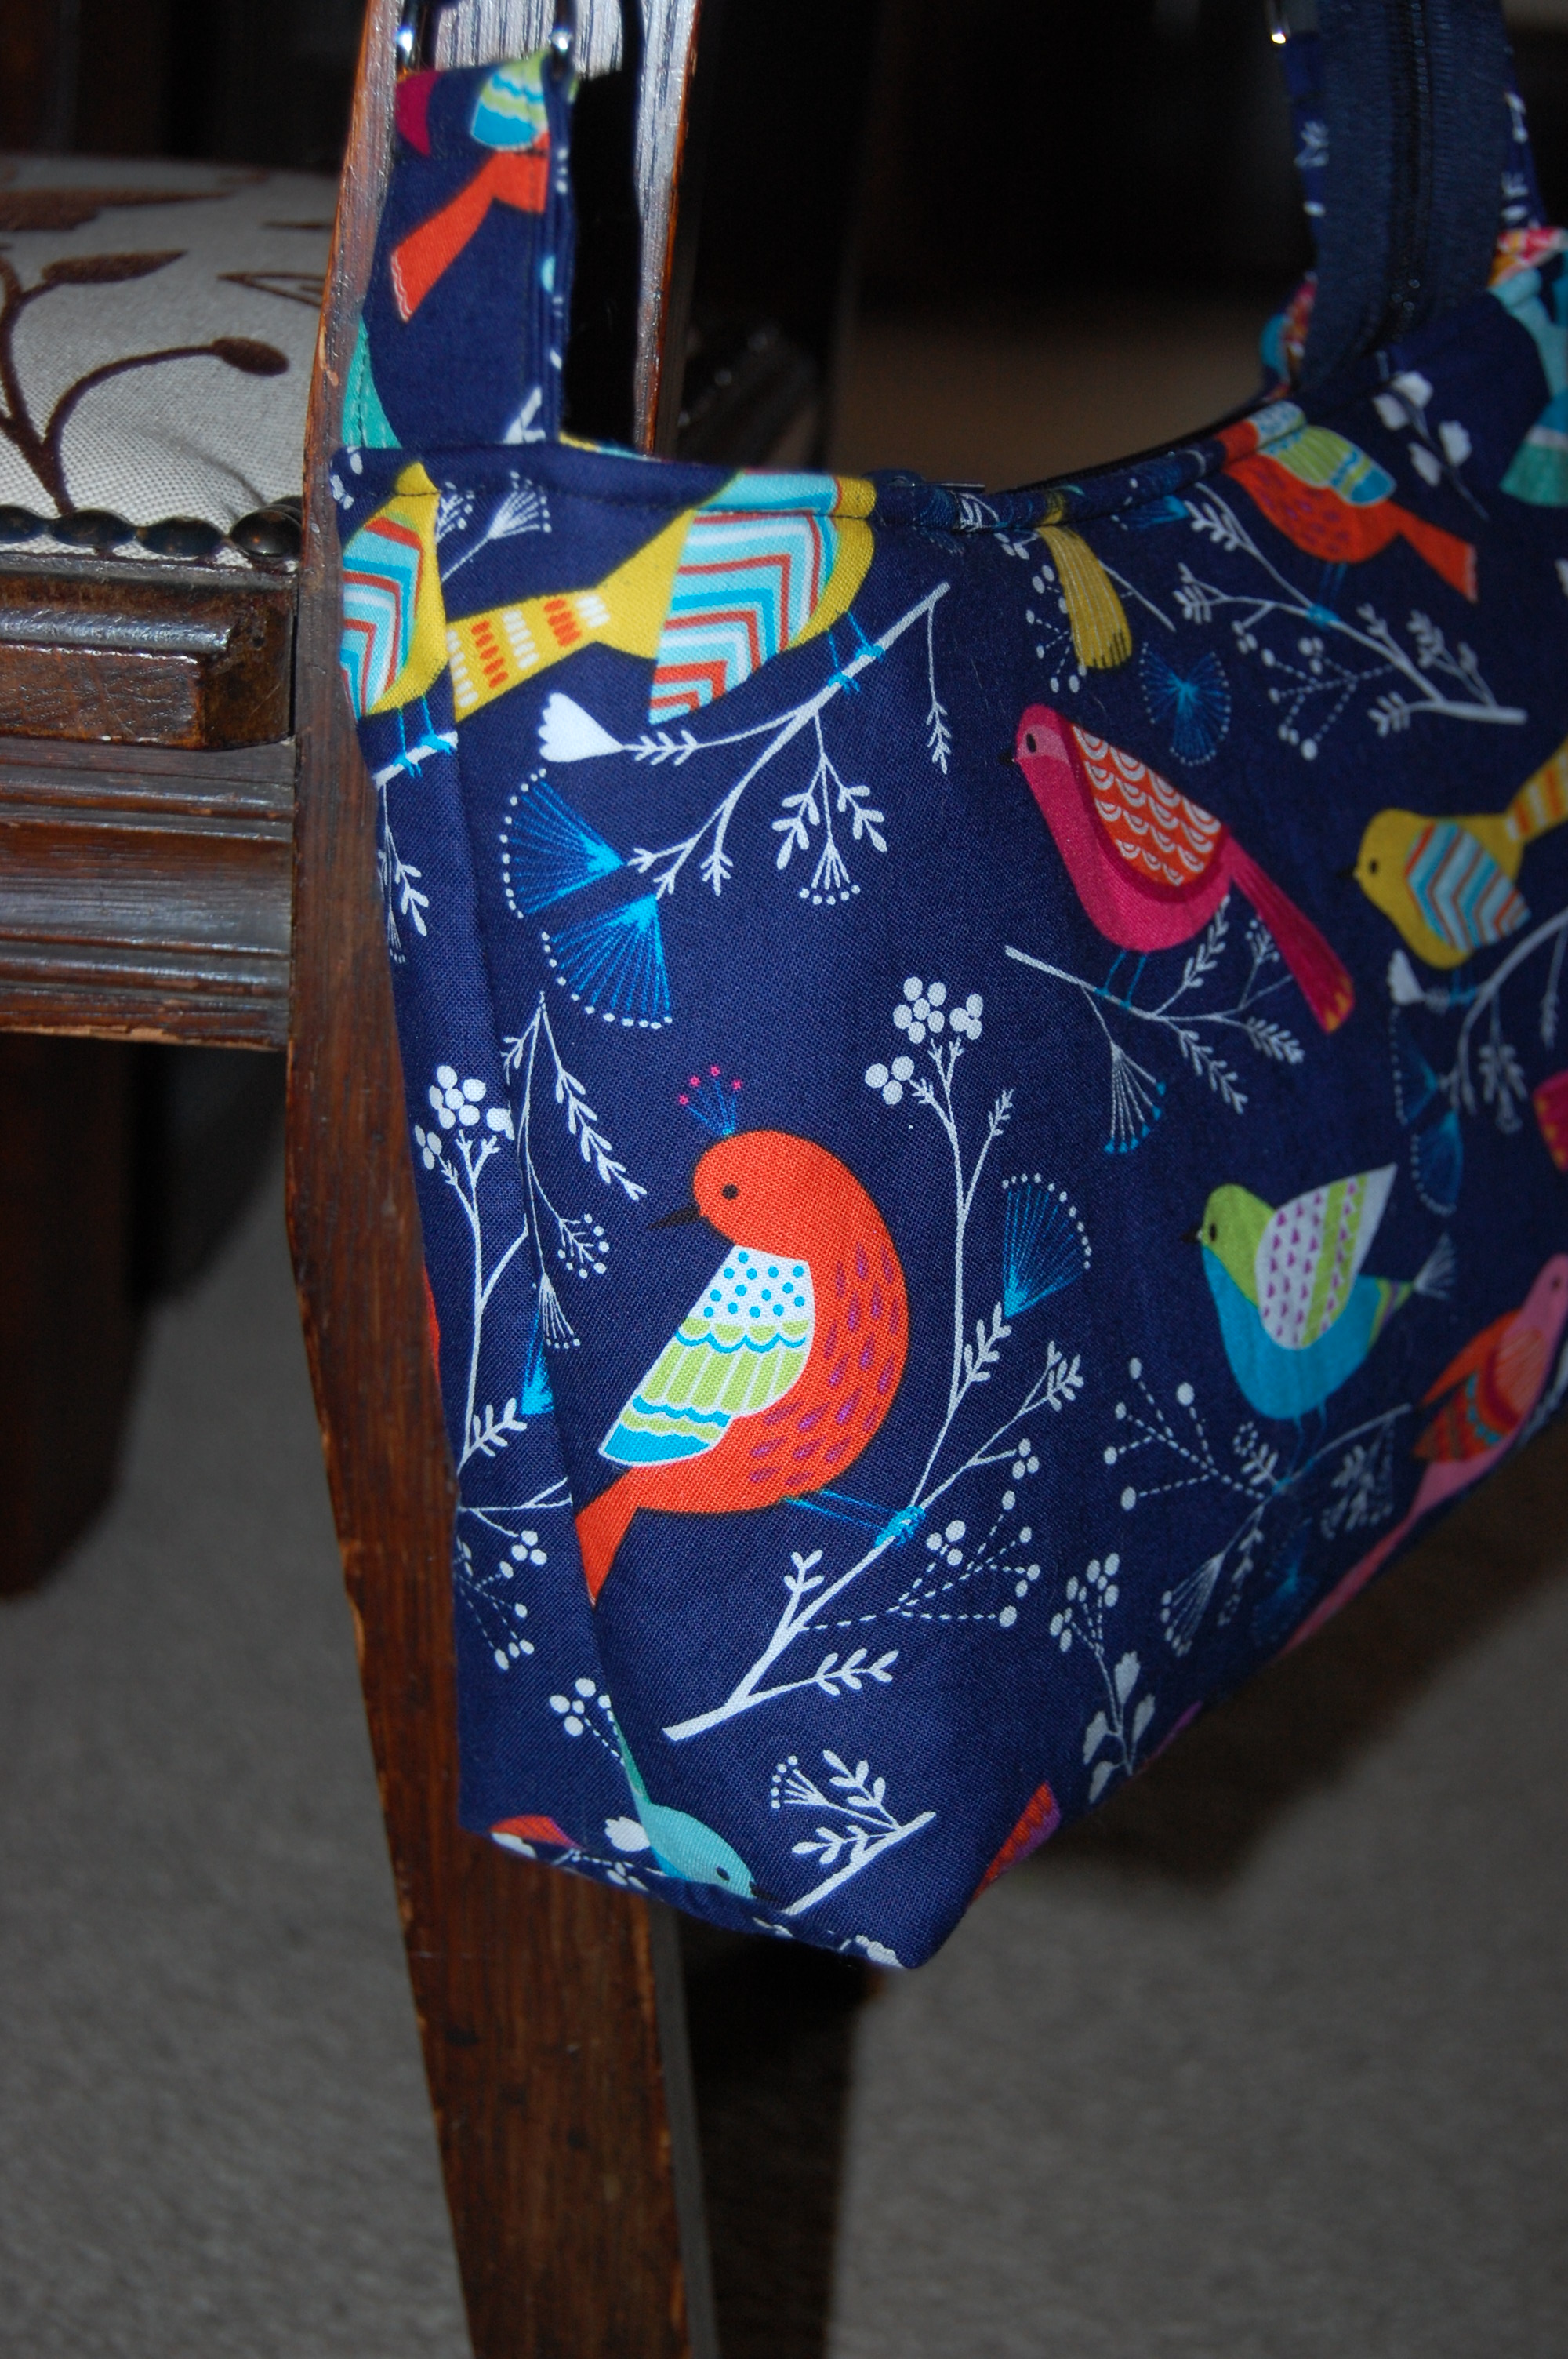
So we set to work looking at colours and fabrics. It’s always harder when I can’t see someone, to get a measure of their tastes. She must be about my mother’s age (this was all done over the phone so I had thought maybe classic floral? Some lovely gentle colours…? Wrong, wrong. She wanted bright. Loves cerise pink. Loves bold patterns. I sent some pictures of fabrics based on that, and she chose this – Michael Miller’s Flock in navy. Lovely. My own cosmetics bag is made from this – not sure I would have chosen a bag for myself in it, but everyone’s tastes are different and valid! And once I made it I had several friends telling me they would buy it if she didn’t want it, so she has good taste 🙂
It’s interfaced but soft and lightweight as requested; because I wasn’t sure of her size I made the strap adjustable; anyway the hardwear always gives a bag a more professional look. I didn’t put any kind of grid in the bottom as I wanted to make it washable (it’s going to be in the hospital a fair bit) – the pump is a sausage-shape with a diameter of 3″ so I made the base 3″ deep. Fingers crossed it fits ok! It’s about 10″ wide by 8-9″ tall… I think! I really should have measured it… enough room for a purse, lipstick etc. Zip closure with enough gap to let out the wires. And long cross-body adjustable strap so it looks like a real bag – that has got to be good for a woman, right?
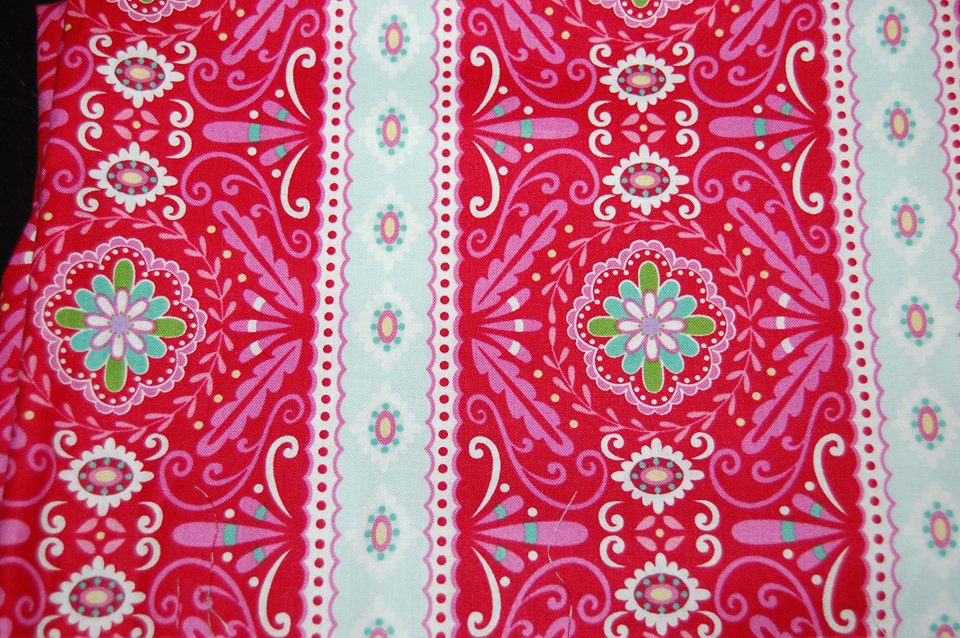
I had meant to line it with this, love and Joy by Dena Fishbein, as she likes cerise pink:
And honestly can’t remember why I didn’t (it was a few months ago). Perhaps it was a cost thing because I wanted to keep the price down and this fabric is full price. From the pictures I went with this instead, Medallions from the Quilted Fish from Madhuri collection by Riley Blake, which I got in a sale:
Anyway, apparently she loves it, which makes me very happy; I really wish her all the best; she’s going through a tough time. Hopefully when her treatment is over she will be able to give it to her granddaughter or something. It’s kind of hard to do commissions like this; I don’t take on that many commissions really as it’s a hobby, but for something like this obviously you want to help. But you also want to do it for free. You can’t always afford to use fabrics and time to do things for charity but you sometimes feel you want to. In this case, she would have been offended; I don’t think she would have liked to think of herself as charity, and had she been a personal friend (rather than mother of an old school friend) it would have been different, a gift.
This “sewing pays for itself” malarkey can be a bit fraught; I know I under-price, I know I shouldn’t. I find it hard to value my own work, even though I know it’s excellent quality and a lot of time and thought goes into it. I’m getting better at it. I would definitely try not to undercut folk if I was on Etsy or Folksy – I buy on Etsy loads, wonderful place, never had an issue with service ever, and it’s not fair to expect someone to create something beautiful and not get paid for their time, and when you undercut people by not getting paid, you create an expectation, whereas especially in the UK, fabric and supplies are very expensive! It has made me think I might make some (cheaper) syringe driver bags for the hospice or chemo pump bags for the hospital here as a charity thing though; stories like this are sobering, and make you remember how much people are going through in their lives. Perhaps if I can help a tiny bit, I don’t mean medically, but by making them feel less of a “patient” and more of a “person” again, perhaps these small thing all help.
Anyway, perhaps a bit sobering for a Friday night! Hope you make the most of your today, stories like this make me more determined to do that! Till the next time,
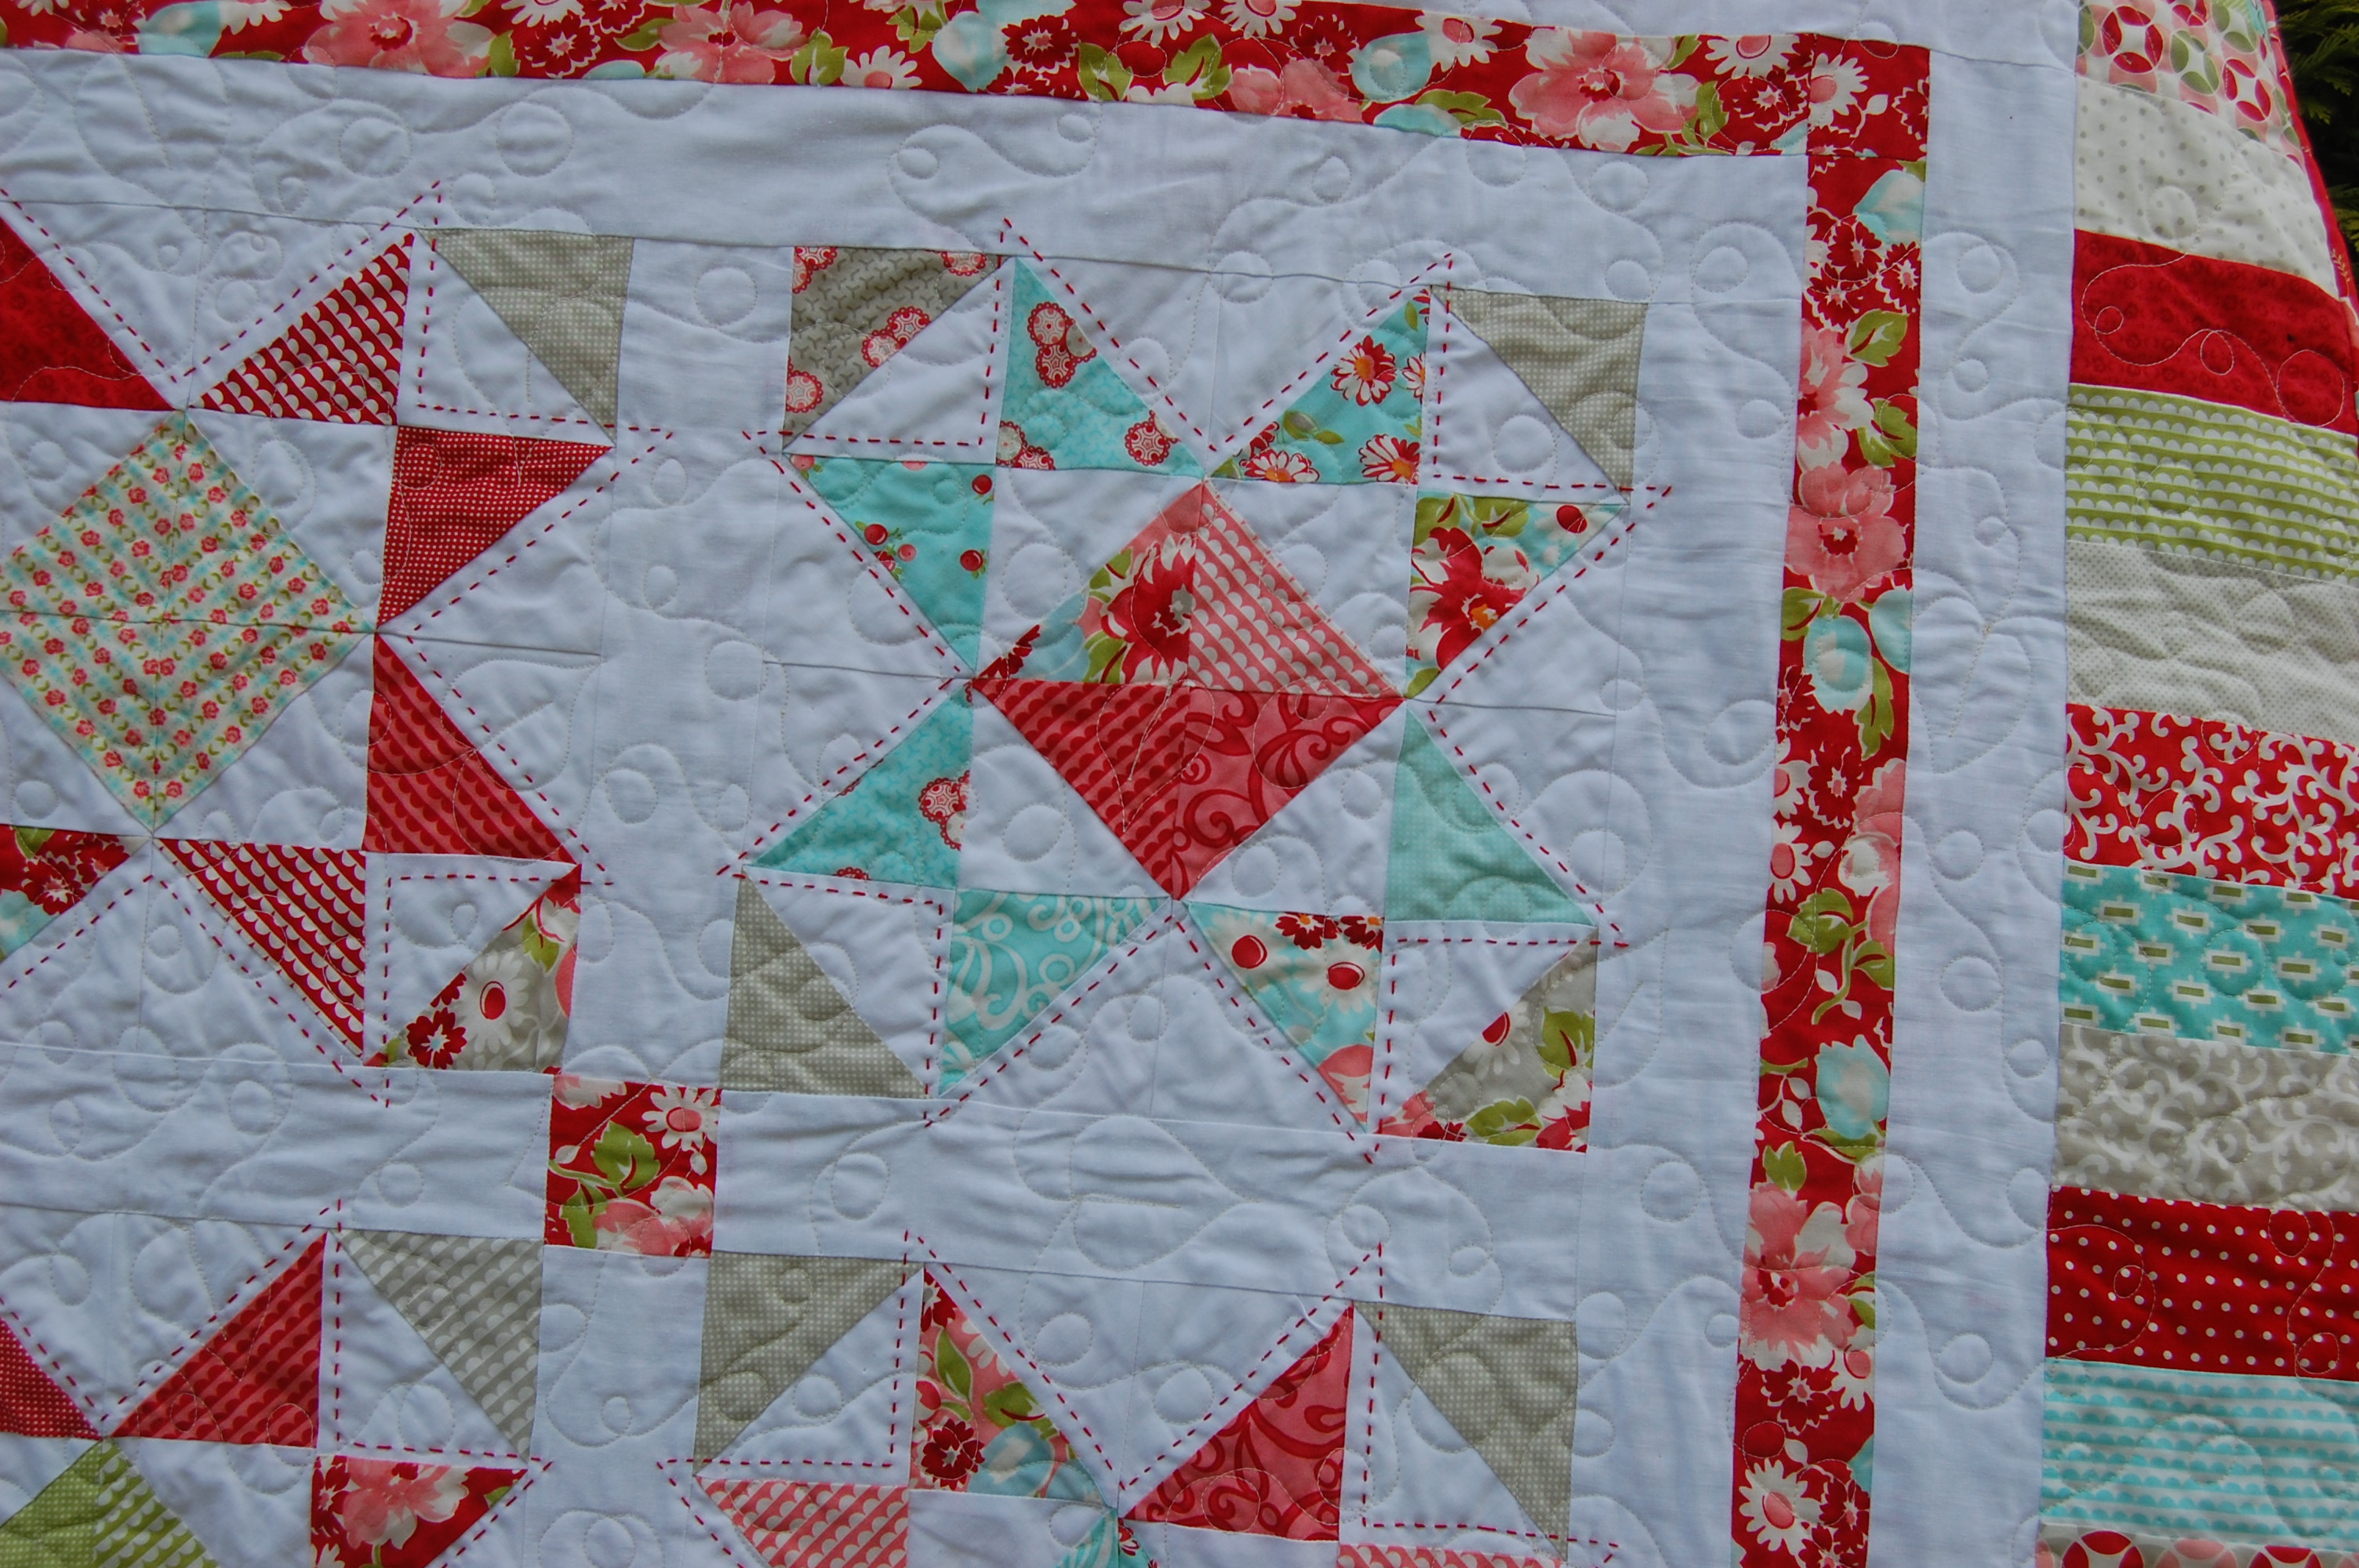
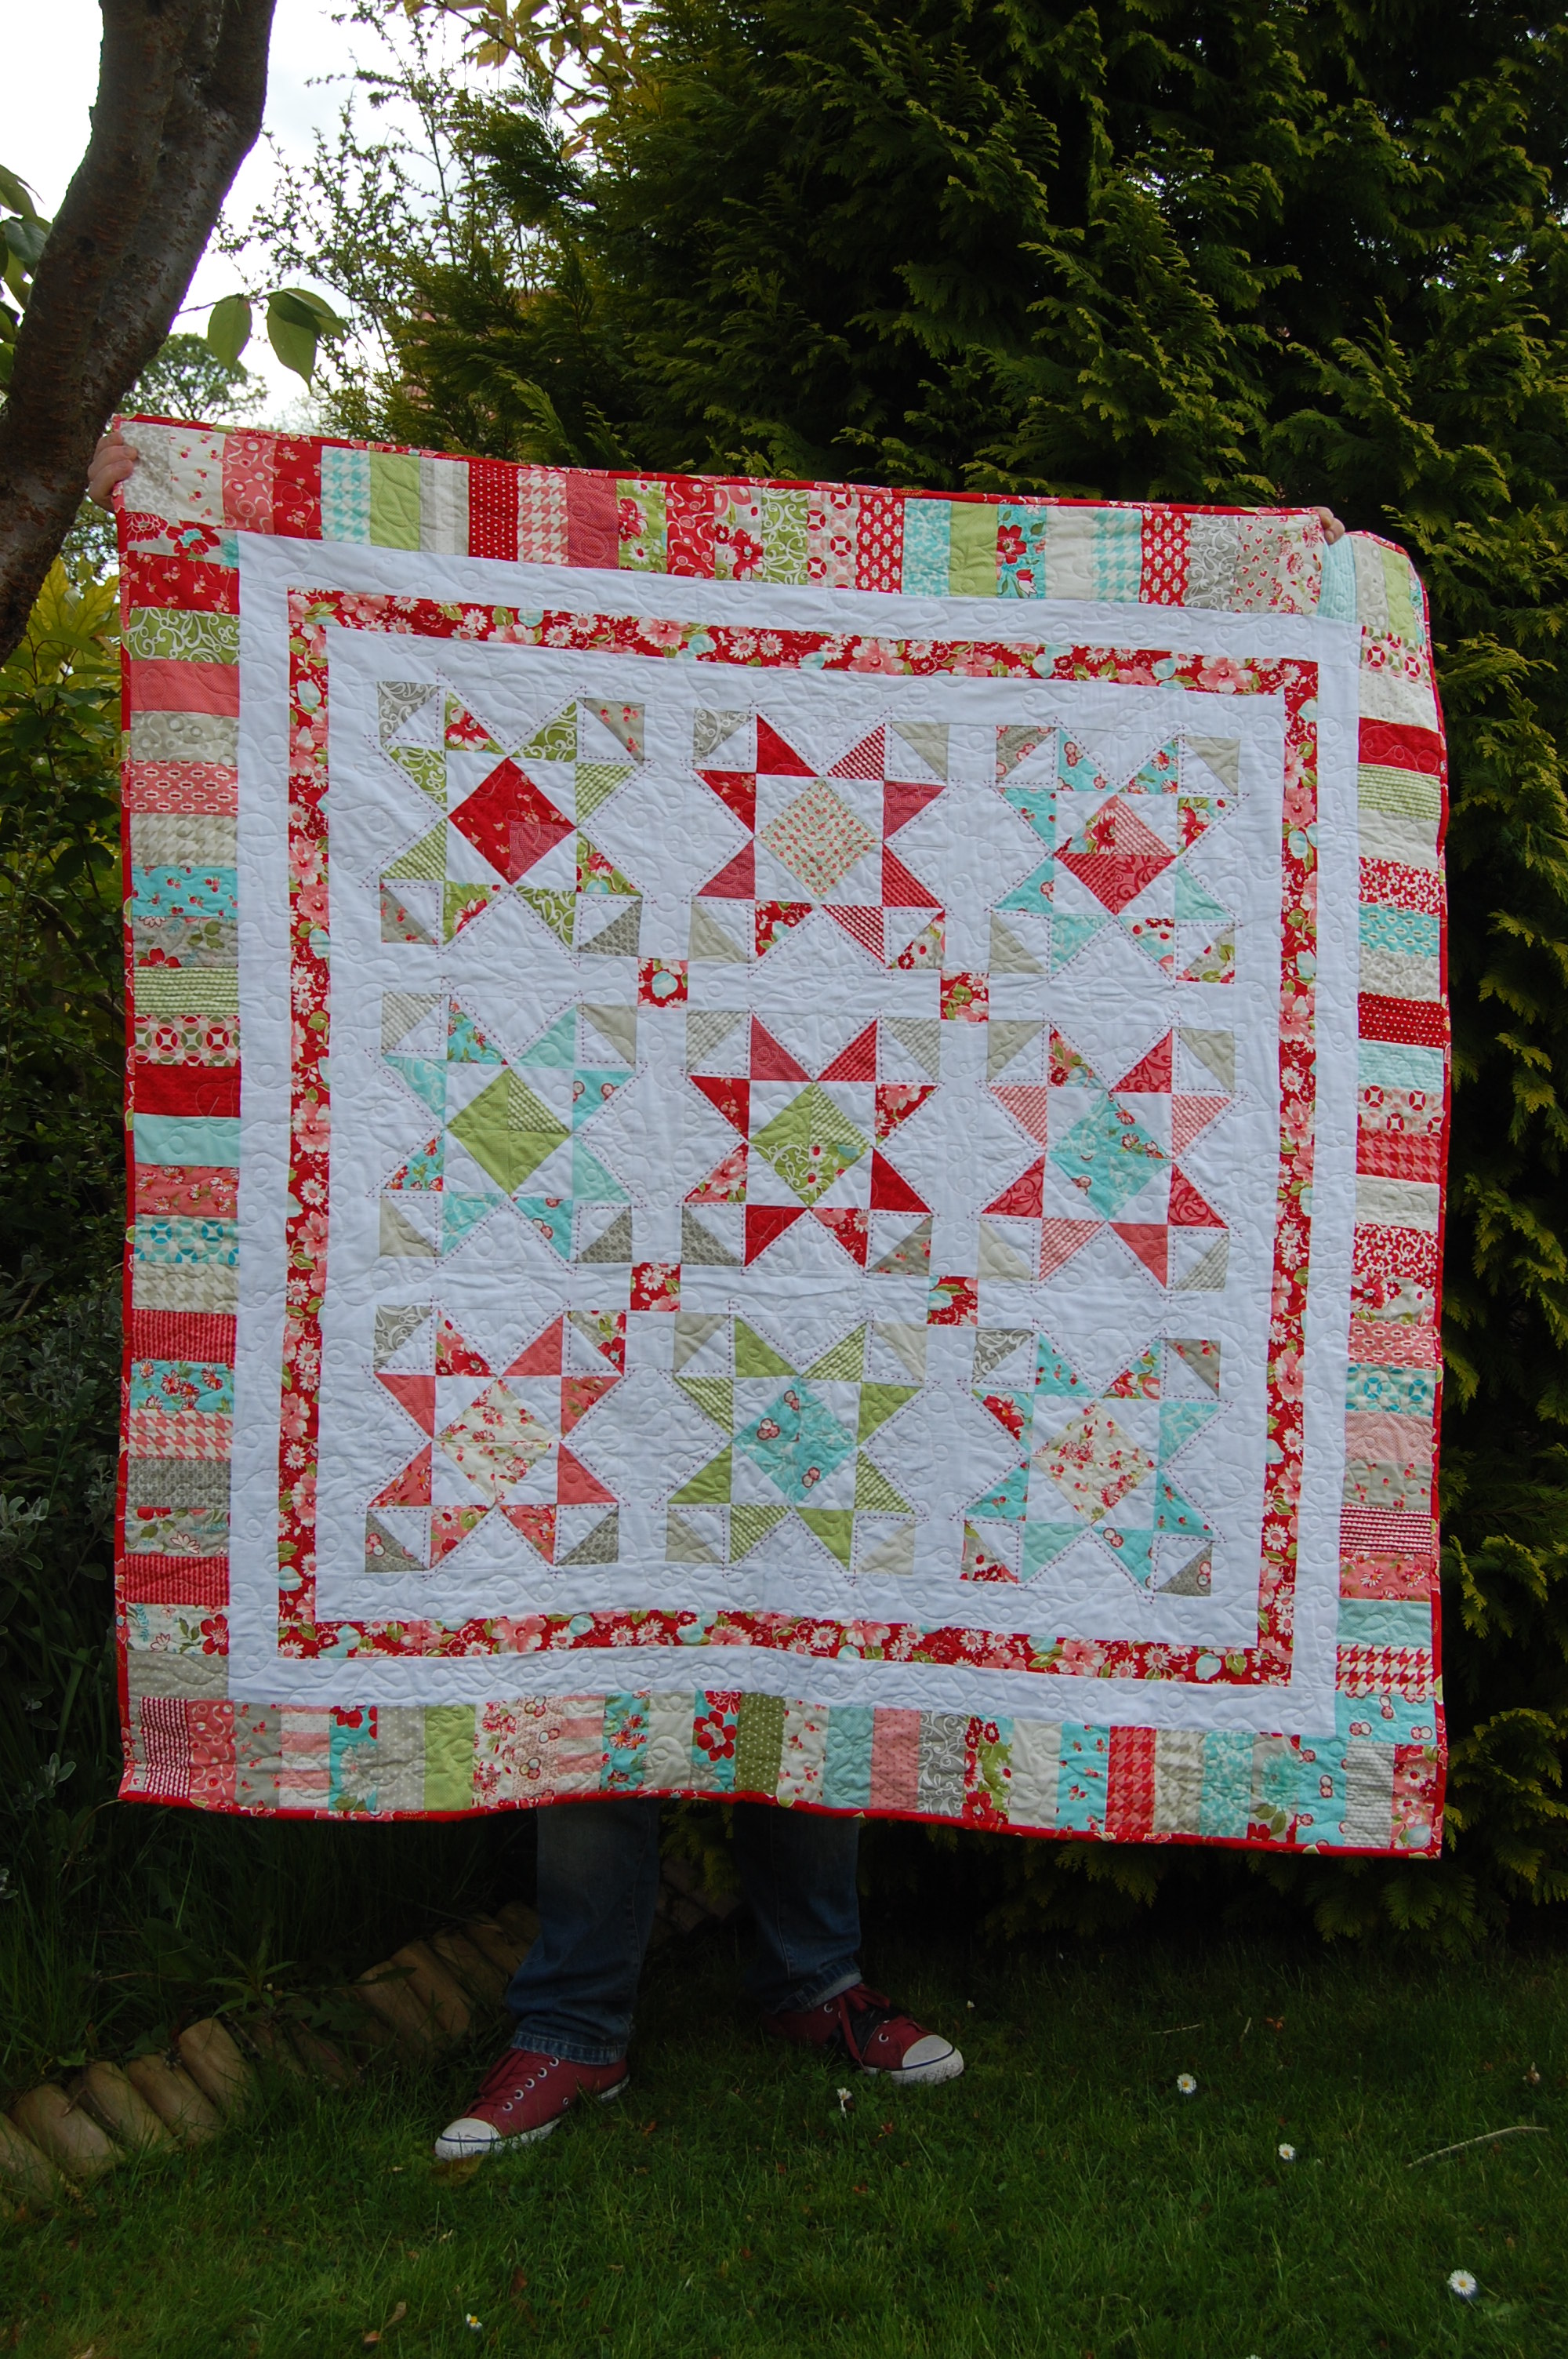
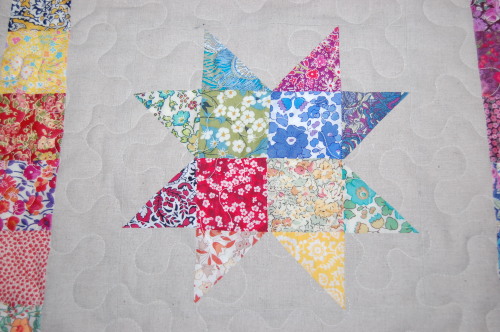
I was banging on about rediscovered project mojo the last time I blogged this – which was when I had made the quilt top (and shared the tutorial). Yeah. 15 months ago. Star blocks made 3 1/2 years ago. Oops. Go-slow-mojo. Never mind, it got there in the end – and is finished!
I’m going to be clear on this – I’m not the best photographer. It looks much better than this up close and personal. Partly the quilting gives it that drapey, textured, soft, 3-dimensional look and feel that pictures can’t:
Can you see it? I have kept up my resolution to do some non-stippling quilting – this is a loop-de-loop combined with a leaf pattern. Quite straightforward and good fun to do! Looks pretty with all the loops, and the leaves make it looks a bit heirloomy. It uses a lots more thread, but is kind of easier than a stipple (although I have mastered the basic stipple now so it’s hard to tell) I think because it’s easier not to get hemmed into a corner. All that Ghostbustery “don’t cross the lines” with stippling means turning corners can sometimes require the foresight of a Chess Grandmaster. Unless you just stop, cut threads and restart elsewhere as I do. Ping – take that Kasparov with your castling and checkmates, I just chopped the head off your queen. I have no idea what I’m on about. Moving on…
I wasn’t that happy with the original quilt top even after quilting; I was still affected by how I saw the fabrics of Ruby (by Bonnie and Camille for Moda) “too few headliner fabrics and too many fillers”, and the addition of a bit of Vintage Modern” (again by Bonnie and Camille for Moda) really pepped up the border, but only came AFTER the stars were made. You can read about my woes over this much-anticipated fabric in my original post if you’d like here: https://cuckooblue.co.uk/2014/03/25/vintage-modern-ruby-stars-charm-pack-busting-hst/
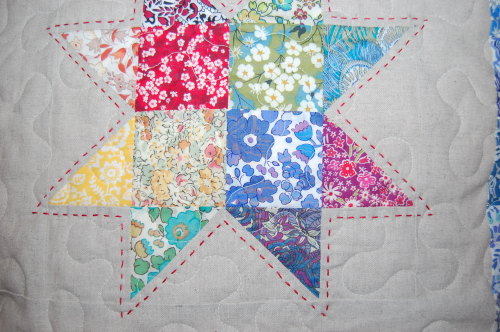
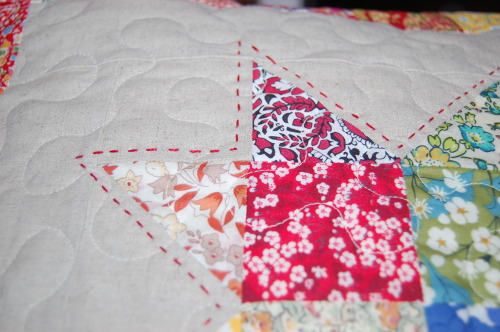
So it still looked as though it was missing something to me. So I added some hand quilting in a red Perle 8 cotton around each of the stars. I cannot tell you how much difference this has made close up. It looks great. Truly. FINALLY.
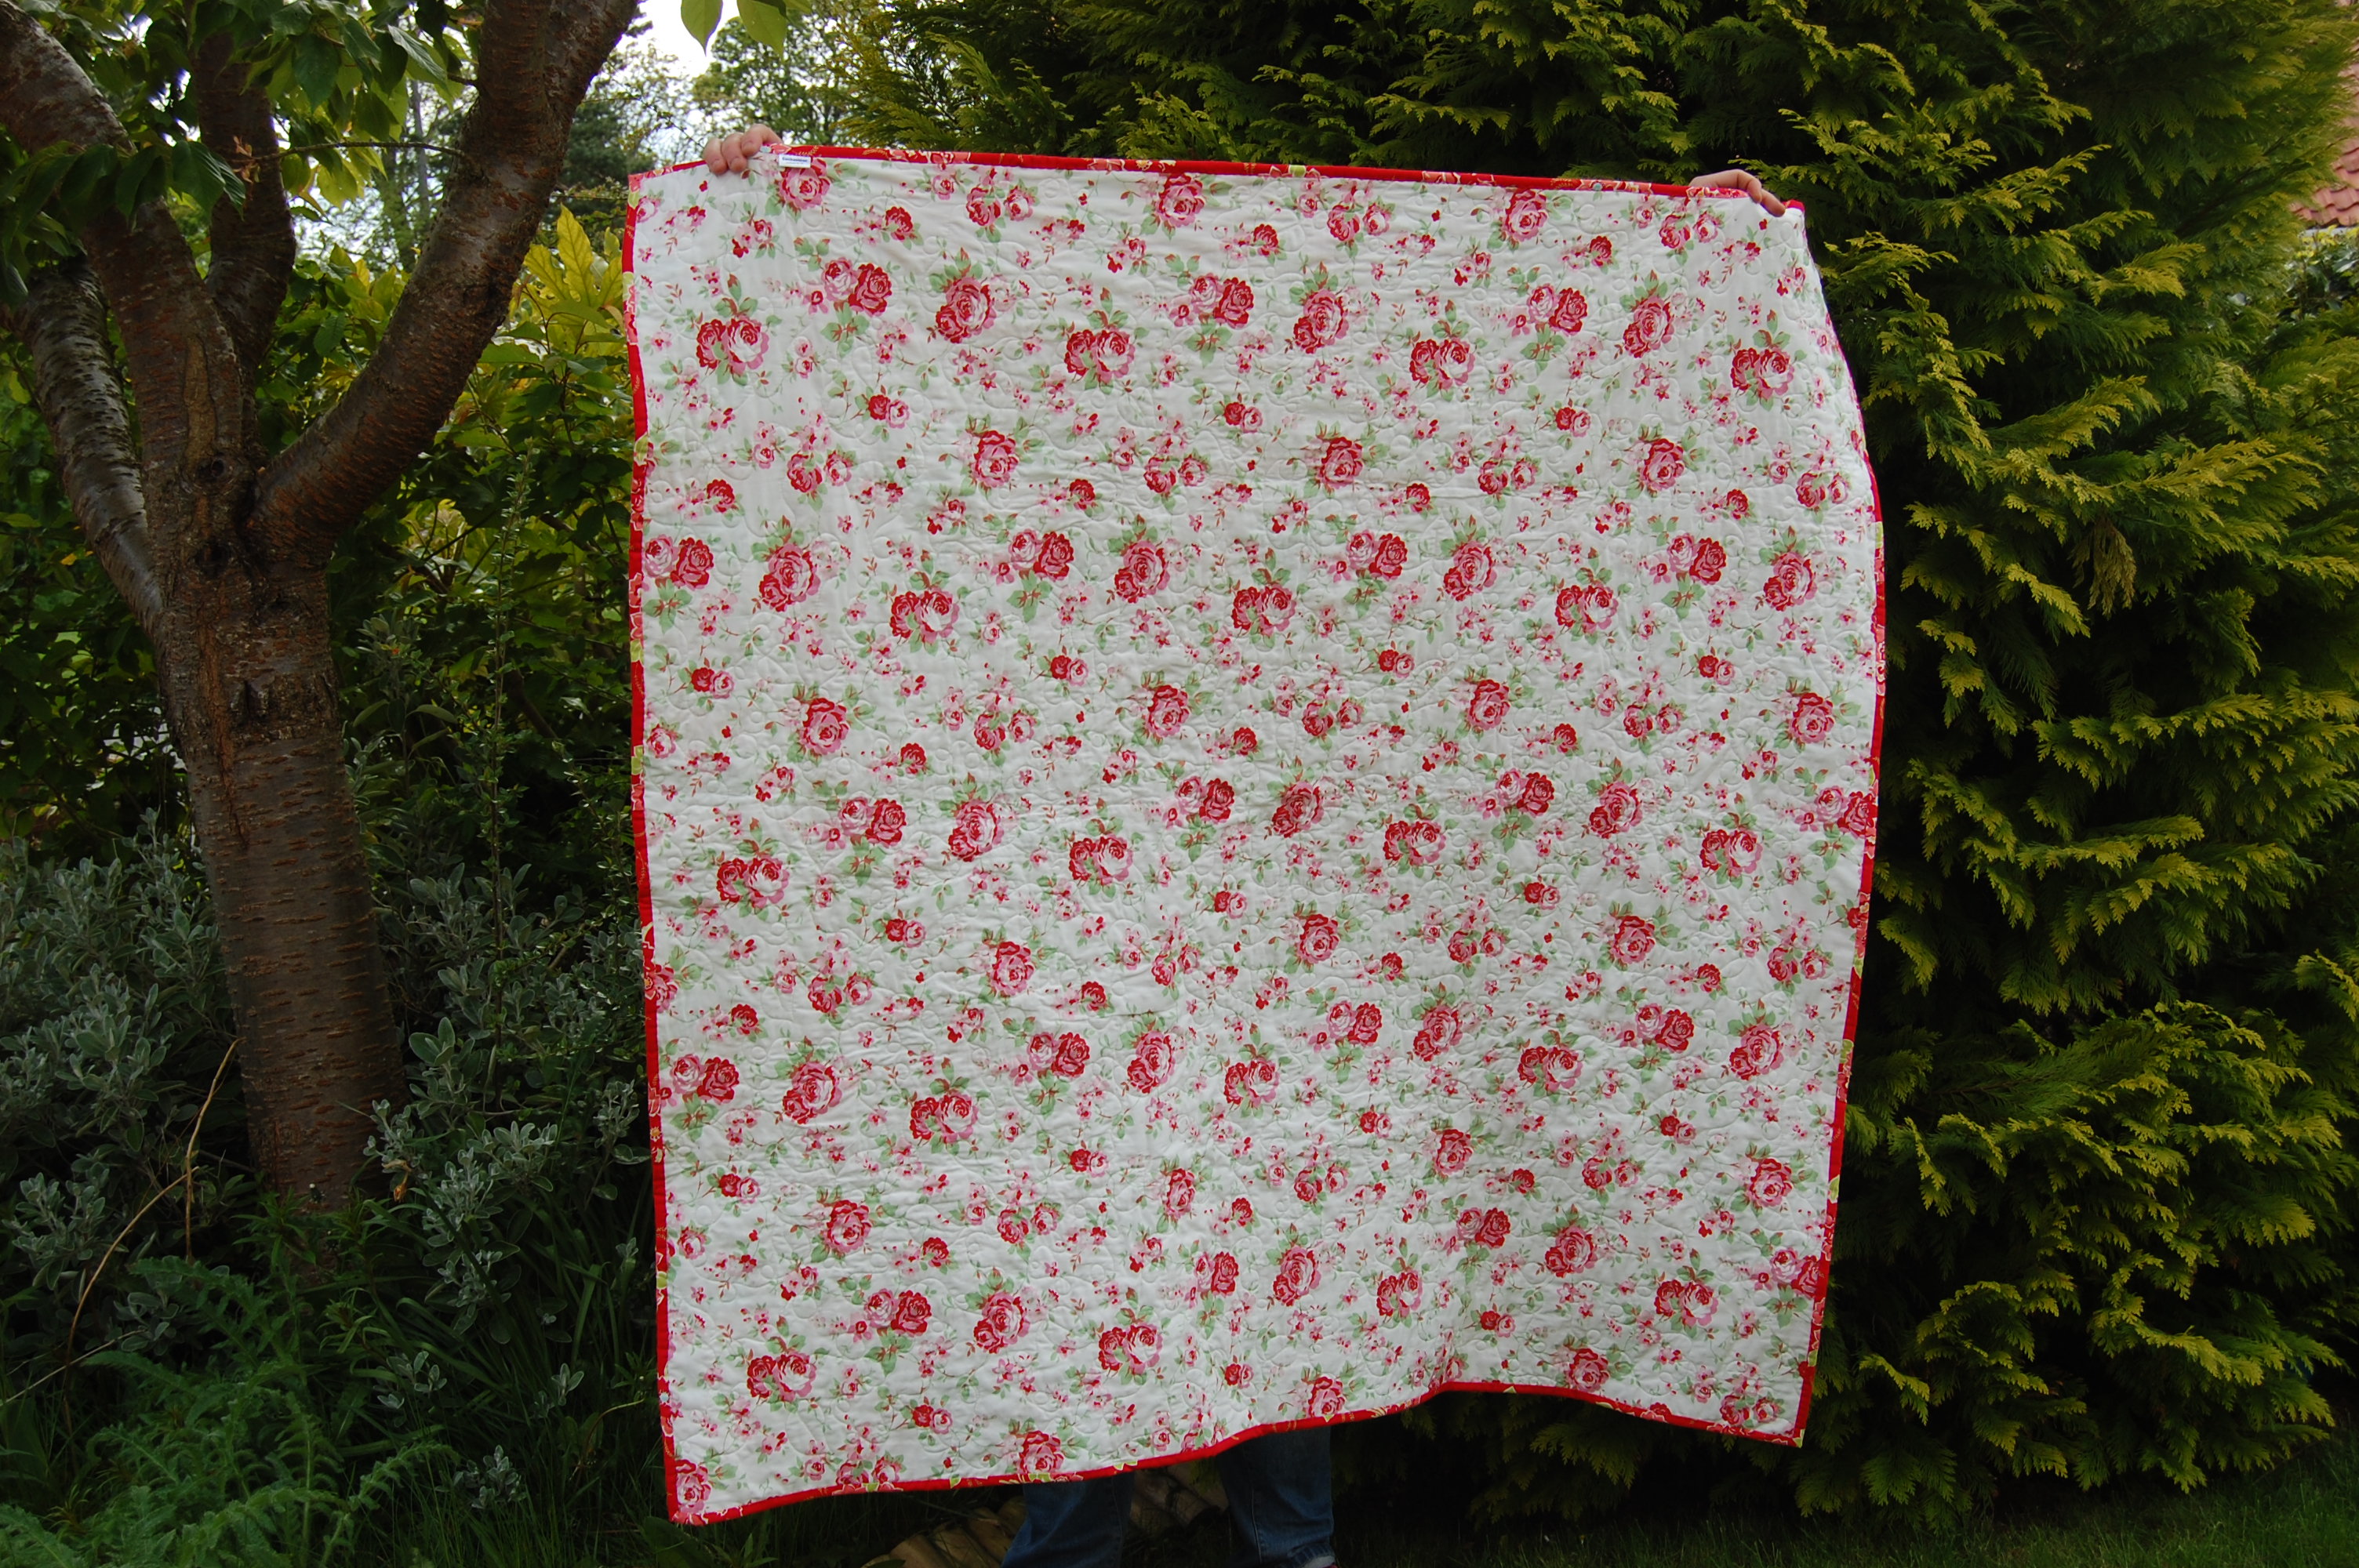
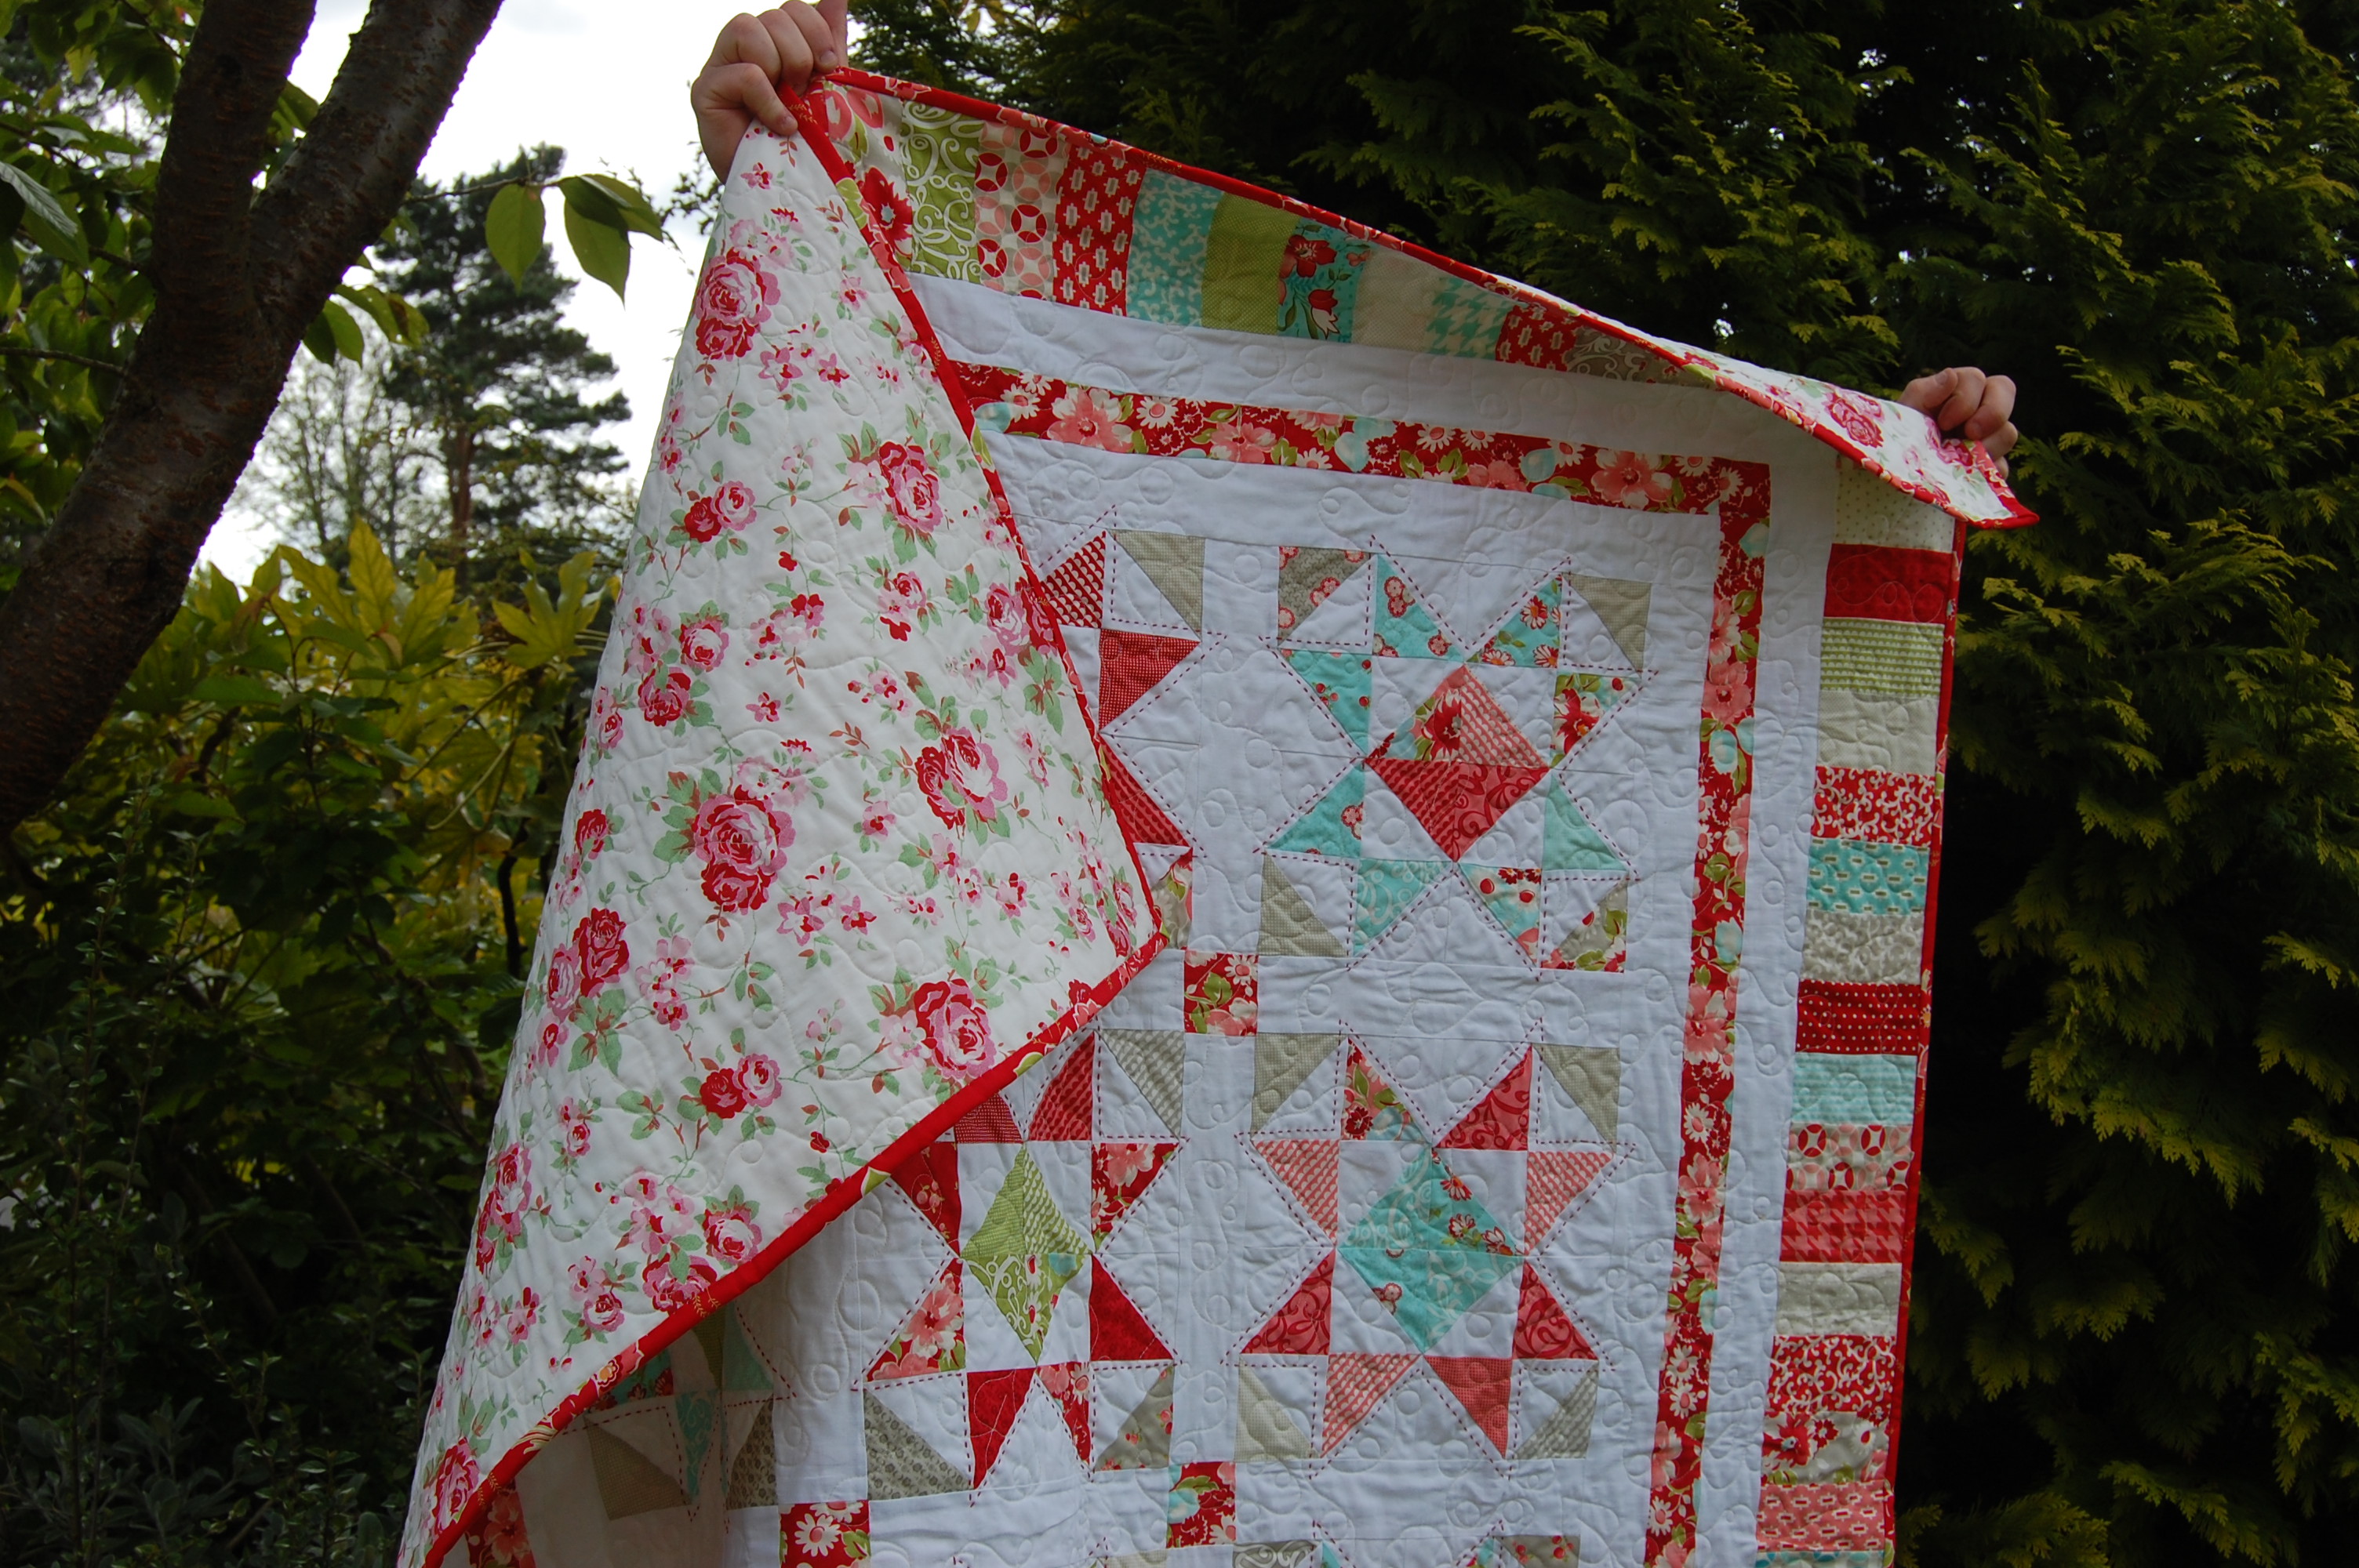
This is the back:
This is going to the girl who was my best friend at secondary school (high school). You know the friend who never judges you, always supports you, laughs and cries with you, studies with you, paints your nails and listens to your woes about boys – and will tell you if you’re going wildly off-course? The one with whom you laugh until you cry? Regularly? And you really can’t remember why? That friend. She was a really great friend, and we’re still in touch although of course our lives went in such separate directions and we live so far away that we don’t do that any more – but somewhere in our memories our two 15 year old selves are lounging around in her room, crying with laughter. Admittedly it’s for her 40th which was 9 months ago, but at least there has been a lot of thought and time put into this quilt! I hope she enjoys using it.
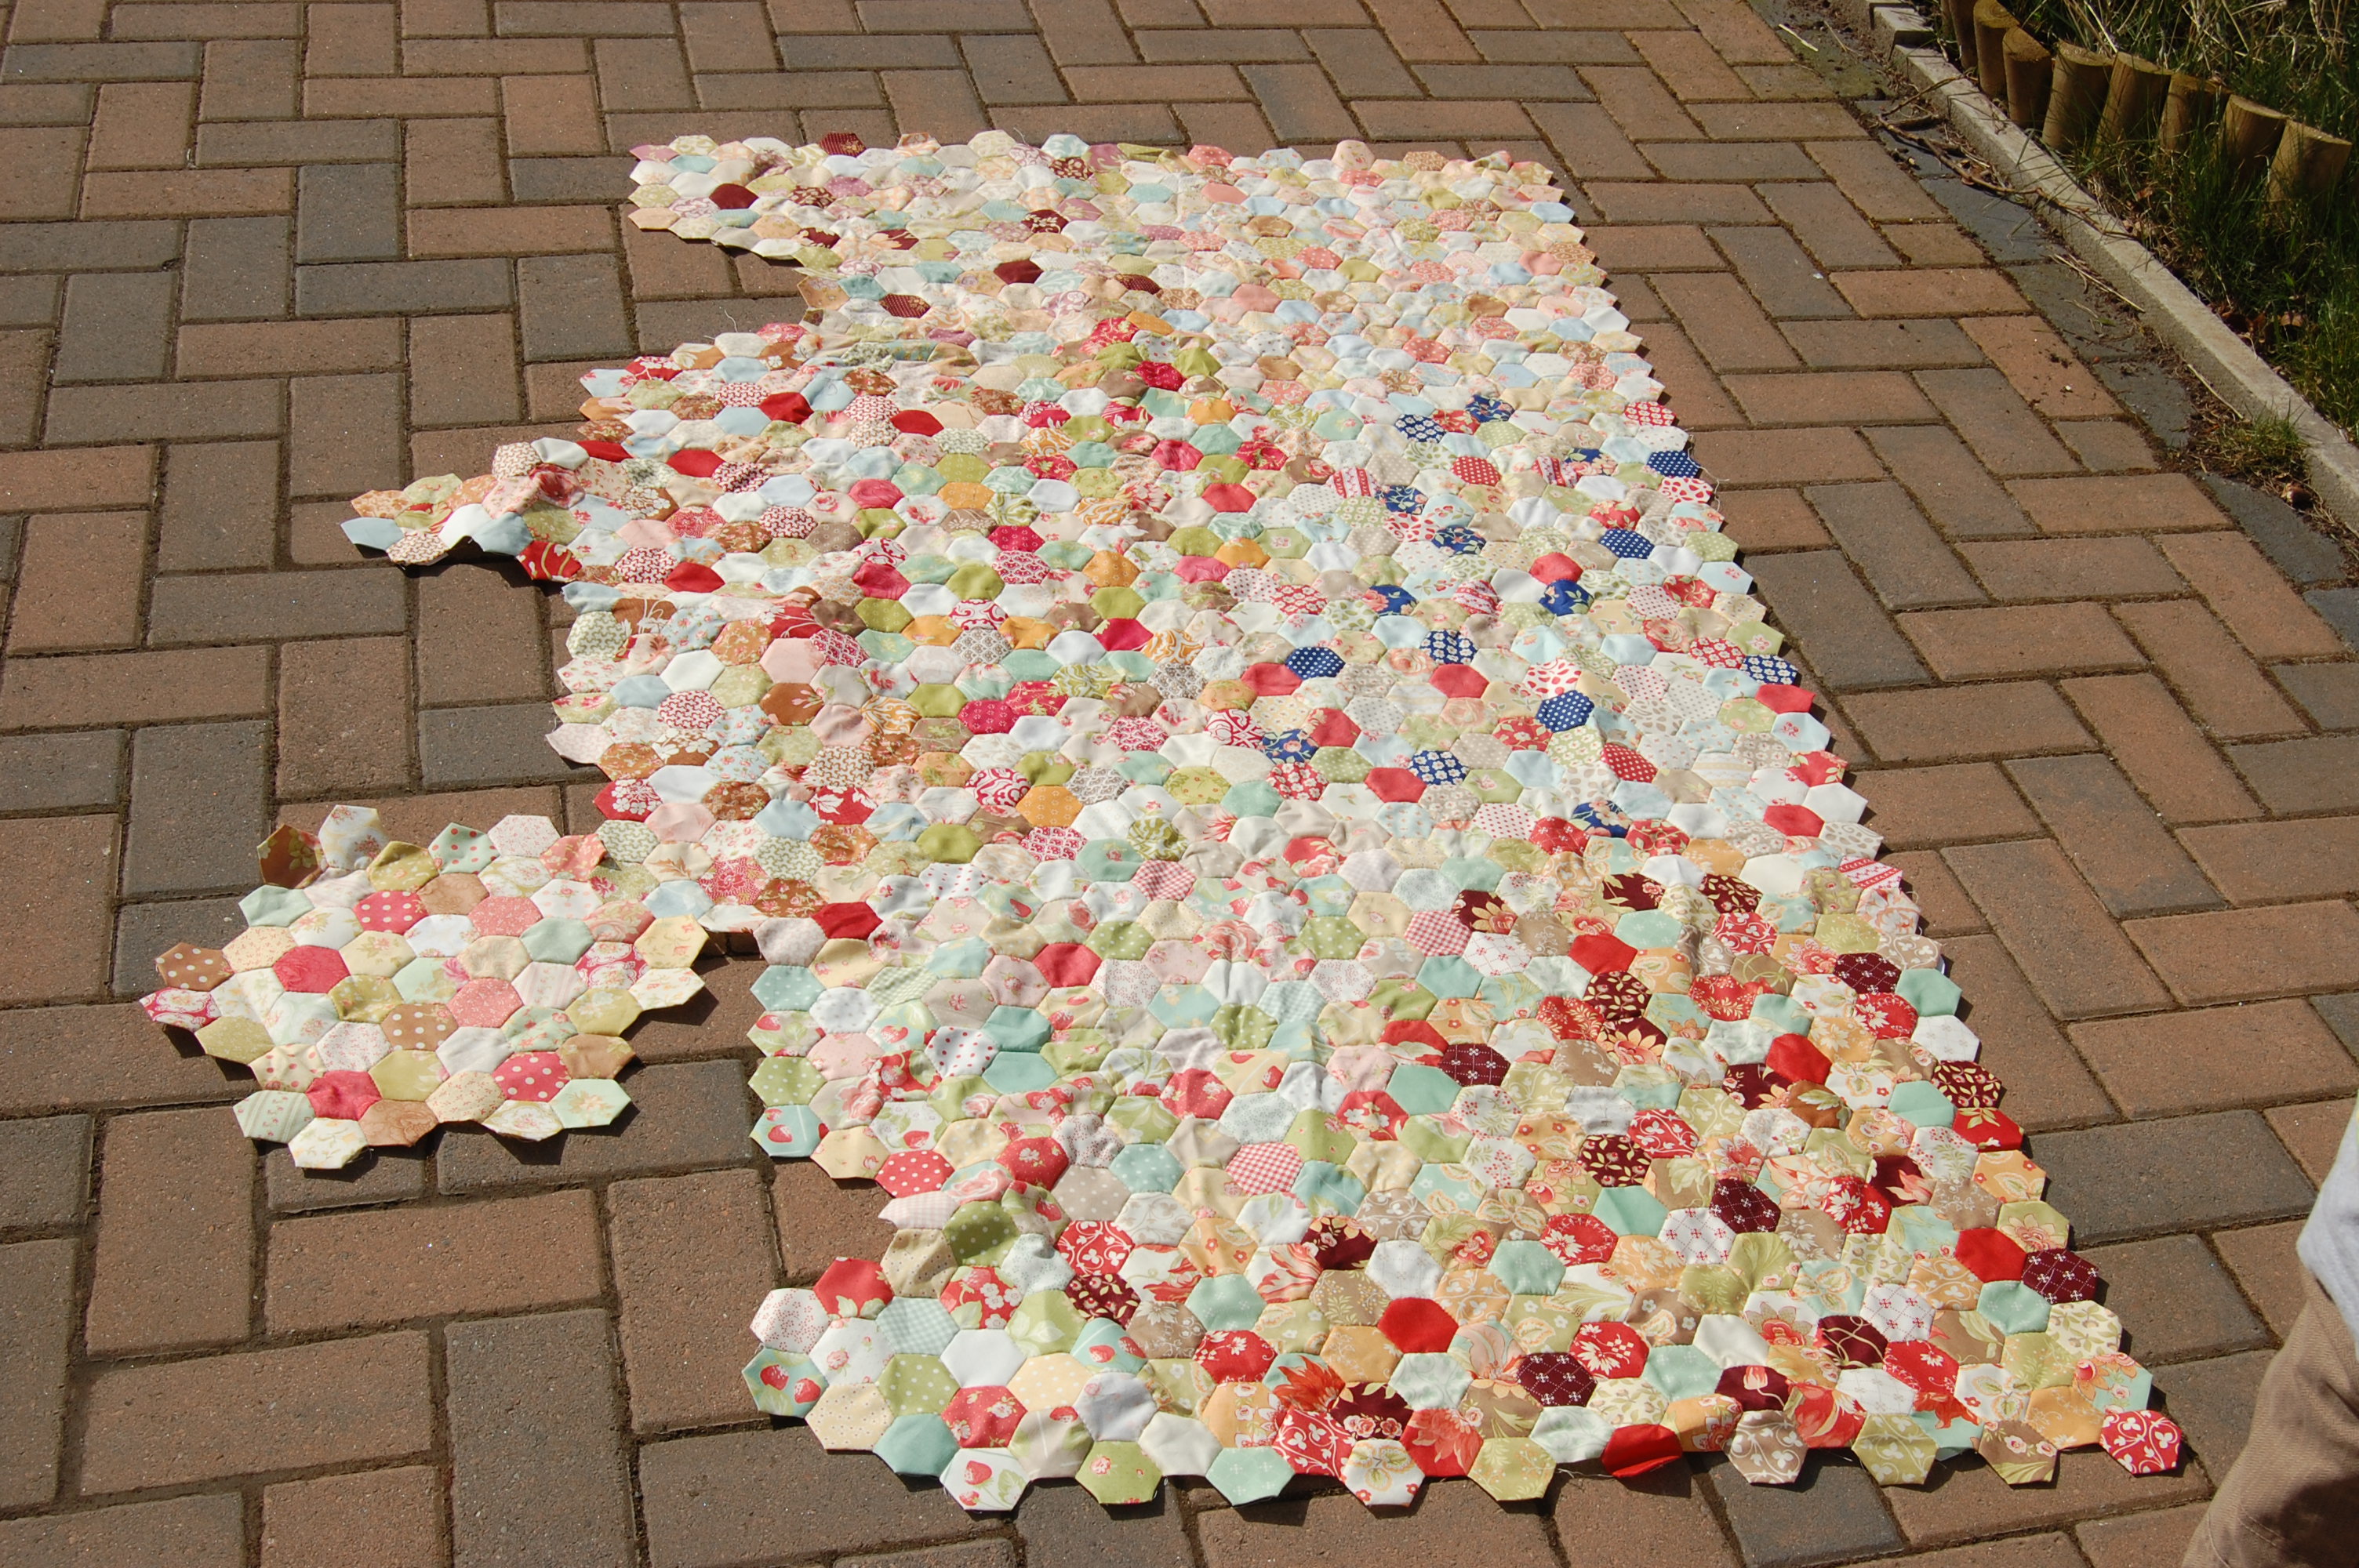
This is my only slow-burning project. I’m not really a slow-burning kind of girl; hence this has been a lesson in patience and process rather than product. But the thing about slow-burning is you don’t really realise how productive you have been.
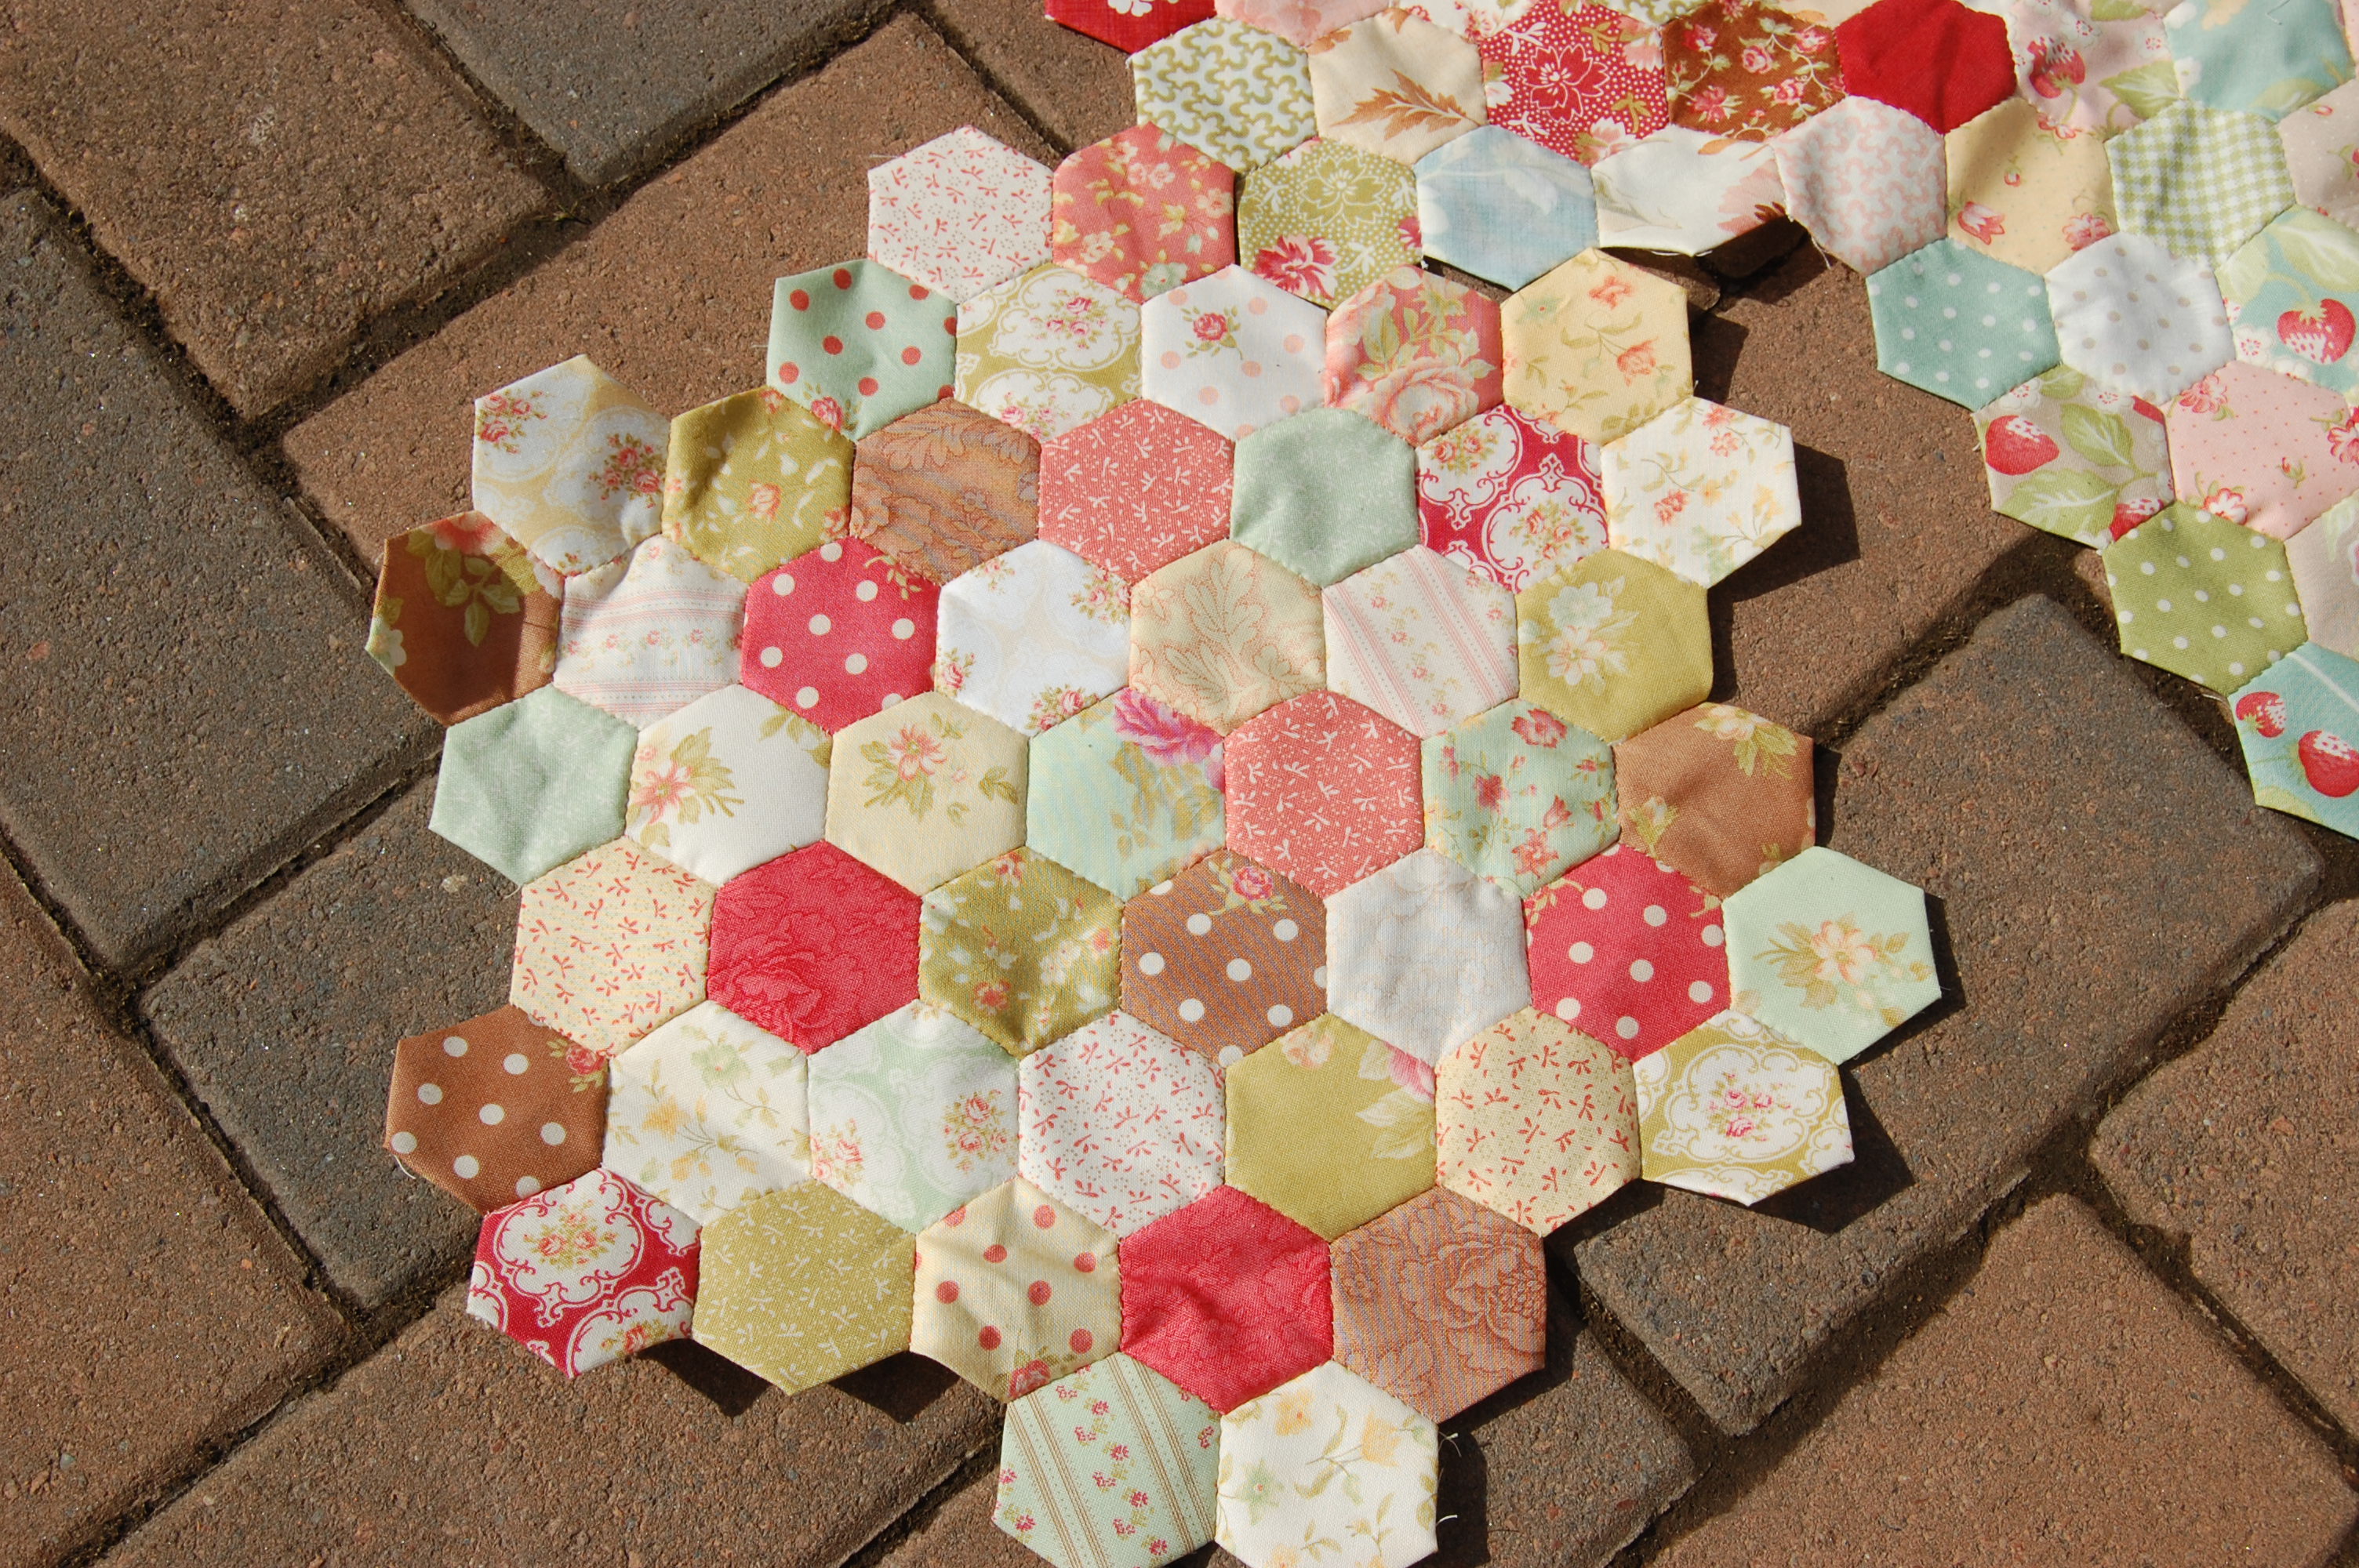
I’ve posted about this a few times before (links at the bottom) – it’s an English-paper-pieced quilt top in the making, made of 1″-sided hexagons. I have to say I thought I might get to about 200 and turn them into a cushion, but I had that hankering, you know, the one which says “I will be a real quilter if I can do this”. That one. Even though you ARE a real quilter if you put front, batting, back and some stitches together. (Real, albeit maybe not astonishing.) Doesn’t matter though, we are our own worst critics, and sometimes we feel we should put ourselves through a rite of passage.
Apparently this is mine.
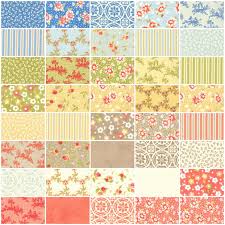
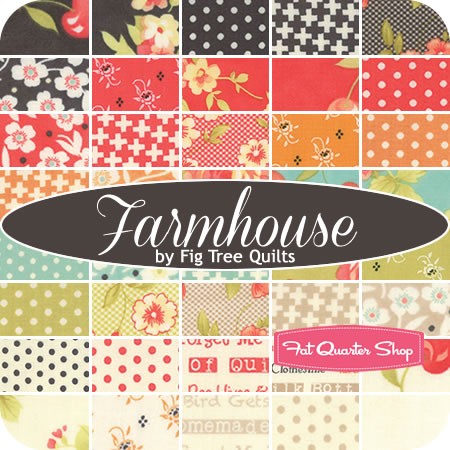
My all-time favourite designer is Joanna Figueroa of Fig Tree Quilts for Moda, and this will be a homage to her work – hexies, hand sewn, kept as collections. I realised that although I wanted a scrappy feel, I also didn’t want a bright mish-mash, which I’d rather keep for a hard-wearing machine-quilted picnic quilt. But a hand pieced hexie quilt of my favourite designer’s collections? I’m being buried in this. I am NEVER letting it go.
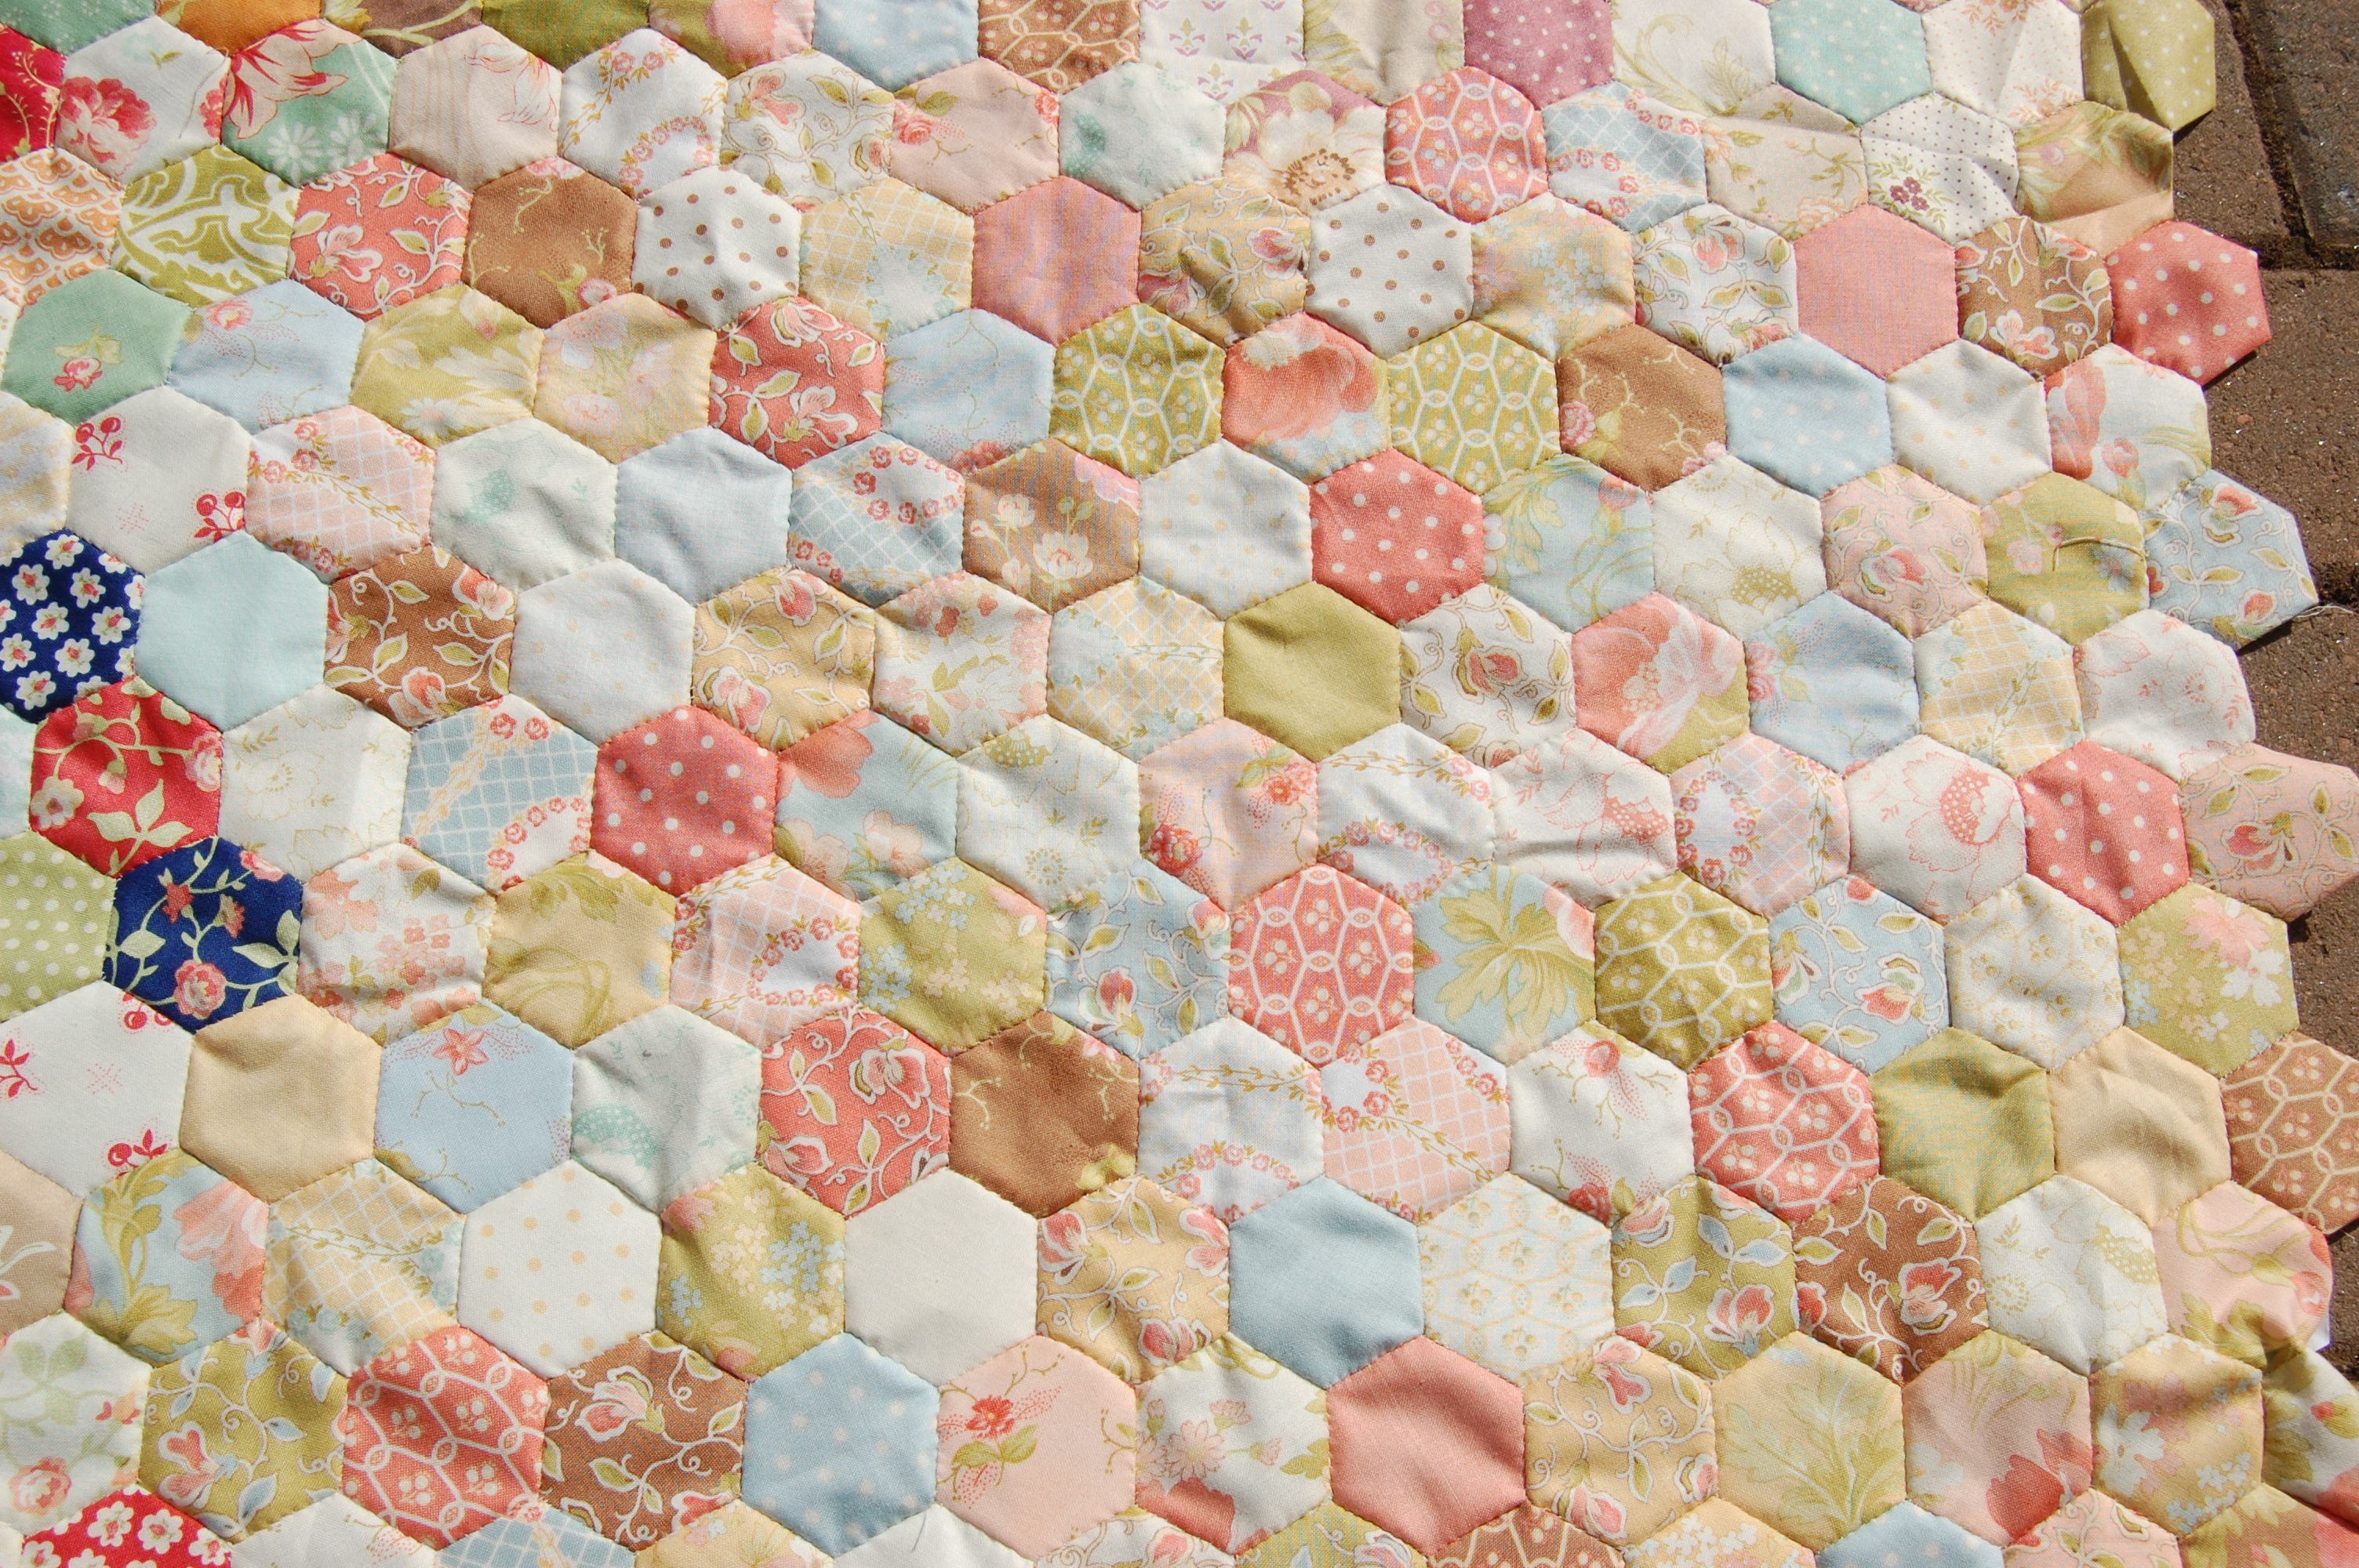
This is “Honeysweet”. I just love how all these florals feel traditional but not dull or stuffy.
“Avalon”. Isn’t it amazing how that random navy blue can somehow fit into a hexagon quilt with no other blue in and you accept its scrappy nature? Or I just refuse to even contemplate that it doesn’t. It WILL fit. It will.
That’s “Buttercup”, so pale and floaty…
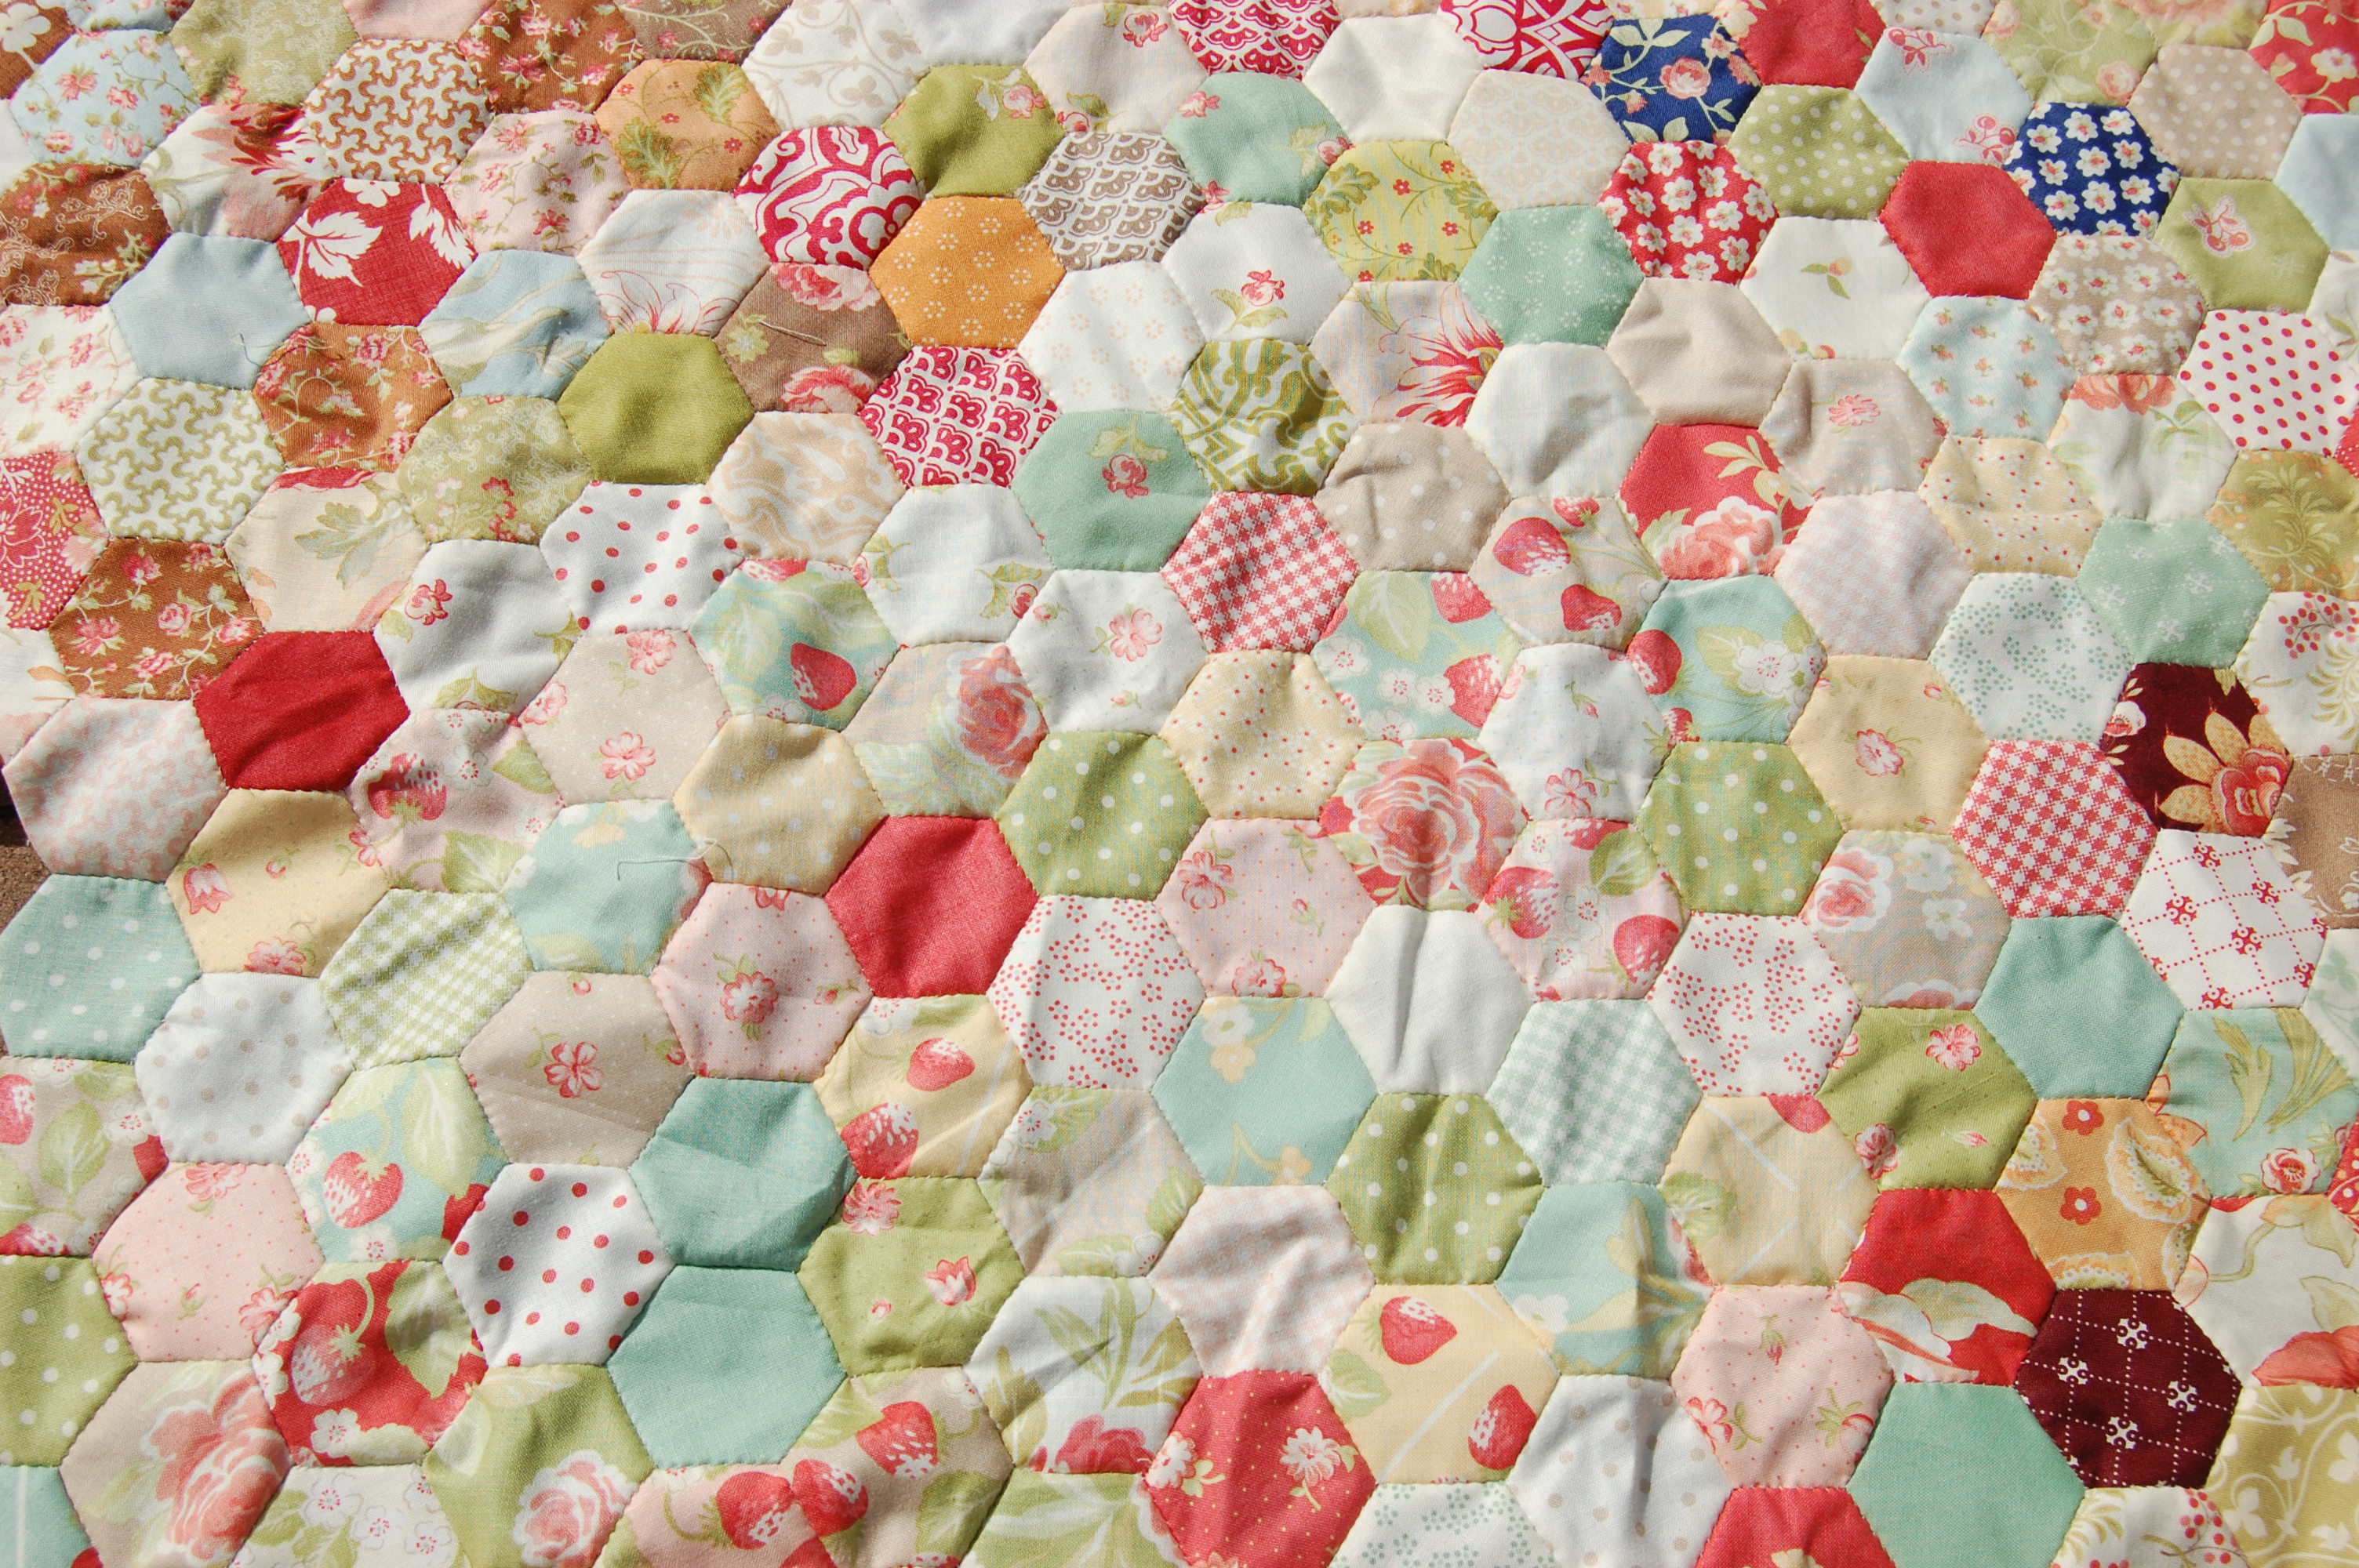
And this is “Strawberry Fields”, an earlier collection which I can’t find anywhere now – I got this single charm pack from Australia. This quilt has definitely NOT got a small carbon footprint… I love this collection; so much nicer in real life, fresh, vibrant, mellow, pretty, perfect.
“Fig and plum”.
“Tapestry”; this is one of my all time favourites – you can tell by the number of quilts I have made with it!
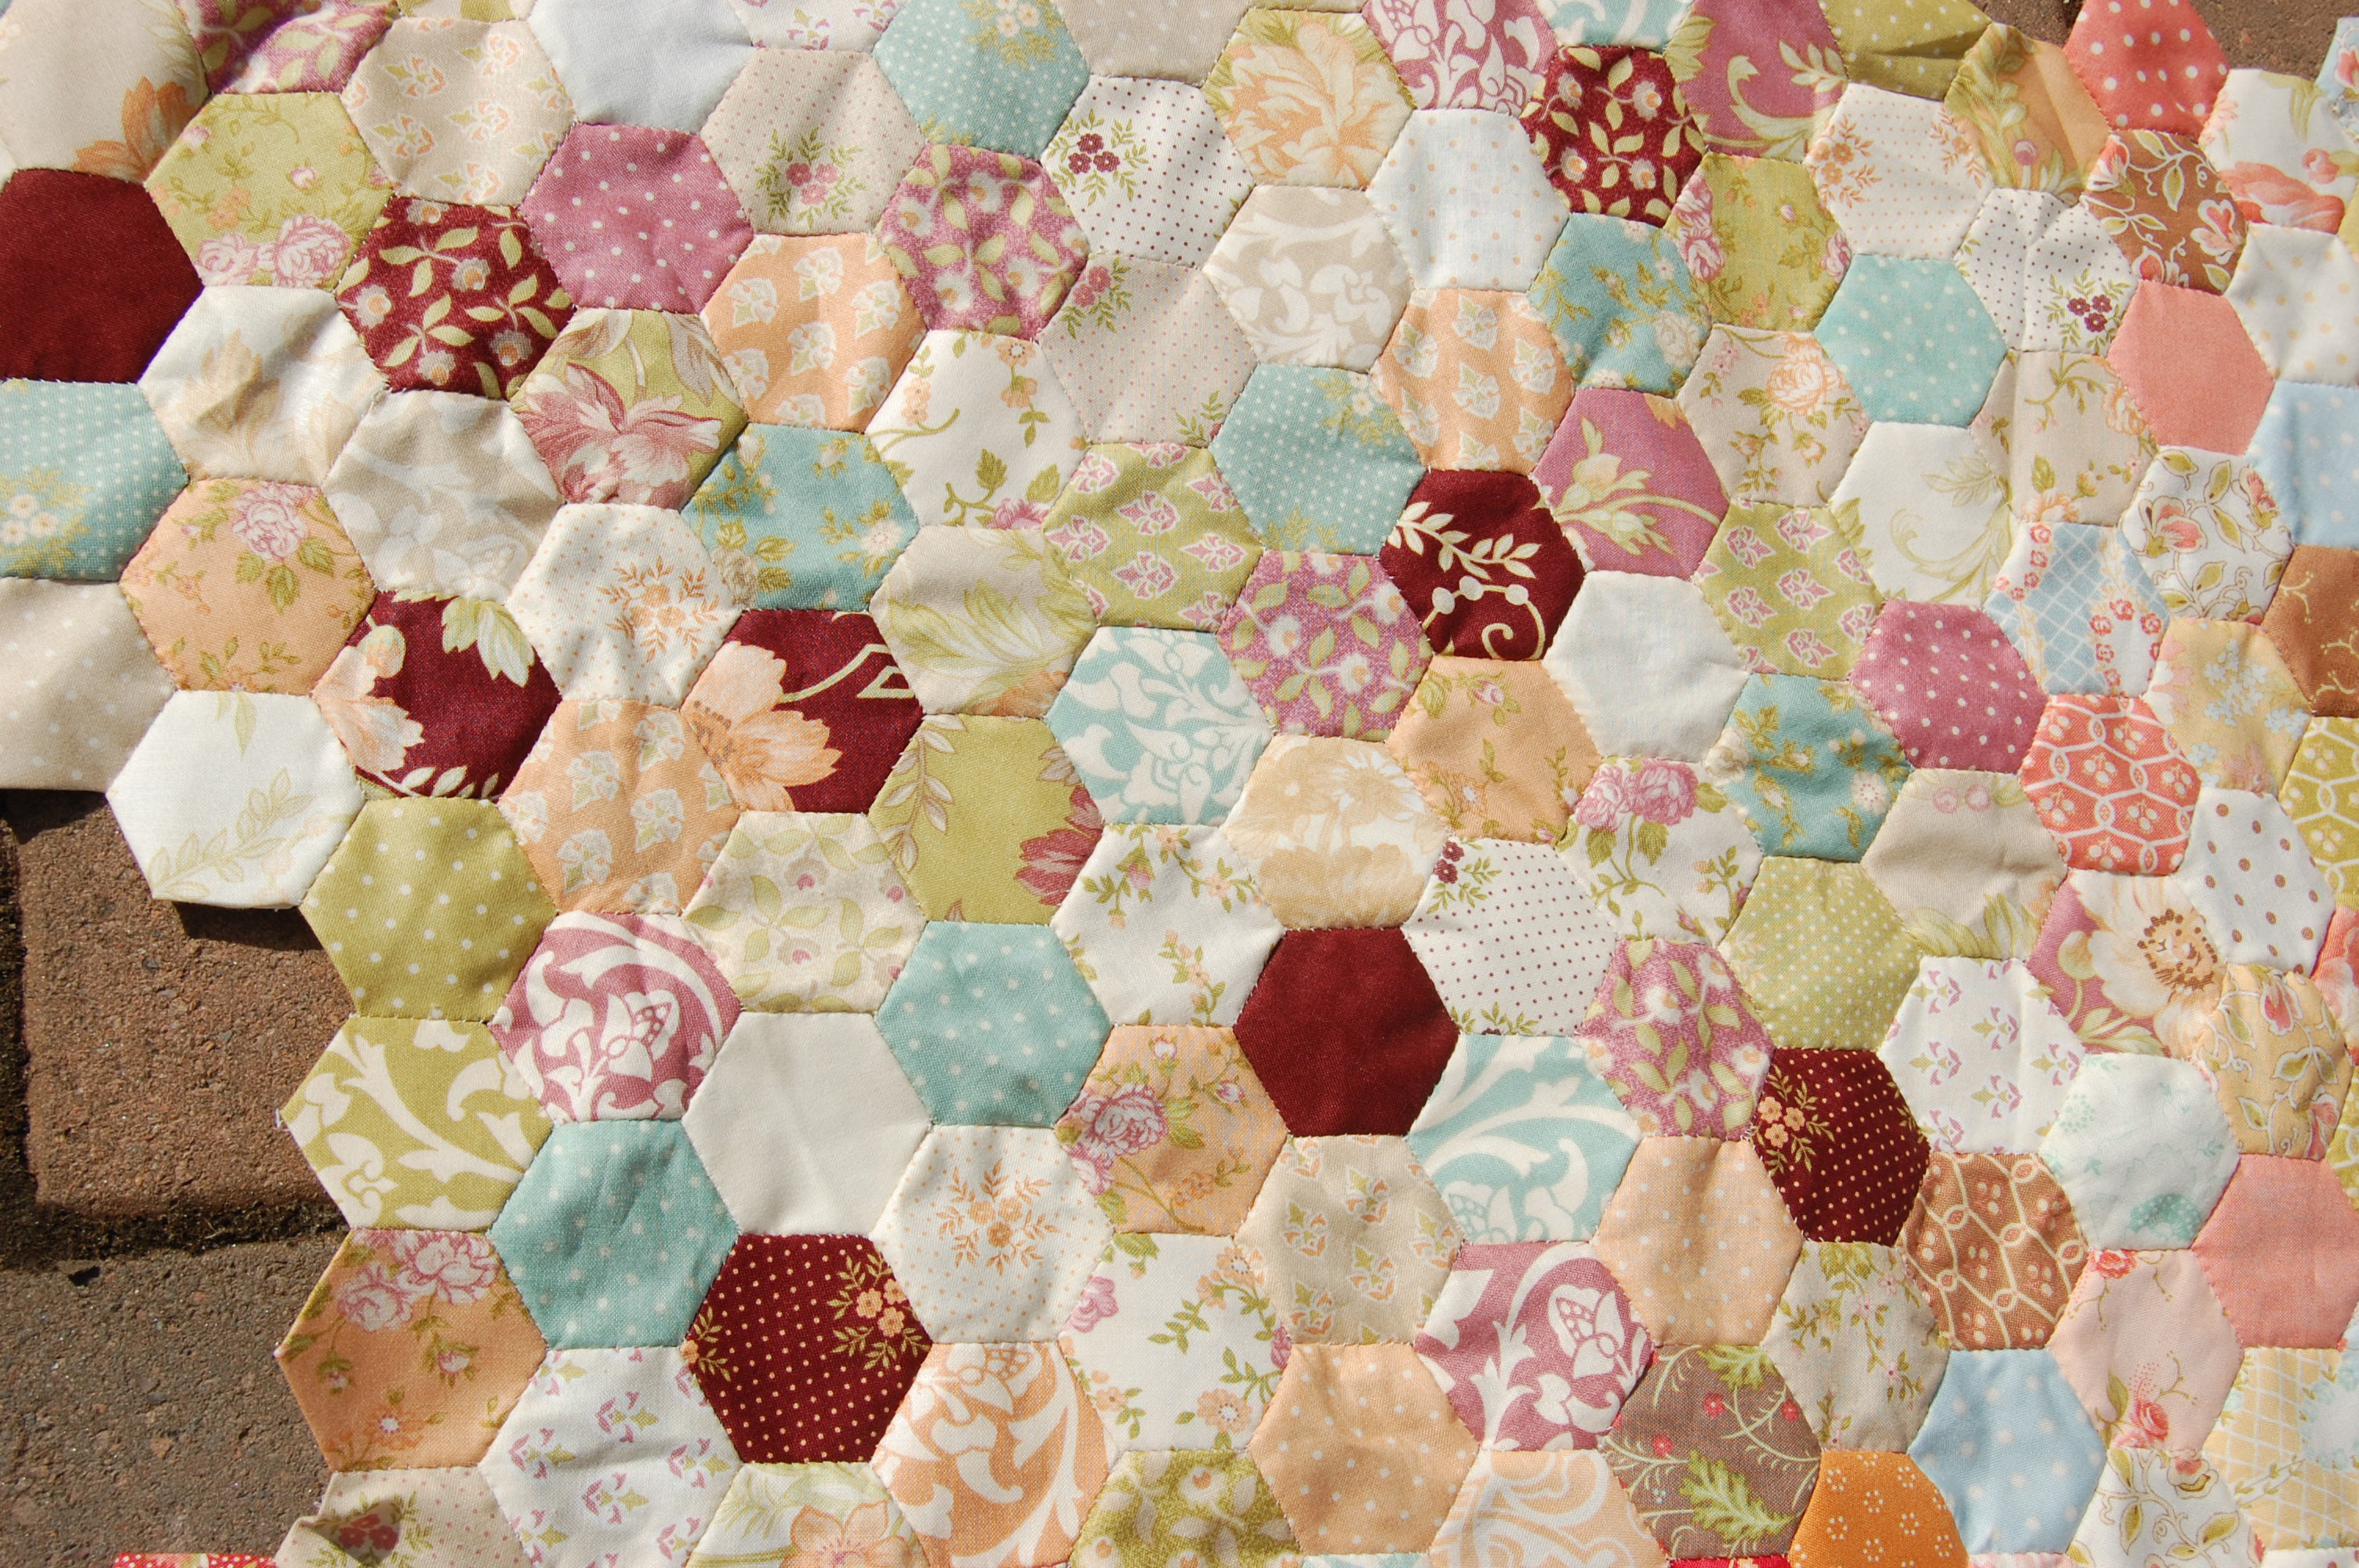
This was a cheat because at the time of taking this picture a few days ago, it wasn’t sewn in – it is now though, along with some more. It’s “Fresh Cottons”. I’ve always been underwhelmed by this collection, but once it’s together it is nice and does work. It’s not my favourite; I’m not keen on the minty green somehow. It made the cut though, unlike “Mirabelle”, a more recent collection which I really didn’t take to at all.
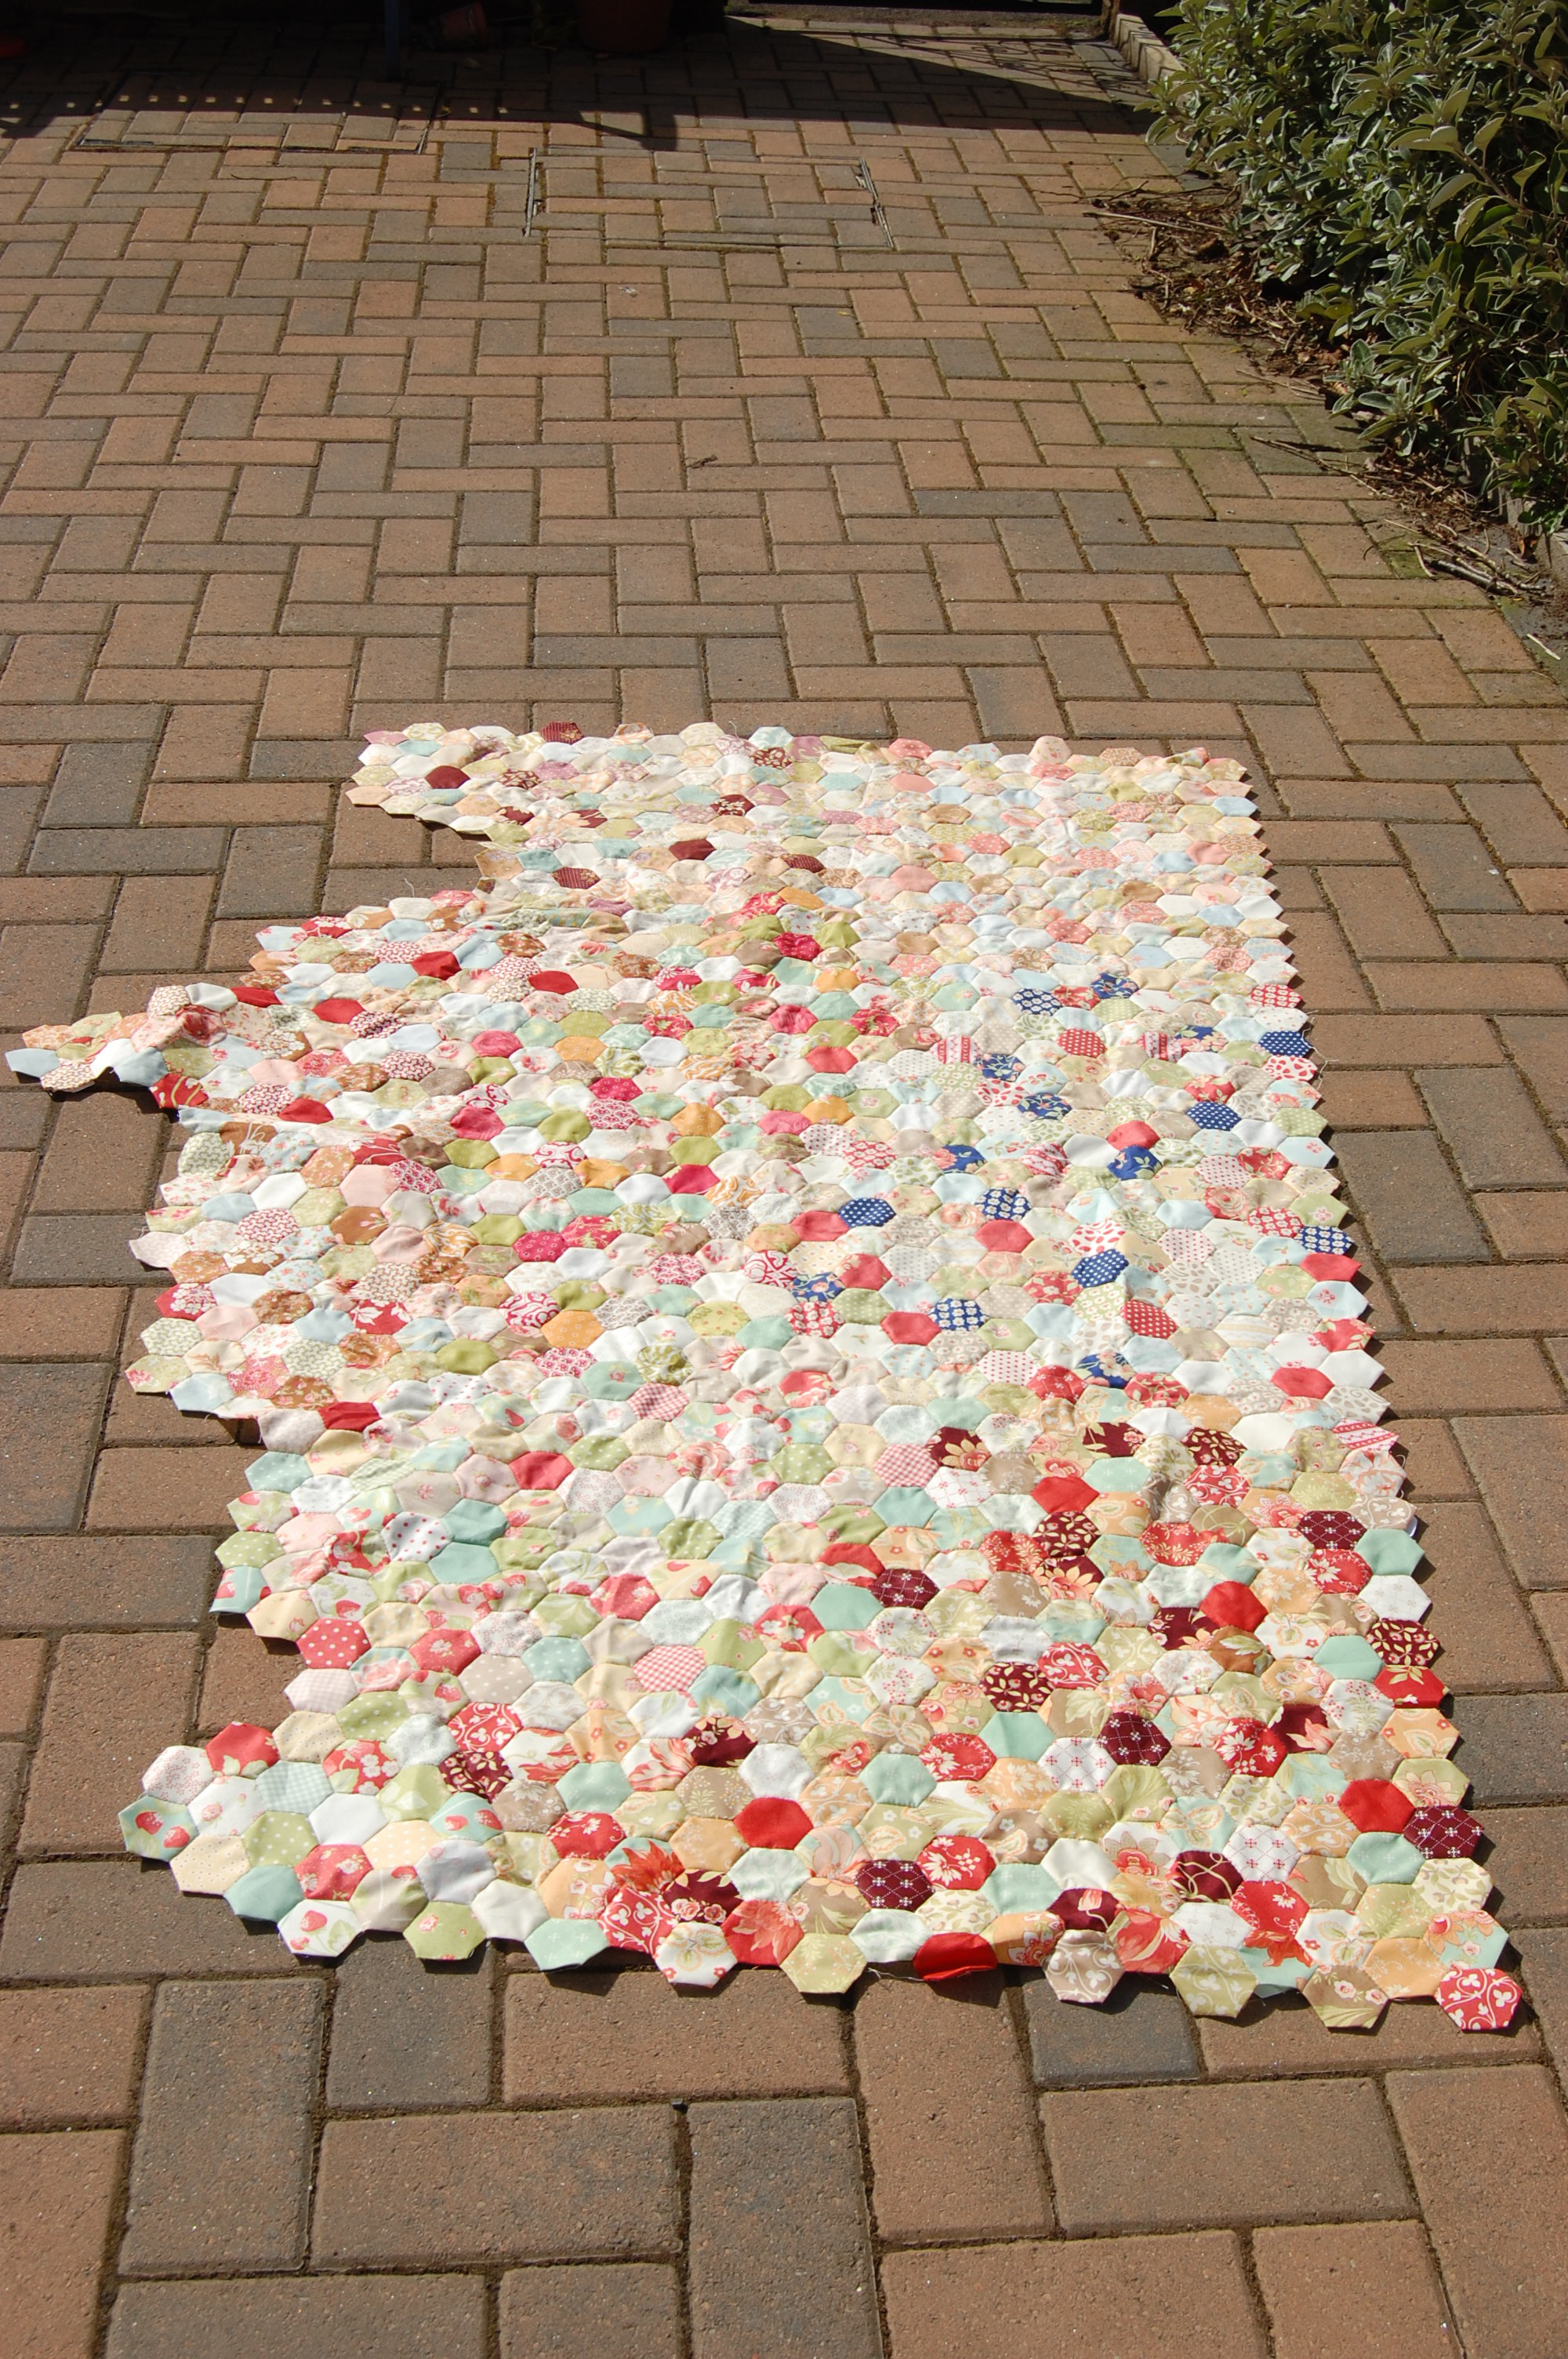
I think this is about 1100 – 1200 hexagons sewn together. I was aiming for 1400 (about 60″ square), but it may be more like 1600; mainly because there are other and new collections which I love too. The nice thing is you can buy a charm pack and get the full collection and 160 paper-pieced 1″ hexagons from it, so it’s not like I have to buy a lot of fabric to get the collection. I have some “California girl” to go in:
Some “Somerset”
Have ordered some “Aloha Girl”:
And the release of this beautiful collection in September will make the end of the summer bearable:
That might be enough. But if she keeps making such beautiful collections I might just have to keep going! Turns out slow burning is OK after all.
And the best bit? Spring’s here, the sun’s out, and I can sit out in it whilst still sewing. Bliss.
Till the next time,
Poppy
xx
p.s. you can find the three previous posts about this quilt here:
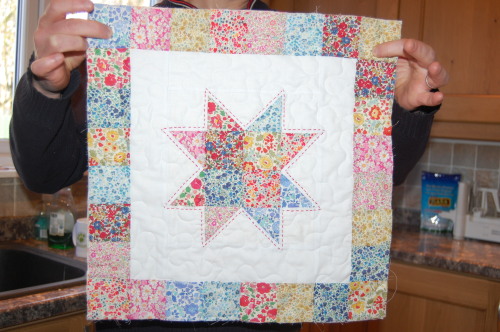
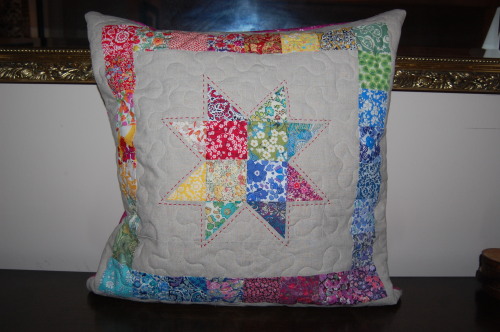
It isn’t though. It’s completely staged because I forgot to mention when I
wrote the tutorial for the one on the left that is was actually commissioned
for someone else. I don’t get to keep it. Yes, my new year’s resolution has
failed spectacularly to kick in, and I am still making for others with no
additions yet to our house. Still this one is a retirement gift for an
apparently wonderful NHS Healthcare worker (a Health Visitor) who seemingly
deserves things of much beauty and love. So. I’m spending time with it. Hanging
out. Like a crazy old quilt lady. I’ll may have to make me one too…
I’m partly posting because I wanted a picture of the cushion when it was properly
filled – The cover is 19.5″ square and it looked too “floppy” last time, with a
20″ cushion pad. Now it has a 24″ pad and looks lovely! I think. I know,
everyone knows you should go bigger… And partly because I wanted to see it
alongside my Liberty dresden cushion, blogged here: https://cuckooblue.co.uk/post/78267964842/liberty-dresden-pillow-love
My wee dog was most upset with this photo shoot. Usually a quilt on the
ground means happy hours of lazing about, snuggled next to mummy chewing a
stick, hopefully with the baby-dinosaur, which is clearly how he sees Kiddo,
engaged in some crafty activity and not charging about with various brightly
coloured missiles in his hands or leaping randomly off furniture. This time it
was a “I know it’s sunny but it’s way too cold for picnics” and everything
swept back in. He kept up this stance of protest next to a juicy pile of sticks
for some time before sloping back inside. Wee cutie.
I know how he feels. Bring on summer. My ambition is to have a whole heap of
cushions ready for when it happens for real, hopefully very soon! Meanwhile, if
you fancy a go at either of them and need any guidance, the tutorial for the
one on the left is here:
Hello lovely creative types, so… how best to gloss over my prolonged bloggy abstinence? How about we make up with a tutorial? You might not need one as it’s pretty simple, but you know, since I took pictures…
This is Liberty of London fabrics and linen. The pattern was actually born when i decided to make a thank-you present for my lovely neighbour who let me use her shower for 2 weeks whilst our bathroom was ripped out and replaced. I now have a hotel bathroom! I’m so tempted to hold dinner parties in it – it’s the nicest room in the house… Anyway, she is more traditional, so I made her this:
This is made with Kona snow cotton… and Liberty fabrics I actually bought at THE REAL LIBERTY OF LONDON SHOP. In London no less. I was slightly in heaven. But also a bit overwhelmed by all its beauty after this pilgrimage (the shop itself is just aesthetically gorgeous)… and by the prices. I felt I should buy something so bought a little charm pack of 36 2.5″ squares, although I had to add 4 more from stash to make this. I must tell you though they came from Alice Caroline Supply (http://www.alicecaroline.co.uk/) and are cheaper to buy from the website. But that wasn’t really the spirit of it all was it? My neighbour was suitably pleased.
Bit of wobbly hand-quilting action going on there.
But I wasn’t thrilled to be honest. I thought that the patchwork border got lost round the sides of the cushion. Amateur. This is what it looked like before it became a cushion – I thought it would make a pretty mini-quilt or wall hanging…
See what I mean? So I was a bit disappointed. Anyway, I thought I would try and fix it with an extra row of sashing:
And certainly you can see it better. but if you decide to make one, you can decide on how you like it! So, for many folk, that will be it as it’s quite simple construction and with a little experience it’s straightforward to work this out, but as sometimes it’s nice to work from instructions, here goes! This is for the Liberty and Linen cushion. Clearly you can make it in anything you like – a moda mini-charm pack and white solid would be nice.
To make the patchwork cushion front, you will need:
A 10″ piece of Linen (44″ wide, I’m assuming your solid comes as 44″ wide)
Forty 2.5″ x 2.5″ Liberty or patterned fabric squares
24″x24″ square piece of batting (I used cotton)
24″x 24″ square piece of cotton backing fabric (this will be on the inside of the cushion, so it doesn’t need to be too nice)
1. Cut the linen fabric into four 2.5” x 44” strips.
2. Strip 1: cut into Four 2.5” x 2.5″ squares Four 2.5” x 4.5” rectangles One 2.5” X 13.5” rectangle
3. Strip 2 : Cut into One 2.5” x 13.5” rectangle Two 2.5” x 10” rectangles
4. Strip 3: cut into One 2.5” x 22” rectangle One 2.5” x 18” rectangle
5. Strip 4: again cut into One 2.5” x 22” rectangle One 2.5” x 18” rectangle
You should now have linen cut into:
4 x (2.5” x 2.5) squares
4 x (2.5” x 4.5”) rectangles
2 x (2.5” x10”) rectangles
2 x (2.5” x 13.5”) rectangles
2 x (2.5” x 18”) rectangle
2 x (2.5” x 22”) rectangles
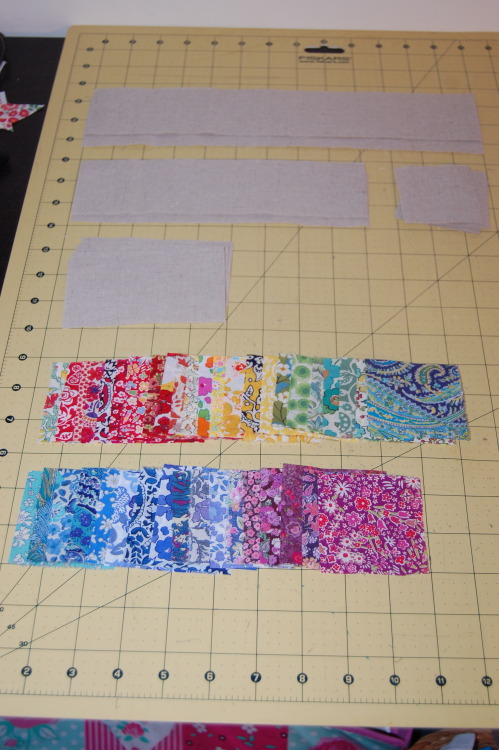
6. And your 40 Liberty 2.5” x 2.5” fabric squares (either buy as a mini charm pack or cut these)
Photo shows my cutting in progress. If you think you’ll get confused, label each pile’s measurements with a scrap of paper. I started to arrange my Liberty fabrics in a rainbow.
Layout
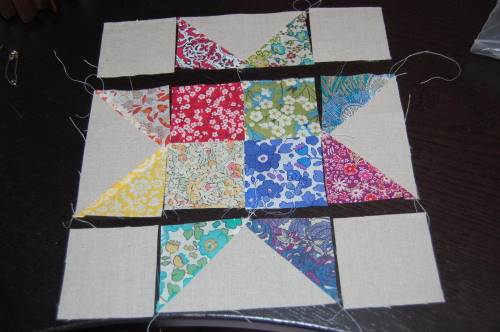
Now arrange your layout as you like it. If you are going for random, this will be easy, you won’t need to lay it all out, you can just start sewing! But I did this:
In the centre, the top two squares will be the top two points of the star, the bottom two will be the bottom points of the star etc. The 4 in the middle will be aa 4-patch which makes the centre of the star.
I think of a rainbow (unsurprisingly!) when thinking about which colours go together. Red – orange – yellow – green – blue – dark blue/indigo – violet/purple – red to enable the colours to meld in a natural way. Obviously orange is made from red and yellow which is why it’s in between them etc, so it works better than red and green next to each other for example, when green has no red in it. Anyway, have a play around until you like it.
Making the patchwork star centre
(BTW I’m not generally a big presser until the end out of sheer laziness, but with this, given it’s going to be a centrepiece and small, I pressed at almost every stage. It keeps everything neater, there’s no doubt.)
1. Sew your centre 4 patch, first by sewing 2 squares together, then the second 2 together, then join them as a 4 patch. Press.
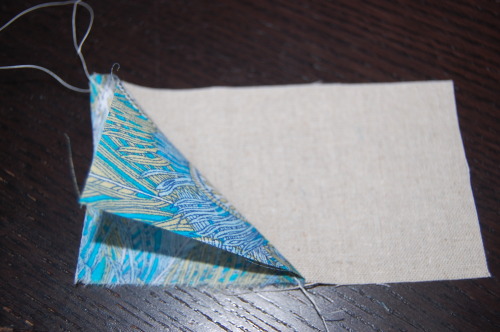
2. The star points are flying geese rather than HSTs – much easier. You are aiming for this:
This is how you do it:
Draw a diagonal line in pencil joining opposite points on the wrong sides of each of your eight squares reserved for the star points.
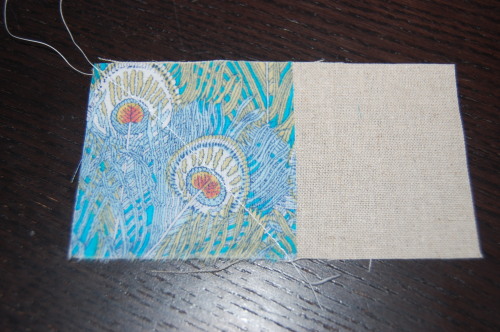
Lay one of these patterned squares, right side down onto one of the 2.5” x 4.5” pices of linen, with the bottom end of your diagonal line towards the centre of the fabric (it won’t be in the centre). Make sure your edges line up nicely.
(if you are using directional prints then be careful with this step, you could easily end up with your fabric upside down. Ditto with getting the two fabrics mixed up – I did this and had to change my layout – rather than unpick…)
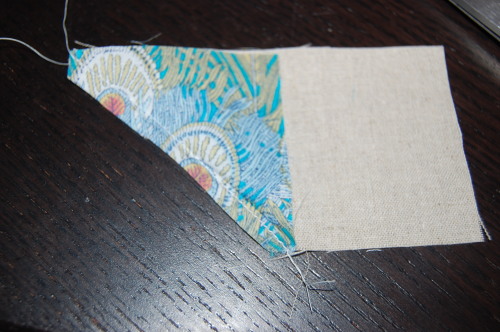
Sew along your pencil line.
3. Now before you cut off the excess, it’s worth folding down the right side to check you are happy.
4. If you are then you can go ahead and trim that excess piece on the wrong side – both the linen and patterned. You’ll end up with little triangles of scrap for a tiny project. Press.
5. Repeat the process on the other side of your linen rectangle as shown in the picture. Don’t worry that there is a bit of overlap, that’s in the seam allowance when you sew them all together. Press.
6. And you have one side of your star!. Do this with all 8 points onto your four 2.5” x 4.5” pieces of linen.
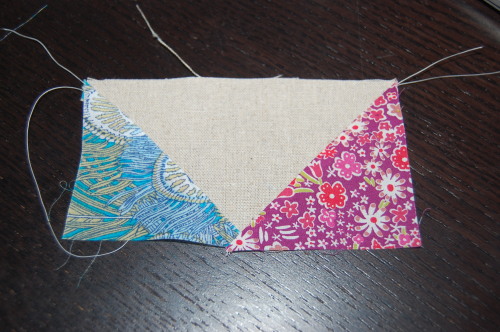
7. Now take your top row star points and sew a 2.5” x 2.5” linen square onto either side. Repeat for the bottom two star points.
8. Sew your side star point pieces to the centre 4-patch…
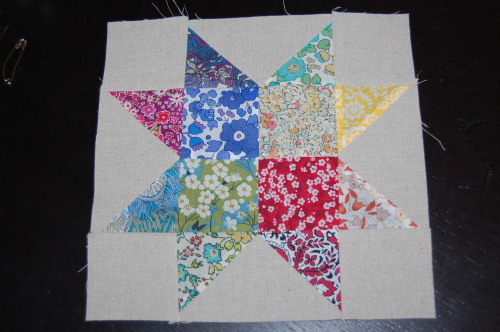
9. And then sew the top and bottom rows on.
10. Press everything.
Is it looking lovely yet?
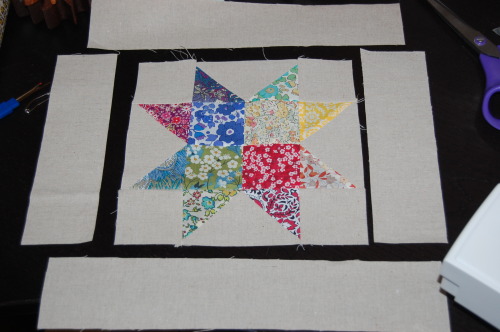
Adding the sashing
11. Sew one 2.5″ x 10″ rectangle to one side of your star. Trim off the excess (I always make sashing bigger and trim in case my seam allowance isn’t always perfect). Repeat on the other side. Trim excess.
12. THEN sew the 2.5 x 13.5″ pieces along the top and bottom, trimming the excess linen afterwards. Press.
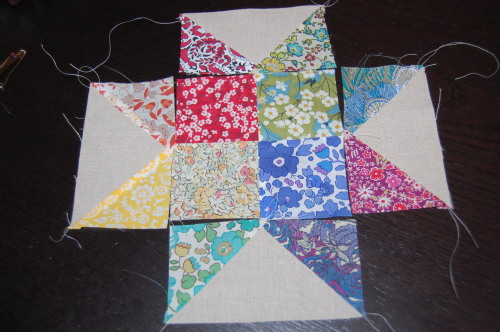
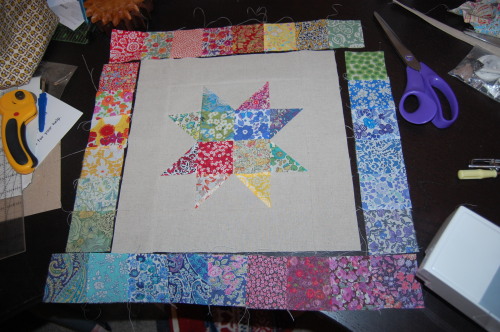
Making the patchwork borders
13. Sew your top 8 liberty squares together and put to one side. Repeat for the bottom eight squares. Now make the left side and right sides which will both have 6 squares. Press.
(somehow I managed to sew 9 squares on the bottom row! Doh! Had to unpick after all…)
14. Sew the sides onto your star block first and then press, before sewing on the top and bottom pieces. pin your patchwork strips to the linen first to ensure it reaches the full length, and match up the seams at the corners as best you can. Press.
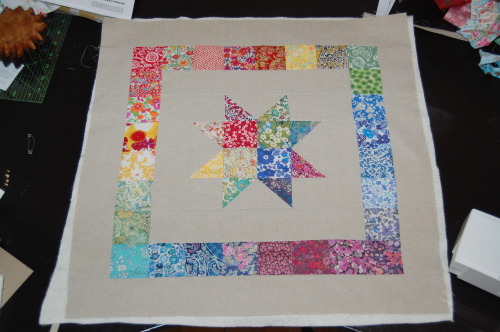
Now at this point you can batt, back, quilt and bind and use as a mini quilt or wall hanging which measures 16.5” square (above). Or you can add the outer linen border to finish your cushion as I did.
Adding the final linen border
15. This is exactly what you did before. Sew the 2.5” x 18” linen strips onto the sides of your star block and trim the excess.
16. Now sew the final two pieces, the 2.5” x 22” rectangles to the top and bottom and trim the excess. Press everything…
And Ta-Dahhhhhh! You’re done!
17. Now, make a quilt sandwich as normal. Lay the cotton backing fabric face down, lay over the cotton batting, lay over the patchwork piece and smoother everything over to ensure there are no wrinkles. I pinned with safety pins (it’s not worth getting out the gun for such a small piece I found) to baste.
18. Quilt as you like – straight or hand quilting on this would be lovely! I machine- quilted with an overall stipple…
19. And then did a little decorative hand quilting with perle 8 cotton in a red colour.
My back is Heather Ross Unicorn in Purple from Far Far away II – and I LOVE it.
Your cushion cover will measure about 19.5″ square.
Add an insert (go a bit bigger, maybe 22 – 24″ square, as you can see from the picture above, mine isn’t full enough at 20″ square, I’ve ordered another insert) … and enjoy your new cushion!
Well I hope this makes up for the absence. Actually, I Firefox has crashed so many times when I have attempted a blog post, I’ve lost 3 already, and this one crashed at least 15 times. I kept saving as a draft and wrote most on Word and copy/pasted. Anyone else having trouble? I’m either going to have to abandon Firefox (likely) or Tumblr (less likely). As a plus, I have a few posts to share when I resolve this. Meanwhile, hope your creative mojo is mojoing away.
Till the next time,
Poppy xx
Edited: you can see how it looks with a fuller cushion insert and in the sunshine here: