Liberty Dresden Pillow Love

Liberty. Dresden. What’s not to love?

image

Yeah, I knew you’d get it. Maybe only those with such a need for the aesthetically pleasing that they wander through blogland searching for it, really get it as we do.  Liberty Tana Lawn is quite honestly the diamond of fabric – silky soft, so bright and pretty your heart aches, and such magnificently classic prints that I swear they will NEVER date. Never.

Are liberty fabrics expensive? Oh, you bet they are. But did I say they will never date? So, an investment then. And that’s what I’ll be telling the Hubster when he works out how much Liberty has suddenly entered this house.

And then the Dresden. Such a pretty block, and so classic. But they can look a bit old fashioned… I must say I didn’t really think I would ever make one – and I probably wouldn’t have, had they not appeared in blogland with bright, fresh colours and a clean modern feel. And a few years ago I saw Jo from www.mybearpaw.com ‘s lovely dresden pillow in the flesh and it helped change my view that Dresdens weren’t modern:

image

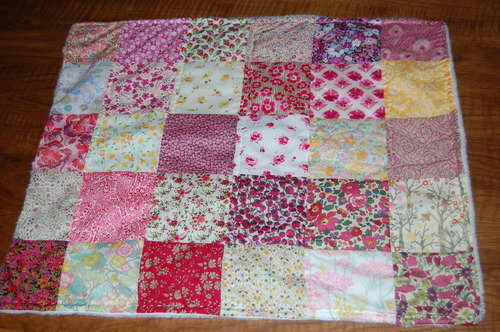
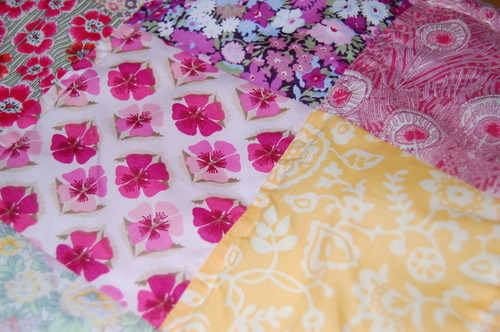
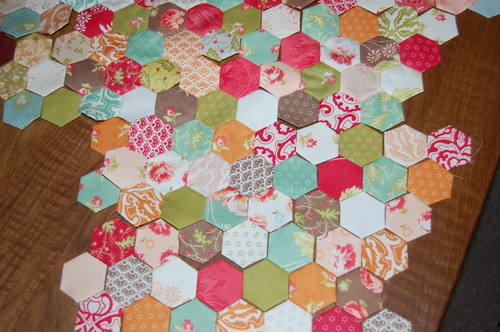
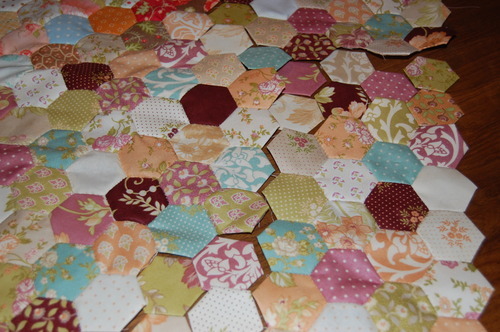
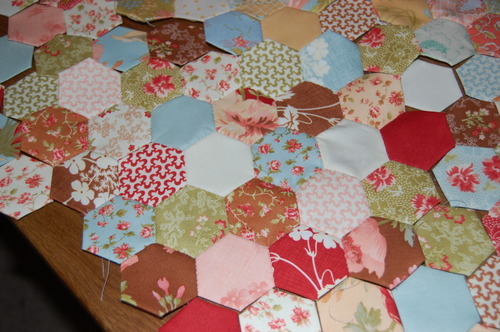
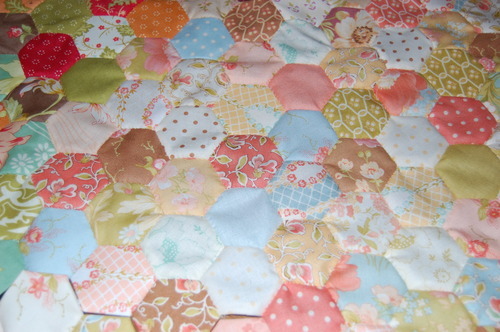
I even got myself an EZ dresden ruler last year , but had never used it. So when my sewing friend Alison had had a hard week, I invited her over for our first (and hopefully not last!) sew-therapy session. I knew just what I wanted to do. I bought a Liberty charm pack fromPickClickSew on Etsy and added a few more prints from my stash until I had 20 x 5” squares. With the Dresden Ruler I  cut 2 wedges from each square, so when Alison came over we each had a pile of 20 wedges ready to get started on. And we did.

I used instructions from this marvellous and easy tutorial from the amazingly talented Elizabeth Fransson:

http://www.sewmamasew.com/2010/04/dresden-plate-block-sew-along/

She made this black and white doll quilt, rather than a cushion, but the principle is the same of course.

image

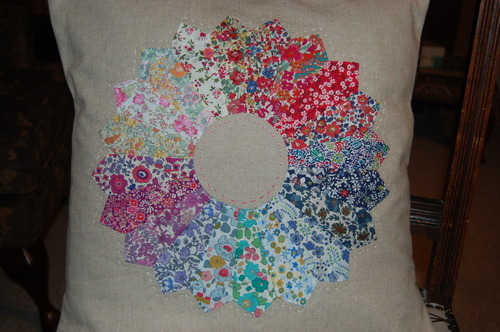
I used Essex linen in natural for my cushion back, cut to 17” square. In fact Alison and I both decided on linen for our cushion backs, so with identical fabrics and linen, you’d expect the cushions to be very similar wouldn’t you? But whilst I decided on a rainbow effect, Alison went for a scrappier look. Also once we’d made the dresden plates we had to decide on how to applique them onto the background linen; she chose to zigzag hers on the machine with white cotton, whilst I hand stitched mine on, and added batting and a bit of handquilting too. They did end up looking quite different! This is Alison’s:

image

The zigzag applique made a kind of outline effect, which is really pretty. Amazing how all the fabrics just look great together. Her cushion front was finished well before mine!

image

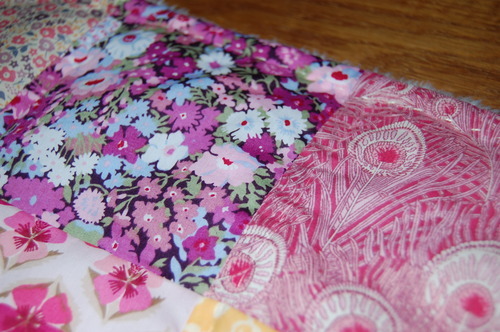
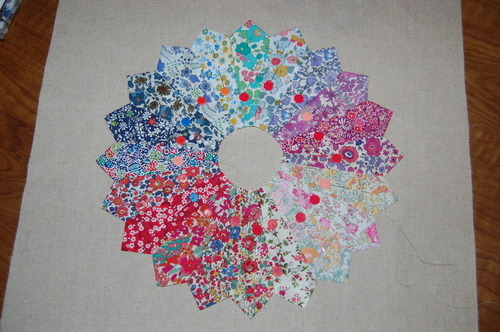
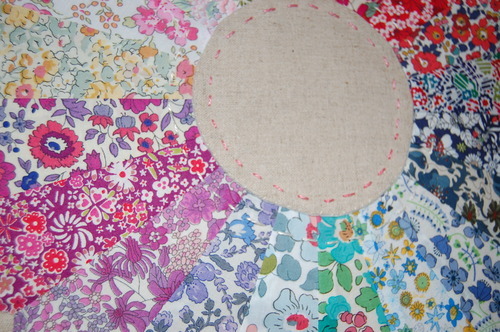
…at which point mine was still pinned to the background, and was being handstitched. I had made the inner circle, but hadn’t appliqued it on yet, so the inner circle is small and raw-edged in this picture below:

image

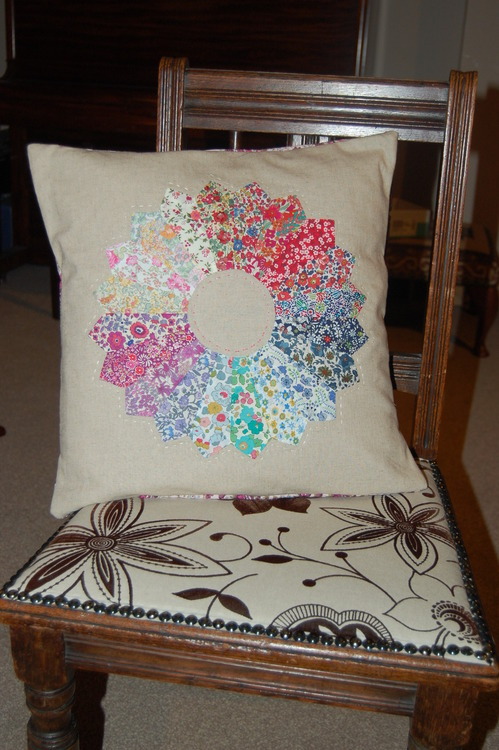
… and then after a couple of hours watching a film, I’d stitched on the dresden and inner circle, added some cotton batting to the back and lightly handquilted with perle cotton – just a simple running stitch around the outside, and either side of the inner circle. It looks surprisingly like it’s pieced onto the background, it really doesn’t look like applique.

image

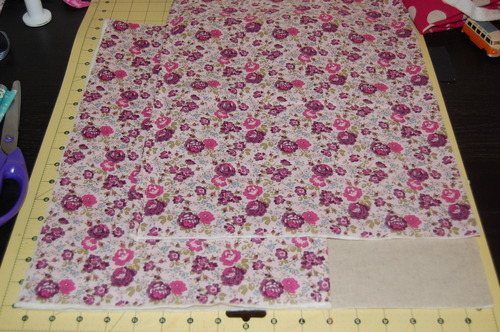
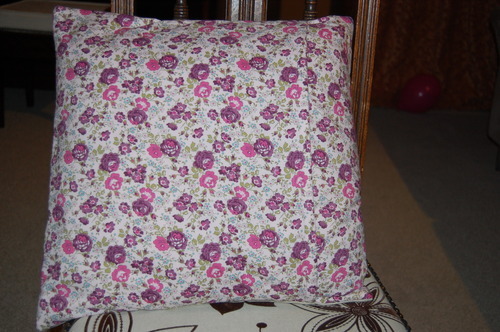
It’s taken me almost a week to finally decide on the back – and I decided to splash out and use this lovely piece of purple liberty which I had. It would be so easy to cut corners or scrimp on fabric and then end up with something I don’t love as much as I would have; I’m not making more of these for our house, so it might as well be as close to perfect (in my eyes!) as it can be!

image

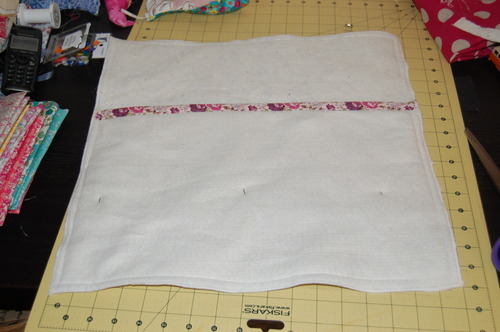
I went with an envelope back, very simple to do of course – cut 2 pieces of fabric which when overlapped will make a 17” square to cover the cushion front, like 17” x 14” and 17” x 11”. I pinned mine to cotton batting as the Tana Lawn is very lightweight fabric and I wanted to match the weight of the front. There is a significant overlap as you can see, otherwise the cushion gapes, especially without a button closure, but you can have a smaller overlap and add a button, poppers, whatever. Double hem the two edges which will be in the centre, lay the big piece over the smaller, or however you want the back to look when it’s finished, and pin together.

image

lie the cushion front onto the pinned together back, right sides together, and pin:

image

Sew all round with 1/2 ” seam allowance, then zigzag the edges to prevent fraying.

image

Unpin, turn out and:

image

View of the bit of very simple quilting:

image

You can’t really see the envelope back – benefits of choosing a busy print:

image

My piano and my Liberty Dresden Pillow. Ahhhhh.

image

Whatever you’re up to this weekend, hope you’re having fun!

Till the next time,

Poppy xx

Starflowers Chain Quilt … charm pack busting HST pattern/ tutorial #1

image

I have soooo many charm packs! I think it’s my quilty pleasure (boom!). 42 x 5” coordinating fabric squares, anyone? Oh, I think so. Although they are not cheap in the UK, they feel affordable if you are only getting one at a time. The problem is you can’t do an awful lot with just one on its own – you could make a baby blanket for a newborn, but that’s about it. Mix it with white and you have a small quilt, perfect for a young toddler, but not really big enough after the age of about 2 or 3. Now 2 charm packs is a different matter. I love sewing them together, putting a white 3” border on and making a traditional patchwork child sized quilt, which is actually still big enough (52” x 43”) for a throw on the sofa, something to put down on the grass for one adult to sit on, or a student take to college or university. And I’ve made lots of those and will likely make lots more. Still, not exactly BIG.

And I thought I should try and do something more exciting – I appreciate that to some the term exciting might be stretched in the context of sewing bits of fabric together, but in the context of knowing I’m amongst like-minded friends, I’ll just keep that word in. So I’ve made 2 quilt tops so far, each using charm packs to try and be a bigger sized quilt. This first one (above) is a starflower quilt made in High Street by Lily Ashbury for Moda; I’ll tell you about the other one another time!

It was inspired by this lovely quilt, but I wanted it smaller, and also decided to break up the stars. Each block takes 8 charm squares regardless, so a 9 block quilt would be 72 squares whether you do all stars or add the “chain”. image

You can see this quilt and more of Michelle’s work here: http://cityhousestudio.blogspot.co.uk/p/my-quilts.html?m=1  . She’s really talented.

My quilt is quite simple in construction, but in case you wanted a few directions, I’ve given a few instructions.

This is the first block – block A:

image

It’s straightforward, but you can’t take any shortcuts with the half square triangles – you have to slice the charm squares in half diagonally and sew them back together, making sure not to stretch the bias edges. There aren’t too many in this quilt, so it’s not too much of a pain. Use a scant 1/4″ seam allowance throughout.

For block A you need:

  • 8 x 5” different coloured charm squares, cut in half along the diagonal to make a “charm triangle”
  • 4 x 5” white squares cut in half along the diagonal to make a “white triangle”
  • 4 x 4.5” white fabric squares
  1. Each charm square gives you 2 charm triangles. Sew one of these to a white triangle along the long diagonal edge. Carry on with the different colours until you have 8 different charm triangles sewn to a white triangle. When you press these open, you have 8 different HSTs, a colour on one half and white on the other.
  2. Then sew your remaining charm triangles together in pairs and press open to make 4 HSTs with a different colour on each half.
  3. Trim all your HSTs to 4.5” square.
  4. lie them out in the above arrangement, putting a 4.5” white square in the corners to complete the block.
  5. sew together into rows and then sew the rows together to make a block.
  6. Block A finishes at 16” square: you need 5 of these blocks.

This is Block B:

image

For block B you need:

  • 8 x charm squares, cut to be 4.5” square
  • 4 x white rectangles, each measuring 4.5” x 8.5”
  1. Sew 4 charms into a four-patch. Next sew the long edge of a white rectangle on each side of your 4-patch. Put this aside.
  2. Take one white rectangle and sew a charm square onto each of the short sides of the rectangle. Do this with the remaining white rectangle.
  3. Put the rows together as shown in the photo and sew together.

Lie your blocks out on the floor in three rows of 2 blocks, starting with Block A and alternating them . Sew the rows together:

image

And ta-da! Easy. This is it at 48” square. I do think it would be really lovely made as 16 blocks, and/or made with smaller HSTs.

image

I’d originally meant to finish here and put a white border on using 2.5” strips of white, intending to bind with something bright and coordinating, probably a deep pink. That would have made a 52” square quilt using 72 charm squares… and mission acomplished – a decent sized lap quilt using fewer than 2 charm packs. The other 12 charms could even have been used as a strip down the back.

image

But in the end I went all out and decided to add a piano keys border to make a larger lap quilt, one which could be used on the beach or as a picnic rug, as well as a sofa quilt or extra layer on a single bed. Partly because I impulsively bought several charm packs in this line and have a male dominated household, not to mention a country-style house interior which is better suited to muted colours and beiges rather than white and brights, so I need to use them up. And partly because although I enjoyed making this, I am likely to stick to my favoured simple patchwork squares. Bah, traditionalist. So I wanted to see it dressed properly this time!

For the piano keys border I used all my 12 remaining charms AND another charm pack… and about another 6 squares, which REALLY annoyed me. I would have liked it to be exactly 3 charm packs… but it would have only worked out if I had omitted the white border round the quilt centre like this (not stitched together, just laid out):

image

I like it. But the Hubster started droning on about negative space being important in design… yadayadayada. He has no concept of running out of fabric. Although he did go on to say it looked as though I ran out of fabric. Drat it all.

So… Piano keys border

– using your remaining 12 charm squares, another charm pack AND 6 more charm squares cut from a fat quarter/stash/layer cake…

  1. First, if using, add a border round your starflower chain quilt, using 2.5” strips of white. Sew a strip to 2 opposite sides of the quilt first and then add the remaining 2 sides.
  2. Cut your charm squares in half, sew together lengthways until you have about 30 in each strip. I chain pieced, sewing them all into pairs, then the pairs into fours, then into eights etc. but others may prefer to just keep adding one to their strip. image
  3. Press all the seams in one direction. Sew a strip to one edge of your quilt and another to the opposite edge, checking first that it’s long enough! Trim the excess. Then add the other two strips on the other sides of the quilt – again check first it’s long enough and add more “keys” if necessary before you sew it on). How folk do the maths for fancy cornerstones, I have no idea.

…And finished! One starflower chain quilt top measuring 61” square from 3 charm packs (+ a fat quarter) and some white fabric (about 2 yards with some spare). Or a 51” square one using 2 charm packs, if you are going to be a stickler for original missions 😉

image

It was so windy today in Scotland, this was the best picture I could get! But at least it’s not raining, so you can kind of see the colours in this lovely collection by Lily Ashbury. Now just to back, baste, quilt and bind. But not today! Enjoy your day/night/evening whatever you’re doing lovely peeps,

Till the next time,

Poppy xx

A Little Liberty

A quick post today for a wee blanket – but no less pretty for being small! Well how can it not be pretty, when it’s made with Liberty Of London fabrics? Liberty Tana Lawn is the softest, most feminine cotton fabic ever. And the prints are gorgeous, usually floral, and always exquisite. My good friend is having baby daughter number 3 very soon, and she has lots of my quilts in her house. Loved and used though they all are, she really has enough quilts for the littlest one to roll around on – and she won’t be rolling around fo a few months! So I decided to use my precious little stash of Liberty (“little” because it is so expensive!) and make her a blanket.

image

It’s just basic patchwork squares as you can see; not only is it my favourite, despite enjoying doing some more taxing patterns lately (more in future posts!), but it feels wrong to cut up Liberty any more than  you have to. Besides, I don’t have enough of the fabric to cope with more seams and still be big enough to use! it’s 30 x 5” squares sewn together.

I just backed it in a beautiful soft cuddle fleece I got at my local quilt shop (Fabrication in Haddington) at a great price, and didn’t put any batting in between. The fleece was a real pain to work with – although I only remembered to use a walking foot after I had begun, so the fleece did stretch and misbehave, and the blanket isn’t perfect. However, it’s not too noticeable, and it is soooo soft and cuddly, perfect for the pram, car, or just a snuggler!

I used perle cotton to hand quilt round the edge:image

and aurifil gold thread to handquilt lightly along the vertical seams

image

The light handquilting (and ahem, imperfections due to the fleece troubles) gives it a “homespun look”, which I don’t normally do, but I actually think it’s really sweet – traditional and lovely for a new baby. i know my friend will love it – she’s worth using the Liberty for, not only because I love her dearly, but also because she has such lovely taste, I know she’ll appreciate it!

I’m rather in love with LIberty after this little blanket – I need to do some saving up and see if I can make myself a quilt. Eeeek. I’d have to save up a lot – but oh, it would be so loved!

Hope you’re all having a fun weekend whatever you’re up to,

till the next time,

Poppy xx

sexy hexies

I admit, only someone who has sewn 450 1 inch fabric hexagons could write that title and not immediately delete it. And I was close. But, darnit, I needed a little motivation to keep me going now that I am 1/3rd of the way through my hexagon quilt, and laid what I have so far on the dining room table. And so, yeah, I’m willing to see this as quilty porn if only for a few minutes.

image

Maybe it’s no Daniel Craig stepping out of the water in Casino Royale. Or Aragorn being, well Aragorn at any moment in the Lord of the Rings trilogy. But compared to where I started, I’m pretty pleased with how it’s going.That photo is about 470 hexagons, about 300 or so sewn together, and the rest laid out.

I first blogged about it here: https://cuckooblue.co.uk/post/63599622305/hexagon-crazy, where I’ve put a wee outline of how to make a hexagon. I was totally unsure if I would like this handsewing-hexagons-round-paper-and-then-handsewing-them-together malarky. It all seemed like the most enormous faff. But then my friend brought round a gorgeous vintage hexagon quilt she’d got from Ebay, wrinkled and worn, with some of the hexagons frayed and torn but glorious, with just the right amount of fading, all in blues, neutrals, reds, a few pinks, all rather understated but so beautiful together. It was love at first sight for me. And made me want to make a hexagon quilt SO MUCH! And there it began.

Alison came round today where I showed her how to make hexagons so she can repair her quilt and start using it – they are very easy, but she was hooked and proud just as I was when I made my first one! And AGAIN did I not forget to take some photos of her quilt? I might have to take some next time and dedicate a full on post to it.

After a lot of thought about scrap quilts, random fabrics, bright, crazy, fun hexie quilt, I decided that really I might not love the result in my house and after all that work I’d want to have it out every day. So I have decided on collections from Fig Tree Quilts – I call it my Homage Quilt, as I just adore their collections. It’s actually really nice to keep them together.

image

The above is “Honeysweet”. I love this collection, it’s so feminine, with a vintage feel and yet fresh modern colours. I could stand looking at a lot of this in my quilt.

image

And that one was “Fig and Plum” – the first collection from Fig Tree Quilts that I saw when I first made the jump from sewing to quilting (about 3 years ago). I have a quilt in this collection already – must be a good sign that I like it! (http://www.flickr.com/photos/cuckoo-blue/8625084929/in/set-72157630302286578)

image

This is Butterscotch and Rose, a gentle, cottagey, warm and yet rich collection which I completely adore. I made myself a sofa quilt in this which adorns our living room sofa and looks lovely! (http://www.flickr.com/photos/cuckoo-blue/8807380614/in/set-72157630302286578)

image

The above is Buttercup – I have made a few baby quilts with this, but not a quilt for myself – it’s just a bit sweet for our house. It is nice though and I thought I’d like the light spots that it and “Avalon” will bring to my quilt, but looking at the whole picture, I’m not as sure anymore, when the rest of it seems so rich. I might have to rethink the buttercup, a shame, but easier to do at this stage!

image

And last but certainly not least, my favourite so far is Tapestry. So lovely. Grown up, classic prints but still modern – how does that amazing Joanna Figuera do it? This has been my favourite bit of the quilt to make, so much so that I have bought myself another layer cake, to make another throw for the living room (it’s a big room and a big sofa, and looks good for the colour). It’s gorgeous!

I had intended to make all the patches a lot bigger and use about 10 collections. I’ll see but I might end up with smaller patches and more collections – an expensive quilt though, because I am cutting up a charm pack for each collection… And all to make a quilt not a lot bigger than a layer cake would yield! Sigh. Quilters are insane.

image

Okidoki guys, I’m off. To sew more hexies, having been re-inspired. 2/3rds to go. Ugh, that sounded awful. 1/3rd in the bag – yay! Seems I’m a cup 1/3rd full kind of girl.

Whatever you’re up to hope you’re having fun,

Till the next time,

Poppy xx

Boy Crazy! (not me, well not for about 20 years…)

Hellooooooo! And happy new year! What a marvellous time of year this is, full of good intentions and a (perceived) clean slate. I get so joyous I accidentely celebrate by making huge steamed puddings and scoffing with my boys with lashings of custard. Before remembering my good intentions. Oh well; it went down a treat and the littlest one loved it, despite being usually a chocolate fiend. I used Delia Smith’s treacle pudding for a change from chocolate or marble which I’ve done before:

image

I should point out that this one was NOT mine, which collapsed a bit when I upturned it (I made it with more fragile gluten free flour) but which tasted delicious nonetheless. The recipe is here by the way:

http://www.deliaonline.com/recipes/type-of-dish/sweet/steamed-treacle-sponge-pudding.html

Other than that I shouldn’t have much to report on this sewing blog, given that the sewing has not really restarted in earnest (yet). However I have loved catching up on all the Christmas iplayer goodies – I mean, Sherlock is back! Sherlock! – on the sofa next to the Hubster whilst sewing up my hexagons. Oh yes, the hexagons. That project is still underway and is happily keeping my fingers working and my head out of mischief. I have posted a few pictures on Flickr, but will update in the next post.

Meanwhile here is a sweet baby quilt I made for my gorgeous brand  new nephew for Christmas! It’s made from a fun range called Boy Crazy by Dani Mogstad for Riley Blake designs. 

Here it is basted (see the pins?) and on the sewing machine:

image

Aren’t the colours and designs great? I wanted something bright for him which could last him more than a year or two. This has blue, orange, white, brown, red, yellow stars, zigzags, circles, diamonds, rockets, cars, words – phew! What’s not to love?

Here is my hand guiding the stippling quilting. Stippling is my favoured quilting pattern – it’s classic and inoffensive, and I love the way it helps to breaks up all the straight lines of the traditional square patchwork which I love so much, and meld all the layers together into one beautiful piece. Maybe if quilts were more common in this country I would tire of stippling; and I AM going to try some loop-de-loop quilting this year – oooh get me, taking risks and all – but at the moment I am happy with the humble stipple! For those not in the know, stippling is like wiggly lines all over the quilt – like bends in a river, some of which follow each other and some of which don’t. You’re not supposed to cross the streams, like in Ghostbusters – but sometimes that happens on my quilt and no giant marshmallow man blows up in my face, so it can’t be that much of a crime.

image

and then ta-da! It’s finished! (thanks Grandpa for being the quilt holder!)

image

Of course the problem with quilting in Scotland is the weather – I couldn’t wait for a day with more light to photograph this in, partly because that might have taken 3 months, and partly because Grandpa was taking it over to my brother-in-law’s that day in preparation for their Christmas, so whether or not this photo does the bright colours justice, here it is!

But let me assure you, this range is supercute, bright, cheery and perfect for any little boy, and probably up to the age of about 10-14 depending on the boy. See the stippling?

image

I used a 10” stacker of Riley Blake’s Boy Crazy, cut it into 5” squares, sewed together and put a white 3” border round. I used the same yummy stripy binding that I used on the elephant quilt a couple of posts back, from Space by Makower, which I love on this quilt. This is one of my favourite ways to make a rich, very scrappy kid-quilt; the eveness of the squares help the eye cope with the mix of colours and patterns, the white border not only helps to tone down all the colours, but gives some space for a name, which I’ve done here – “Rufus” is my sweet nephew’s rather cool name. I used Quilter’s Dream Orient batting to provide more warmth than cotton but still be machine washable and dryable.

image

It finished up about 43” x 52”, which I think is the perfect child quilt – you can see by Grandpa who is 5’11” and not rake-thin by any means that it will last for a child for a good many years as a lap quilt, extra layer, something to throw down on the grass or beach to lie about on – and of course as a lovely playmat full of interesting things to look at when he’s discovering his fingers and toes!

You can tell, I’m quite into this collection and quilt – not as much as I’m besotted by my nephew though! And the family have literally just moved to BERMUDA (2 days ago), so I’m gutted i won’t see him change over the next few months until we see them again. However, the upside is they can send me a good picture of his quilt in the sun 😉 Preferably with him and his big (but still very little and totally adorable) sister on it!

Better go before I get teary! Wishing you all the most productive, happy, healthy 2014 – and one full of colour and creativity!

Till the next time,

Poppy xx

Elephants, peacocks and splashes of colour

A while ago I made a baby quilt which a neighbour of mine snapped up for her little baby grandson; on the back is the most glorious print from a designer called Violet Craft, who designs for MIchael Miller fabrics. My neighbour has a daughter in her twenties, and was smitten by the print from the moment she saw it, and asked if I would make a wholecloth quilt from it for her daughter. Her daughter seemingly just adores elephants and my neighbour is convinced she is going to be absolutely thrilled with this print.

And here it is:

image

Isn’t it the most beautiful fabric? It’s called Parade Day in Grey from the collection “peacock Lane” by Violet Craft for Michael Miller fabrics.  It reminds me of celebrations, of fireworks. Of hot, dark nights in far-off lands. Of adventure, of the world being a wondrous place full of mysteries and laughter. My only regret is that I didn’t notice this collection until it was almost out of print, and this is the only fabric I got. I love the collection as a whole and its bright sorbet colours remind me of the summer days we rarely get in scotland!

image

So I wasn’t sure about this brief; firstly a wholecloth quilt the top made from one piece of fabric) seems… well, cheating, doesn’t it? Although you can’t slice into this incredible scene either, so it’s not like I had any other solutions! Secondly, Catriona is in her 20s, and I was worried it would be too childish for her. Apparently she has a charcoal grey sofa and this will go well whilst providing the colour the room might need, so my neighbour was unconcerned, but I wasn’t. Still I made it, and you know what? I love it. I really do.

image

It’s about 55” x 55”. In order to make it wide enough, I used 5.5” sashing of Kona charcoal, with a 3 inch border along the top. The charcoal was a good match to the background dark grey, which although nearly black it has little white lines on it, which adds a kind of “drawing” feel to it, and gives the print texture and movement, so dark grey was perfect.

image

In order to reconcile myself with giving this to a grown woman, I decided on a more grown up but still fun backing. I love this numbers in words 100% cotton print from IKEA. The words are in deep grey, which is perfect, and it works reallly well with the front. It’s a grey day in Scotland today with no bright red elephants and trees bursting with colour to cheer it up here, so apologies for the dark pictures!

image

Catriona lives in norway, so I wanted to make this as warm as possible. I almost went with wool batting, but the potential difficulty in washing it put me off. Cotton is the coolest, and I try not to quilt in polyester in case it might end up over a sleeping child. I tried for the first time Quilter’s Dream Orient – a blend of silk, tencel (eucalyptus!) bamboo and cotton, which supposedly combines the best of these natural fibres and although not as warm as wool, it supposedly isn’t far off. I really liked it, easy to quilt, no issues, nice drape and softness afterwards, machine washable. Apparently it won’t shrink, so maybe go with cotton if you want the antique crinkly effect after washing.

image

The biggest issue I had and I’ve still not resolved in my mind is the quilting thread. I went with white as you can see, and it’s not too dense a stipple (although I seem to be out of practice!) to avoid breaking up the design too much. White works for the fabric itself which does have those little white lines on it anyway, but of course it doesn’t really work for the solid grey borders, where it all shows up, quilting mistakes and all. I didn’t really want to muddy the bright colours of the print by using grey thread, which would also have changed the back. The only thing I could have done was use a variegated coloured thread, although I was worried about making a mess of stringy colour all over the front. So in the end, white it is. Now the quilt is finished, I think it looks good as a whole, but I’m still trying to work out if I should have quilted it differently!

I am very happy with the binding though – this is a stripe I got from my local fabric shop, “Fabrication” in Haddington. I am pretty sure it’s from the Makower company from a collection called “space” – rockets and aliens for little boys. Laura, the lovely owner, had this on end-of-bolt offer, and I took all she had – it’s such a versatile print – stripe, boyish enough for boys, multicoloured enough to match most projects and despite that, not too “primary colour” to be used for adult projects. Perfect. And stripy bindings – well. Yummy. Calorie-free yummy.

image

Finally, a label with mum + dad’s choice of message, and it’s off to its new owner for Christmas! 

image

Hurrah. I hope she likes it. And hope your Christmas shopping, baking, sewing, crafting, playing or denial is all going swimmingly!

Till the next time,

Poppy xx

Marmalade quilty love, teeny cars and more pink tweed

The sun is still shining here in Scotland (Yay!!!) so I took the opportunity to photograph this little quilt made with Marmalade fabrics from Bonnie and Camille for Moda. It measures 31.5” x 36”, 100% cotton.

image

I was really excited to see a collection in flannels, so bought them for this quilt, making it gorgeously cosy and soft. I think it is a beautiful quilt and exactly what I would choose if I had a girl – definitely my taste!

image

I stipple quilted it, backing it in this Ikea cotton print called Rosalie based on a Cath Kidston design. The design is a little “pixelated”, but really it doesn’t seem to matter once it’s all sewed up, and makes a lovely quilt backing. 

image

My only minor regret with this quilt is that I hadn’t realised only some of the designs were in flannel, and so I didn’t receive many of the beautiful prints I really like, like this one:

image

So I did buy some of this print and make it into a washbag, which is very pretty, and may be on the “for sale” page soon! I keep wondering whether to go the whole hog and reinvest in the whole marmalade cotton collection just to satisfy my love for it, but I haven’t got a daughter – and even this quilt has not got a home to go to yet. I might put it for sale too.  And I still have enough of the flannel for a 45” x 45” toddler quilt (bigger if I use a border), so I can’t really justify it 😦 I think my affair with Marmalade may be over…

… particularly as I am falling in love with (and trying hard to resist) this latest collection again by Bonnie and Camille called Happy Go Lucky:

image

… But I am seriously trying to resist because I have already spent many impatient months waiting for the release of this collection called “High Street” by Lily Ashbury for Moda:

image

You can’t see much of the fabrics here, but trust me, the designs are too beautiful, with just a hint of ethnicity and yet such modern bright girlish colours! I have NO BUSINESS getting this, as I am not going to get a daughter, and all the babies coming are boys, but I so badly want to sew up this collection that I have promised myself I can get it. If I make some sewing money. And when it is released. Which is August in the U.S. and probably ages for the UK 😦

Instead I am busying myself with wee projects like this little washbag I made for baby Hamish – I know I made him bunting, but this print was too cute – check those teeny tiny cars! You’d think a child doesn’t need a washbag, until you think about cotton wool, wipes, cream, bath wash and later on toothbrush, their own toothpaste – they are more high maintenance than me!

image

image

…and despite my dislike of making the same thing over and over,  I was persuaded to make another bag using those pink and aqua fabrics, but this time a bit smaller 10.5” wide x 3” deep x 8” tall in middle – and with the fabrics reversed – pink on top. I actually like it much better this way – like the size and love the pink tweed. It was given to me years ago as a present, so when it’s gone it’s gone – I should remember that and enjoy using it now! The felt flower is a brooch, so is removable. I probably would remove it if it was for myself, but a lot of folk seem to like it.

image

image

And purse feet! Well, they are my new favourite thing 🙂 I know, I need to get out more…

image

So I should get going. I have heaps of stuff still to sew up instead of sitting procrastinating at my computer! Such as: A huge beanbag (pattern review to follow) almost finished for my friend’s husband. More travel chalkboards. A quilt for my goddaughter to be. Some Happy Birthday bunting for same precious girl (almost done!). A wholecloth quilt for a neighbour’s daughter. A christmas stocking for a neighbour’s new grandson. Some baby quilts for a few babies – including my new nephew who’s on his way in a few months, I can’t wait! Some washbag commissions. That’s a sneak preview of the next few blog page!! And at some stage I’ll be listing a few things on my new “For Sale” page… hopefully…

Hope you are enjoying the sun wherever you are,

Till the next time,

Poppy xx

ps you can email me at poppy@cuckooblue.co.uk

or visit my flickrstream at http://www.flickr.com/photos/cuckoo-blue/

In love with my machine

And I am! The new needleplate came superfast thanks to the lovely folks at http://www.uksewing.com/ who were just wonderful and coped admirably when I phoned up slightly hysterical – and it arrived the following day, hurrah! And it turns out, the whole episode was A Good Thing, as I now feel suitably chastised about not regularly cleaning out the machine now that it is supersmooth. And where is that ratatatatatat noise of it sewing? Gone. I had forgotten how quiet it is supposed to be! Ahem.

So I have been putting it to good use. First with the ill-fated quilt of my last post. It remained a bit ill-fated as I sewed a deep pucker into the back and couldn’t bring myself to unpick it after everything – I thought it would never get done! So I left it, beautifully scarred, but made with love. (and sanity). The back is completely plain, and with all our plain-backed quilts we never see or show the backs, so hopefully it won’t be too awful. The front looks good though, I think!

image

This is the beautiful “Etchings” collection by 3 Sisters for Moda. I have used their fabrics a few times and am always struck by how unbelieveably soft they are – why aren’t all fabrics like that? More than any other Moda fabrics. And they are genuinely luminescent. With gorgeous classic designs.The biggest problem is they don’t show up as beautifully on photos as in real life.

image

This is from a quilt I made with this same collection last year (https://www.flickr.com/photos/cuckoo-blue/7443697326/in/set-72157630302286578)  – just to show you that amongst all the muted classic colours and patterns there are street maps of Paris and blueprints of French buildings – quirky and sweet, but still grown up. I really like the collection 🙂

image

We ran across the road to take this picture against the backdrop of the forest we live next to after I complained that the car isn’t very inspiring, snapped a couple of pictures and ran back as the baby monitor was out of range despite us being 10 metres in front of the house… So not a great picture of the quilt, despite the lovely setting sun, but those wildflowers make me happy! I can’t imagine what the neighbours thought we were doing. N said it felt like streaking. If only we were so adventurous!

Quilter’s dream cotton batting, pattern is the “double slice” free pattern by Missouri Quilt Co again (link to the tutorial/ pattern is in my previous blog post).

… And I made myself a bag for the holidays, a pretty one which still carries all that kid stuff! Hurray. I initially chose this wonderful home decor print by Valorie Wells called Finnelopy in Curry from her Novella collection:

image

It’s so great and I was so sold on this as THE BAG for the holidays. Started making it. Was uncommonly pleased with how it was all going. Then, partway through, the husband wandered in, casually said he “wasn’t keen on the yellow” – “but it’s OK, it’s your bag, if you like it that’s what matters”. Hmpfff. 

So. Somehow I just lost 100% confidence in it, and changed my mind; chose instead a lovely print called songbird in powder blue by Little Yellow Bicycle for Blend fabrics and here’s my new bag for the holidays:

Sorry in advance about the rubbish photos, I was losing the light! This is the fabric as it actually is, the colour is almost accurate, so you might just have to use some imagination and “superimpose” this on my bag picture!

image

It’s a pleated bag, measuring 15” at botton, 14” height and 4” depth, and I can confirm it’s the perfect toddler bag size! image

image

The interfacing makes it soft but structured and will stand on its own. I actually really love it 🙂 So bring on the holidays!

I won’t be blogging for a couple of weeks as we will be enjoying the longawaited and most welcome sunshine with some time off, so meanwhile I’ll leave you with a picture of a finished lily stem – I did them with pipe cleaners and green florist tape. They look really lovely actually, and the flowers have been getting lots of compliments – another silver lining to the needleplate incident 😉 I will show you how I did them in another post as the internet was no help in making the stems for me (though lily tutorials are all over the place, which is great!)

image

Till the next time,

Poppy xx

ps you can email me at poppy@cuckooblue.co.uk

or visit my flickrstream at http://www.flickr.com/photos/cuckoo-blue/

A Finish!

So I’ve finally finished a quilt for myself in a fabric line I’d coveted for SO long – Butterscotch and Rose by the enormously talented Joanna Figuera of Fig Tree Quilts for Moda. I didn’t need another quilt. But eventually I guiltily bought some in fear of it being discontinued soon and regretting. But the guilt has passed now it’s finished and being used – and I LOVE it!

image

Aren’t the colours glorious? It’s so cosy. The patterns are floral and vintagey but with a modern feel, and as all their fabrics the colours feel so fresh and vibrant whilst staying cottagey. It’s about 52” x 56” (I’ll check those figures at some point, but they are about right, a perfect sofa quilt size anyway).

image

I used the “double slice” pattern for Layer cakes demonstrated here by the ever-perky Jenny from Missouri Quilt Company :

http://www.youtube.com/watch?v=jxC-0T5lXw4

It’s a great pattern, so quick and easy. I made another quilt top (which I’ll show another day as it’s a gift) with it recently – in an evening, and a real pleasure to do, easy but not too monotonous.

I used wool batting for the first time – Hobbs’ Tuscany wool batting. It’s gorgeous to use, really easy to quilt. It gives a puffier result than cotton, but not nearly as much as high-loft polyester – it makes it feel very cosy. I’m worried about washing it, but I’ve read lots of forum posts by folk saying they’ve cool washed – and tumble dried! – with no problems, so fingers crossed when that time comes. It’s drapes so beautifully. My little boy keeps cosying up in it which makes me smile a lot.

And here it is on our futon sofa ready for TV watching with the husband when the boy is in bed (if I ever get off the computer/ off my sewing machine – ha!)

image

Till next time

Poppy

xx

ps you can email me at poppy@cuckooblue.co.uk

or visit my flickrstream at http://www.flickr.com/photos/cuckoo-blue/